Summary:
- Chapter #1: Product content & initial setup
- Chapter #2: Owner menu
- Chapter #3: Basic usage
- Chapter #4: Rares
- Chapter #5: Options
- Chapter #6: Appearance
- Chapter #7: MD Labs Online Services
- Chapter #7.1: Register an account and activate the product
- Chapter #7.2: MD Gacha Machine homepage – a quick overview
- Chapter #7.3: Store management tab
- Chapter #7.4: Gachas tab
- Chapter #7.5: Gachas tab – Basic operations
- Chapter #7.6: Gachas tab – Additional operations
- Chapter #7.7: Machine’s details: play list
- Chapter #7.8: Machine’s details: play statistics
- Chapter #7.9: Machine’s details: settings
- Chapter #7.10: Events tab
- Chapter #7.11: Players tab
- Chapter #7.12: Presets tab
- Chapter #7.13: Managers tab
- Chapter #7.14: Blacklist tab
- Chapter #7.15: Archived tab
Initial notes
! IMPORTANT: The following user manual applies to:
- MD Gacha Machine Script (advanced) version 4.0.0
- MD Gacha Machine Script (basic) version 4.0.0
When some of the features are available only for a specific version, will be clearly stated.
Chapter #1: product content & initial setup
Once received and unpacked, MD Gacha Machine will contain the following relevant items:
- MD Gacha Machine Script (full / basic): the script-only version of MD Gacha Machine; once dropped it will transform the object into in a gacha machine;
- MD Gacha Machine / MD Gacha Machine (Board) / MD Gacha Machine (Box): the complete mesh version of MD Gacha Machine; this devices comes loaded with all the necessary scripts and the user will just have to rez it on the ground, add the MD Gacha Machine Script and proceed with the setup;
Depending on the configuration chosen, the owner will have to either drag the MD Gacha Machine Script in any object or just rez one of the MD Gacha Machine meshes and drop the MD Gacha Machine Script inside. Then a simple click will prompt the debit permission request. This step is mandatory for the gacha machine setup and it’s required to activate several of the script’s features. Granting the permission will complete this step.
Once granted the debit permission, the gacha machine is not already setup for working and some other steps are necessary. If a normal user – different from the owner – clicks on the machine at this point will get a message notifying the machine is not yet ready for work. When the owner clicks on the machine a dialog menu will appear: this dialog is called “owner menu” and it is visible only by the owner; through this menu it’s possible to access all the gacha machine’s settings.
The basic setup for the gacha machine is now done, but to make it working a couple of more additional steps are required.
Chapter #1.1: why script needs debit permission
To complete the gacha machine’s setup the owner has to grant the script the debit permission; this allows the script to take moneys directly from the owner’s account. Even though this may sound somehow dangerous this permission is necessary to enable some advanced script’s features; at the same time there are only a few limited occurrences when this permission will be used.
Here are listed all the reasons why the script could use the debit permission:
- Split L$: when the feature is enable, then a money transfer is required from the owner’s account to the splitter’s one.
- Blacklist: if the avatar is blacklisted, then the transaction is cancelled and the player avatar is refunded by the amount paid.
- SL issue/hack: when for some issue the amount paid do not match with the price set by the owner, then a refund of the amount paid is performed.
- Event rounds: when the machine is associated to an event round having a specific start and/or end time and the player pays the machine outside the working period, then a refund of the amount paid is performed.
- Machine already in use (busy): when the machine is communicating with the server to finalise the current transaction and a player (same or different) pays the machine again, then a refund of the amount paid is performed.
These are the only occurrences when the debit permission will be used, and money will be automatically taken from the owner’s account.
Chapter #2: owner menu
When the owner clicks the gacha machine the configuration menu is displayed; this particular menu – accessible by the owner only – contains all the settings and options of the gacha machine and allow the owner to setup a machine in a quick and flexible way.
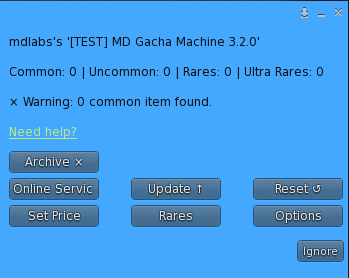
This menu is divided in many sections, some of them leading into other sub menus:
- Set price: set the gacha machine’s play price in L$; the allowed value are ‘0’ (zero) for a free play cost, or any integer value.
- Rares: this button will lead the owner to the rares sub menu where items contained into the gacha machine can be flagged with a rare category (uncommon, rare, ultra rare) and extraction chance can be picked for any of the listed category. This menu is used also to un-flag the items from the assigned rare category; the detail of each features will be explained in the options chapter.
- Options: this sub menu groups together some advanced features such as profit split, discount, group mode and special prize. The detail of each features will be explained in the options chapter.
- Appearance: this sub menu interact with the appearance of the gacha machine, providing a texture change module. These features will be described in details in the appearance section of this user guide. Please note: the appearance menu is available only when using the MD Gacha Machine / MD Gacha Machine (Board) / MD Gacha Machine (Box) version of this product, no appearance menu is available in the third-party machine setup.
- Update: this button starts the update module, which will look online for a new update of the product and – if found – deliver it to the owner.
- Reset: this button will reset the gacha machine.
- Archive: this button triggers a specific feature for machines which are not used anymore; by archiving, the gacha will be removed from in-world keeping all the it’s statistics and transactions accessible via the MD Labs Online Services web page. This will allow store owners to access and analyse the machine’s statistics, while helping them to keep their data sorted and organised.
Chapter #3: basic usage
The basic usage of the MD Gacha Machine is very simple:
- once rezzed and granted the debit permission, from the owner menu price must be set through the “Set price” button, submitting an integer value greater than zero. That will be the cost in L$ users will have to pay in order to use the gacha machine.
- the second mandatory step is drop one or more items inside the gacha machine’s content. For this step are very important the owner permission’s on the items: owner must have at least copy and transfer permission on the items, so user will be able to play and get a copy of the items they won. As one or more items with the right permissions are dropped inside the gacha and correctly detected, the machine will be ready for anyone to use.
Users will be able to right-click the machine and pay the price to start a game and win a random prize. By left-clicking on the gacha machines, users will receive a list of all items present inside the machine itself, grouped by rarity level.
Chapter #4: rares
The MD Gacha Machine can easily handle up to 3 different category of rare items with specific extraction change for each category. The rares categories are:
- uncommon;
- rare;
- ultra rare;
In addition to this the normal items are called “common” items.
PLEASE NOTE: common items do NOT need any additional tag in their name to be correctly detected; the name tags are used only for rare items.
MD Gacha Machine uses a feature called “automatic detection” to automatically mark (or flag) a specific item as rare, assigning it to the corresponding rare category. The automatic detection works by adding a special keyword (or tag) into the item’s name, so the script will scan for the keyword and understand the correct category. The keyword can be added either prior or after dropping the item inside the machine’s content, since at any inventory change a new scan will be performed. The keywords must be exactly like the following:
- UNCOMMON: mark an uncommon item;
- RARE: mark a rare item;
- ULTRARARE: mark an ultra rare item;
PLEASE NOTE: the keywords must be written exactly like reported above, in capital letters or the script won’t be able to detect them.
When the script is started and each time the content of the gacha machine changes a new scan is performed and the result is written as output in the chat, telling how many items are found for any category.
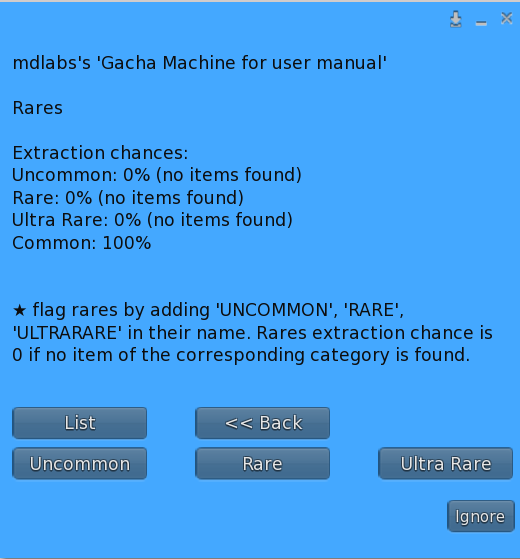
The rares sub-menu lets the owner to pick an extraction chance for each rare category: this number represents the chance for the users to win an item assigned to that specific category.
IMPORTANT: by default the rares the extraction chance are set to:
- 30% for uncommon items;
- 10% for rare items;
- 3% for ultra-rare items;
The owner can edit each percentage by submitting any value between 1 and 99%.
Please note: by any logic it’s a best practice to assign a lower extraction chance to a rarer item’s category. This means ultra rare chance should always be the smallest one, followed by rare and then uncommon.
There are still two very important considerations to be done on rare items and win chances:
- If a win chance for a category is set – i.e. 10% for rare items – but no items of the specific category are inside the machine, then the win chance for the category is automatically set to 0.
- The win chance is associated to the rare category and not to the single item; if the win chance for the rare category is set to 10%, then there is the 10% of chances that one rare item among all the ones inside the machine will be picked as prize:
- If the machine contains only 1 rare item, the chance to win the prize is 10%;
- if the machine contains 2 rare items, each rare has a 10/2 = 5% of chance to picked, while the chance to win a rare prize is still 10%.
- if the machine contains 3 rare items, each rare has a 10/3 = 3,33% of chance to be picked, while the chance to win a rare prize is still 10%.
Chapter #5: options
In the option sub menu is possible to find some additional features aimed to enrich the experience with the gacha machine.
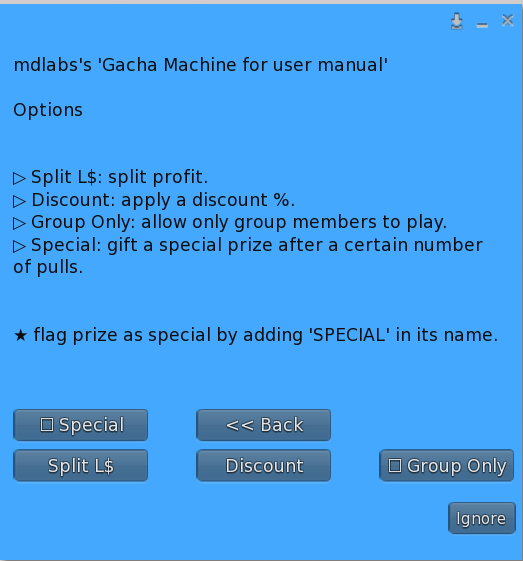
- Split L$: this feature allows the owner to split the earnings from the gacha machine with up to two different avatars. Clicking the Split L$ button will prompt a dedicated sub-menu, where the owner will have to select which split to setup among first and second; after this first choice, the owner will be asked to type the name or UUID (avatar key) of the avatar whom is going to split the profit with, and pick a split percentage between 0% and 100%. If both steps are done correctly, each time a user pays the gacha machine to start a game, the profit is splitted with the avatar declared and the L$ immediately payed out. When this option is active a “check” sign will appear in the corresponding button of the menu and details will be listed in the menu’s header; hitting another time the ‘Split L$’ button will disable the feature for the chosen splitter.
- Discount: this option let owner apply a custom discount % to the items present inside the gacha machine. The owner will be asked to submit a custom discount percentage between 1% and 99%. Once this step is complete, the discounted price is calculated based on the percentage chosen and applied to the item’s cost. When this option is active a “check” sign will appear in the corresponding button of the menu and details will be listed in the menu’s header; hitting another time the ‘Discount’ button will disable the feature.
- Group Only: by enabling this feature only the users wearing a specific group’s tag will be able to interact with the gacha machine. First, the owner will have to assign the machine the desired group using the group tool that can be found under right-click > Edit >General tab. Once selected the right group, clicking on the “Group Only” button will enable the feature. When the group only mode is active clicking on the button again will disable it. The basic usage of the group mode will allow only users wearing a specific group tag to be able to use the machine; however, this feature becomes even more useful when used in combination with the discount. Enabling both the discount and group mode, in fact, will allow only users having the right group tag to play at a discounted price, while the others will have the choice to join the group or proceed and playing at the full price.
- Special: this option enables the feature to gift a ‘special’ prize to users whom played with the gacha a certain number of times. By clicking the button the owner will be asked to submit the number of pulls after which the special prize will be gifted. Please note: only one special prize is allowed and the special prize must contain the keyword ‘SPECIAL’ (without quotes and in upper case) in its name, or the script will not be able to find it.
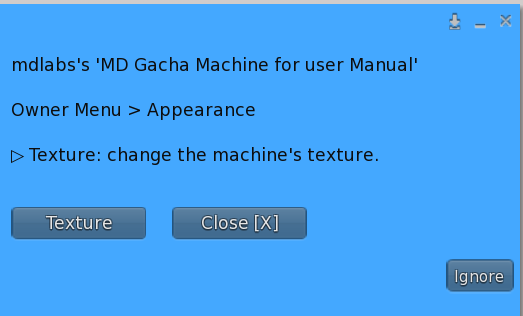
Chapter #6: appearance
This sub menu allows the owner to change the gacha machine’s appearance.
PLEASE NOTE: the appearance sub menu shown only when using the MD Gacha Machine Script inside one of the provided mesh machines: MD Gacha Machine, MD Gacha Machine (Board), MD Gacha Machine (Box).
- Set texture: the owner can change the overall texture of the machine.
Chapter #7: MD Labs Online Services
MD Labs Online Services is a responsive website, accessible from any platform from mobile devices to desktop computers, which allow to interact with the products released by MD Labs. Here’s a quick overview of what the the MD Gacha Machine owner will be able to do:
- Get a quick overview of all the gacha machine, with locations where they are rezzed, total number of plays and total profit;
- Rename, delete a specific machine or multiple machines at once, including all the transactions performed;
- See the transactions list for any gacha machine, including player name, play cost, item won, item’s category, play date-time;
- Create events and rounds and assign them to the machines; (MD Gacha Machine Script (advanced) only)
- Create presets and assign them to the machines; (MD Gacha Machine Script (advanced) only)
- Add one or more users as managers – with several permissions levels – allowing them to access the store’s data and interact with the machines; (MD Gacha Machine Script (advanced) only)
- Add one or more users as blacklisted – preventing them from using the machines;
Chapter #7.1: register an account and activate the product
Before accessing the website for the first time, the owner must register an account and activate the service. In order to do so, an Online Services HUD is provided inside the MD Gacha Machine pack.
Click here for the detailed instructions about how to register and activate your product for MD Labs Online Services.
Chapter #7.2: MD Gacha Machine homepage – a quick overview
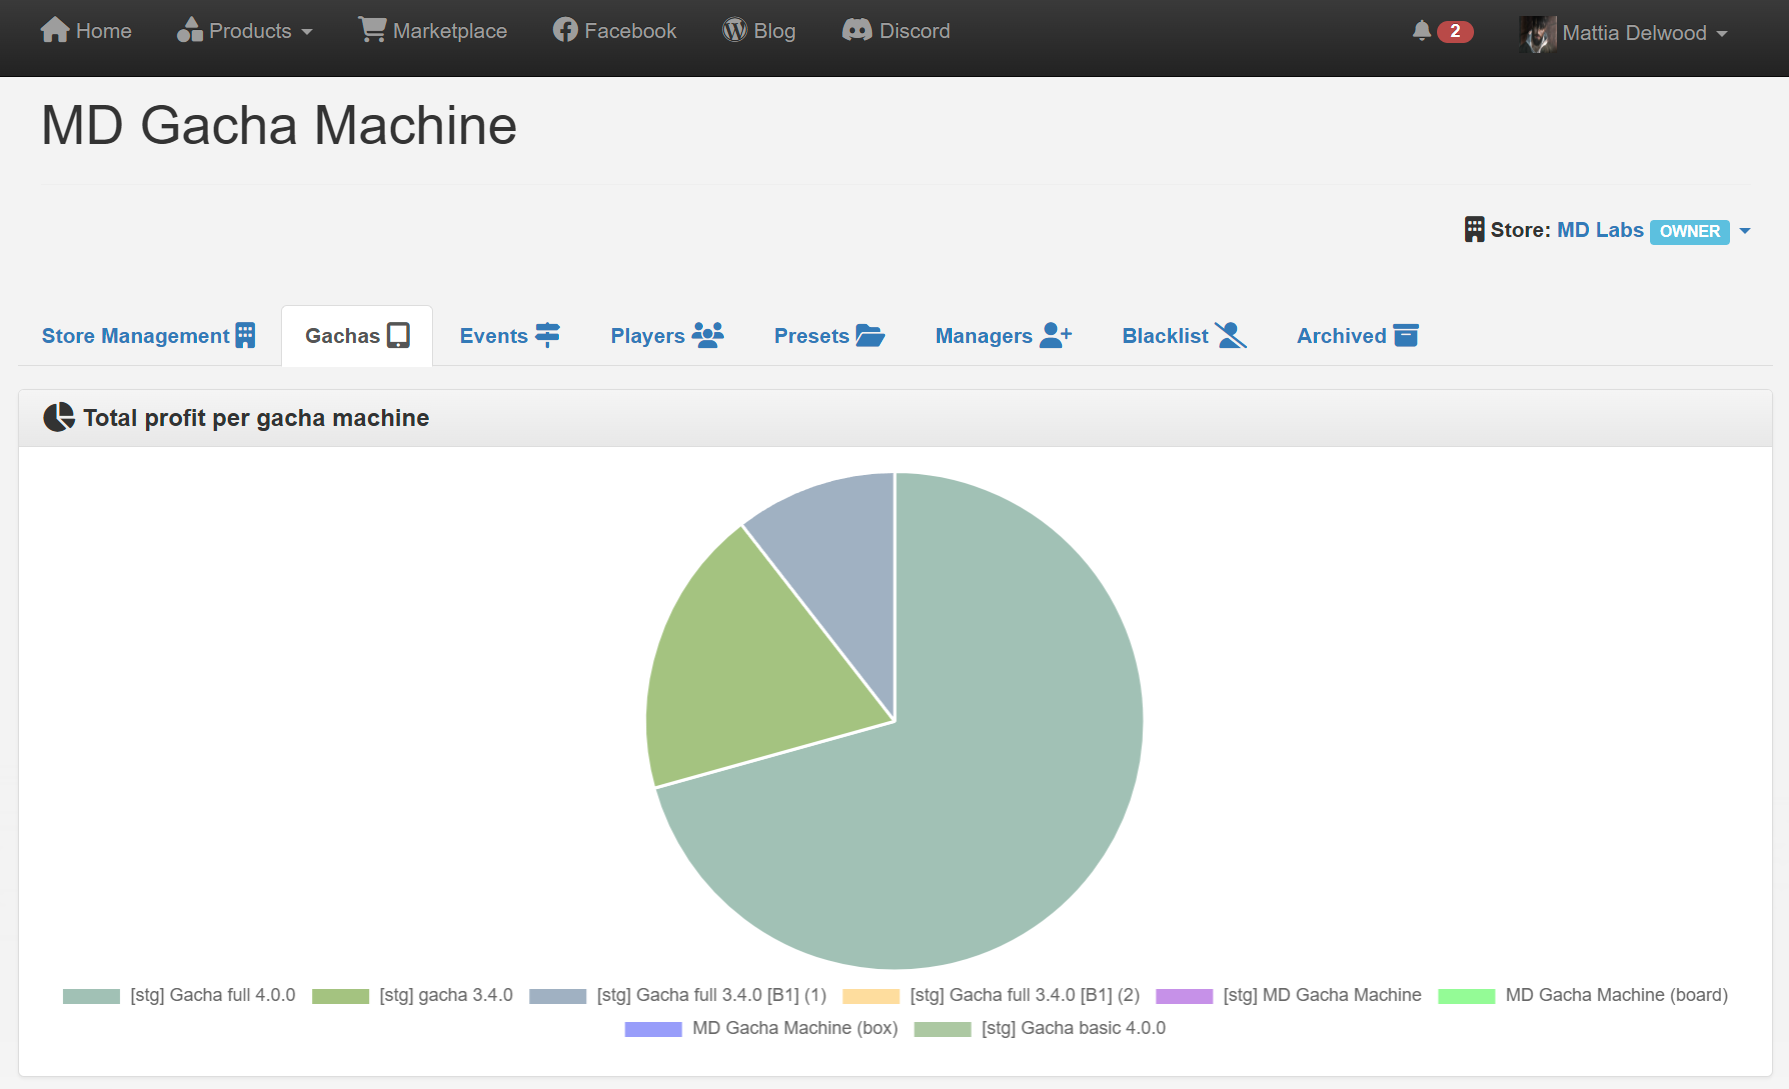
Once logged in the MD Labs Online Services website, it is possible to access the MD Gacha Machine section from the ‘Products’ dropdown list on the top of the page. The page that will load is the MD Gacha Machine homepage and will look similar to this one:
The webpage is divided into several different tabs (right under the top bar), each one containing specific features:
- Store Management: from this tab it is possible to export all the data from all the gacha machines and manage some store-wide options.
- Gachas: it’s the main tab, from here is possible to access the store’s data as well as to a list of all rezzed machines and the detailed transactions list of each of them.
- Events: this second tab is dedicated to listing all the created events and rounds, showing the number of pulls, the profit made and also access the event’s transactions list.
- Players: this tab contains the list of all the avatars whom have used the machines; different data-sorting are available, allowing the owner to conduct several types of analysis.
- Presets: this tab contains all the created preset for the machines; from here it’s possible to create, edit and remove presets, as well as apply them to the gacha machines.
- Managers: this tab lists all the store’s managers, with detailed info about their permissions; from here it’s possible to add and remove managers, as well as change their permissions levels.
- Blacklist: in this tab are listed all the avatars who have been banned from the store. Once blacklisted, an avatar cannot play any gacha machine and receive any prize from it.
- Archived: this tab lists all the archived machines, the ones that are not used and/or not rezzed anymore in-world. Archiving the machines help keeping data sorted and consistent.
Chapter #7.3: store management tab
The ‘Store Management’ tab includes several tools and features designed to help the owner manage store-wide options. This tab contains a different features and data: from the ‘Auto-refund’ option toggle, to the store’s total statistics, to the import and export tools.
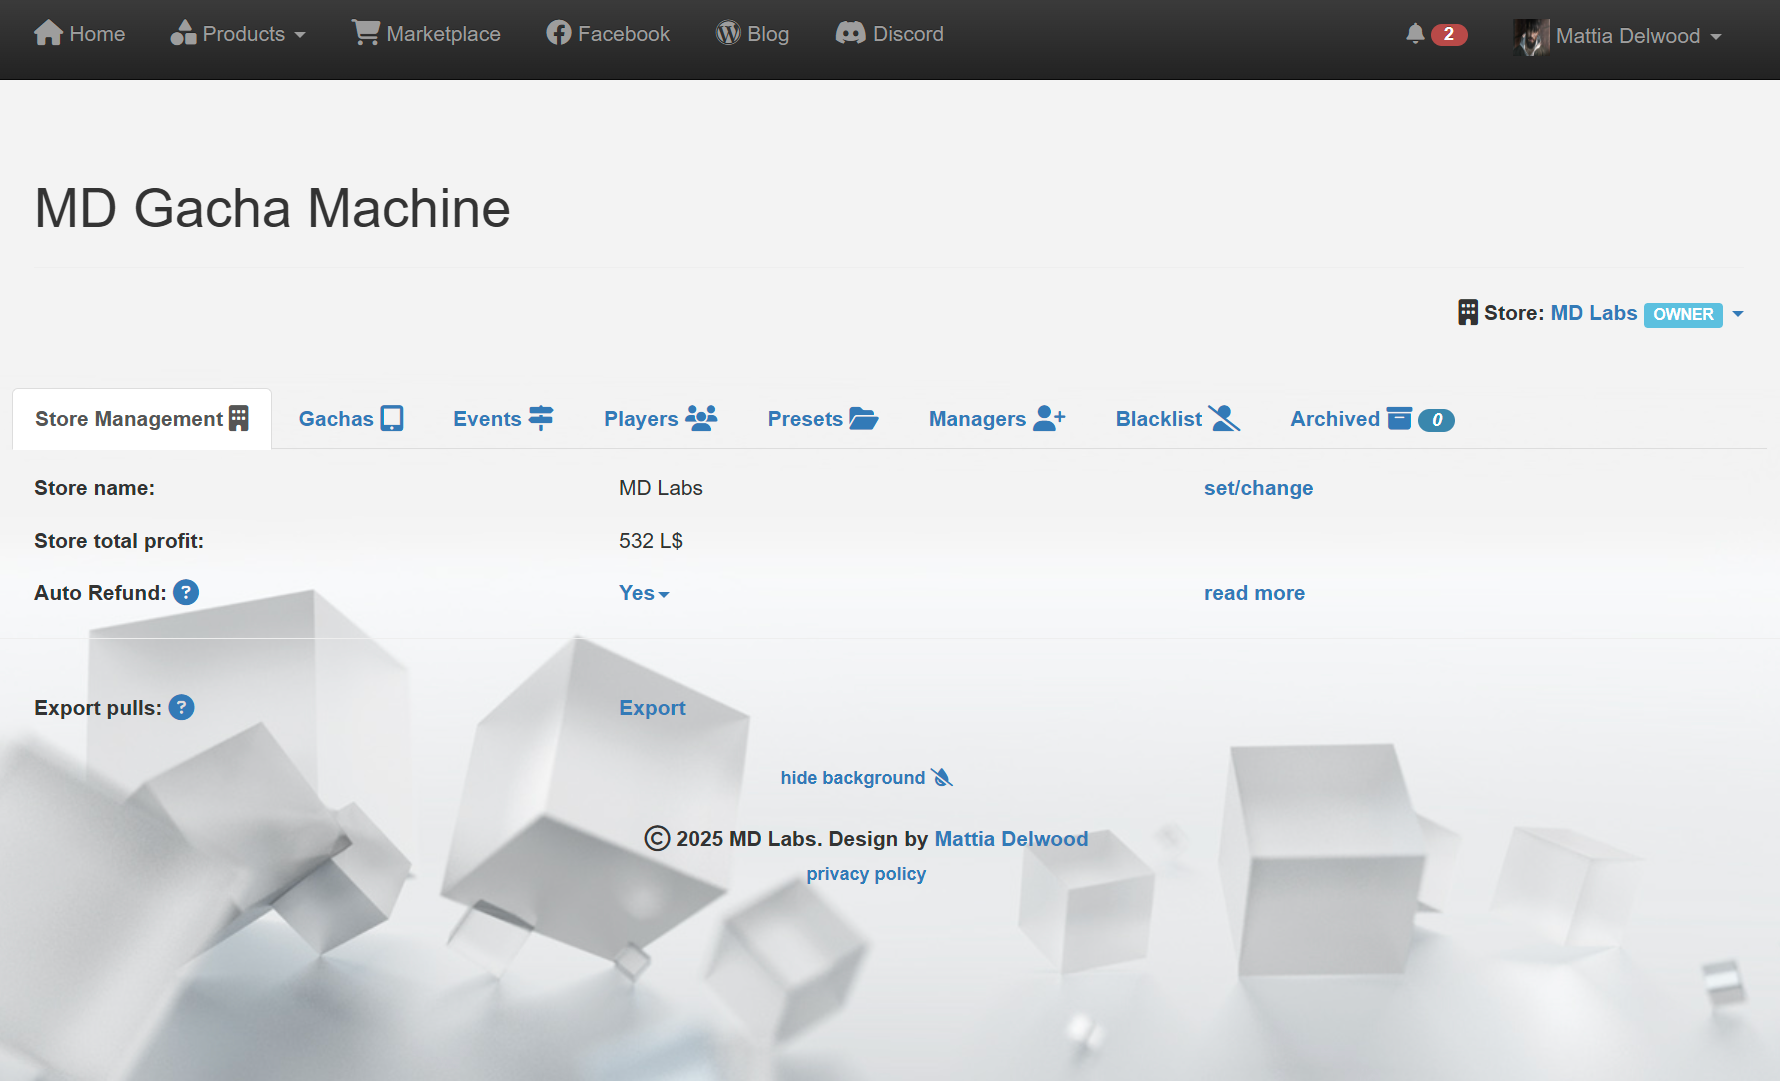
- Store name: the owner can use this feature to set or change the store’s name that will be reported in several areas of MD Labs Online Services website.
- Store total profit: the total amount in L$ made using MD Gacha Machine.
- Auto Refund: this option enables the automatic refund of the player avatar in case of any error occurs.
- Export pulls: this feature allows the owner to export all the pulls from MD Gacha Machine into a data file.
Chapter #7.4: gachas tab
The Gachas tab is the main tab present inside the MD Gacha Machine homepage; this tab lists all the rezzed machines showing an overview about their statistics, as well as giving several tools to analyse the store’s data and sales.
The first element in the homepage is the graph panel: the data represented here will vary based on the current view selected. The default view is “by gacha” and the graph will show a pie chart with all the machines and their totals.
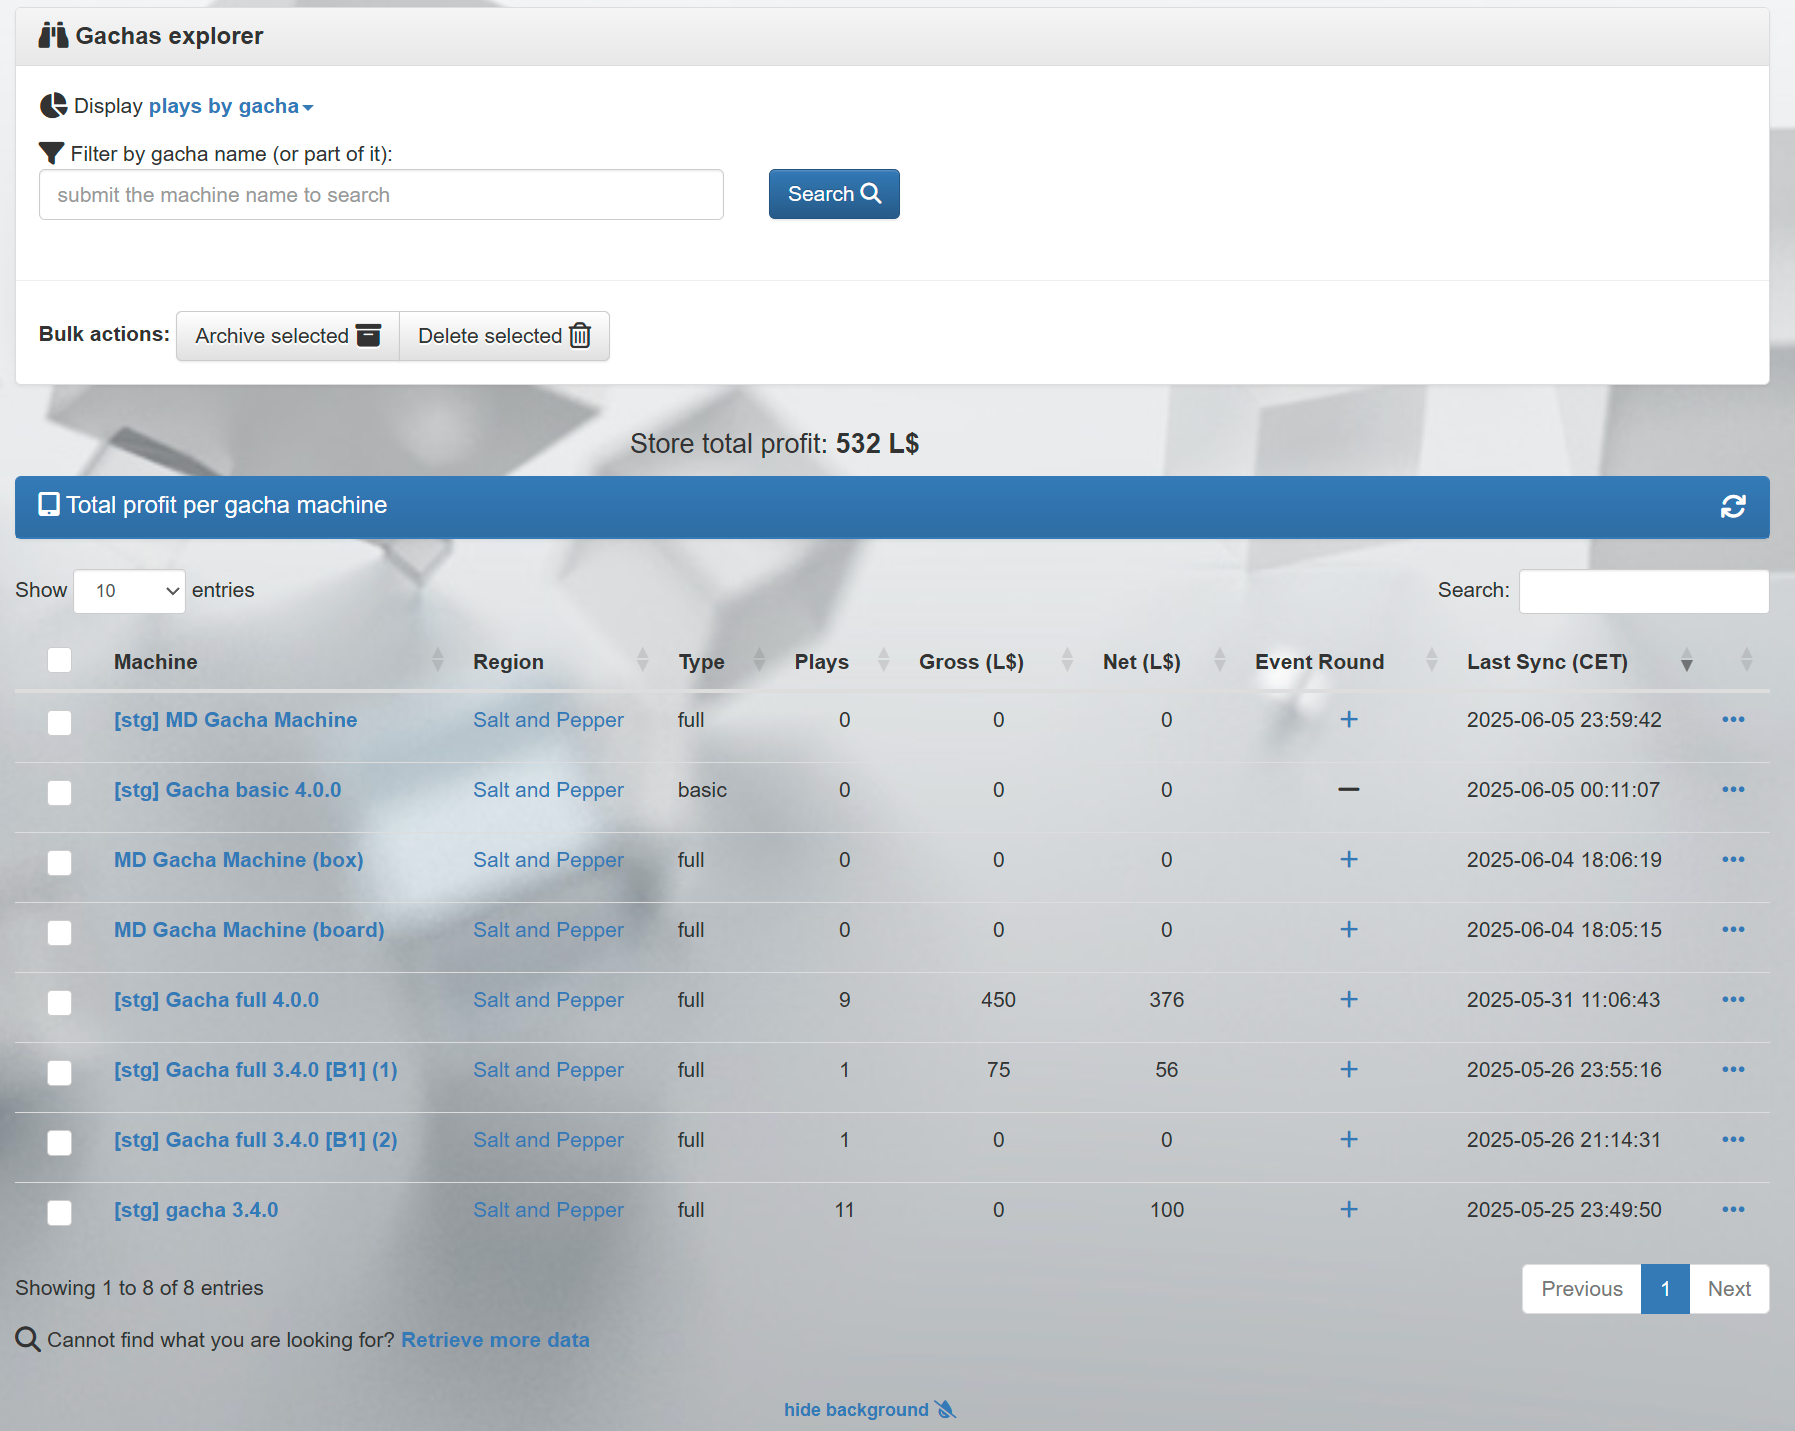
The Gachas Explorer panel groups together some useful tools to analyse and manipulate the machine’s data. The most important tool of this section is the ‘display‘ drop down list which allow to group, sort and view the data in several ways:
- by gacha: this is the default view, useful to analyse the number of pulls and profit made by each machine;
- by region: through this view is possible to analyse which regions generate the most profit; (MD Gacha Machine Script (advanced) only)
- by day: this view is useful to analyse the daily profit made by the gacha machines; (MD Gacha Machine Script (advanced) only)
- by month: this view is useful to analyse the monthly profit made by the gacha machines; (MD Gacha Machine Script (advanced) only)
- by year: this view is useful to analyse the yearly profit made by the gacha machines; (MD Gacha Machine Script (advanced) only)
- by prize: through this view is possible to analyse the profit made from each machine’s prize; (MD Gacha Machine Script (advanced) only)
Other useful tools are the ‘bulk actions‘ buttons, which allow the deletion or archiving of multiple machines at once.
Chapter #7.5: gachas tab – basic operations
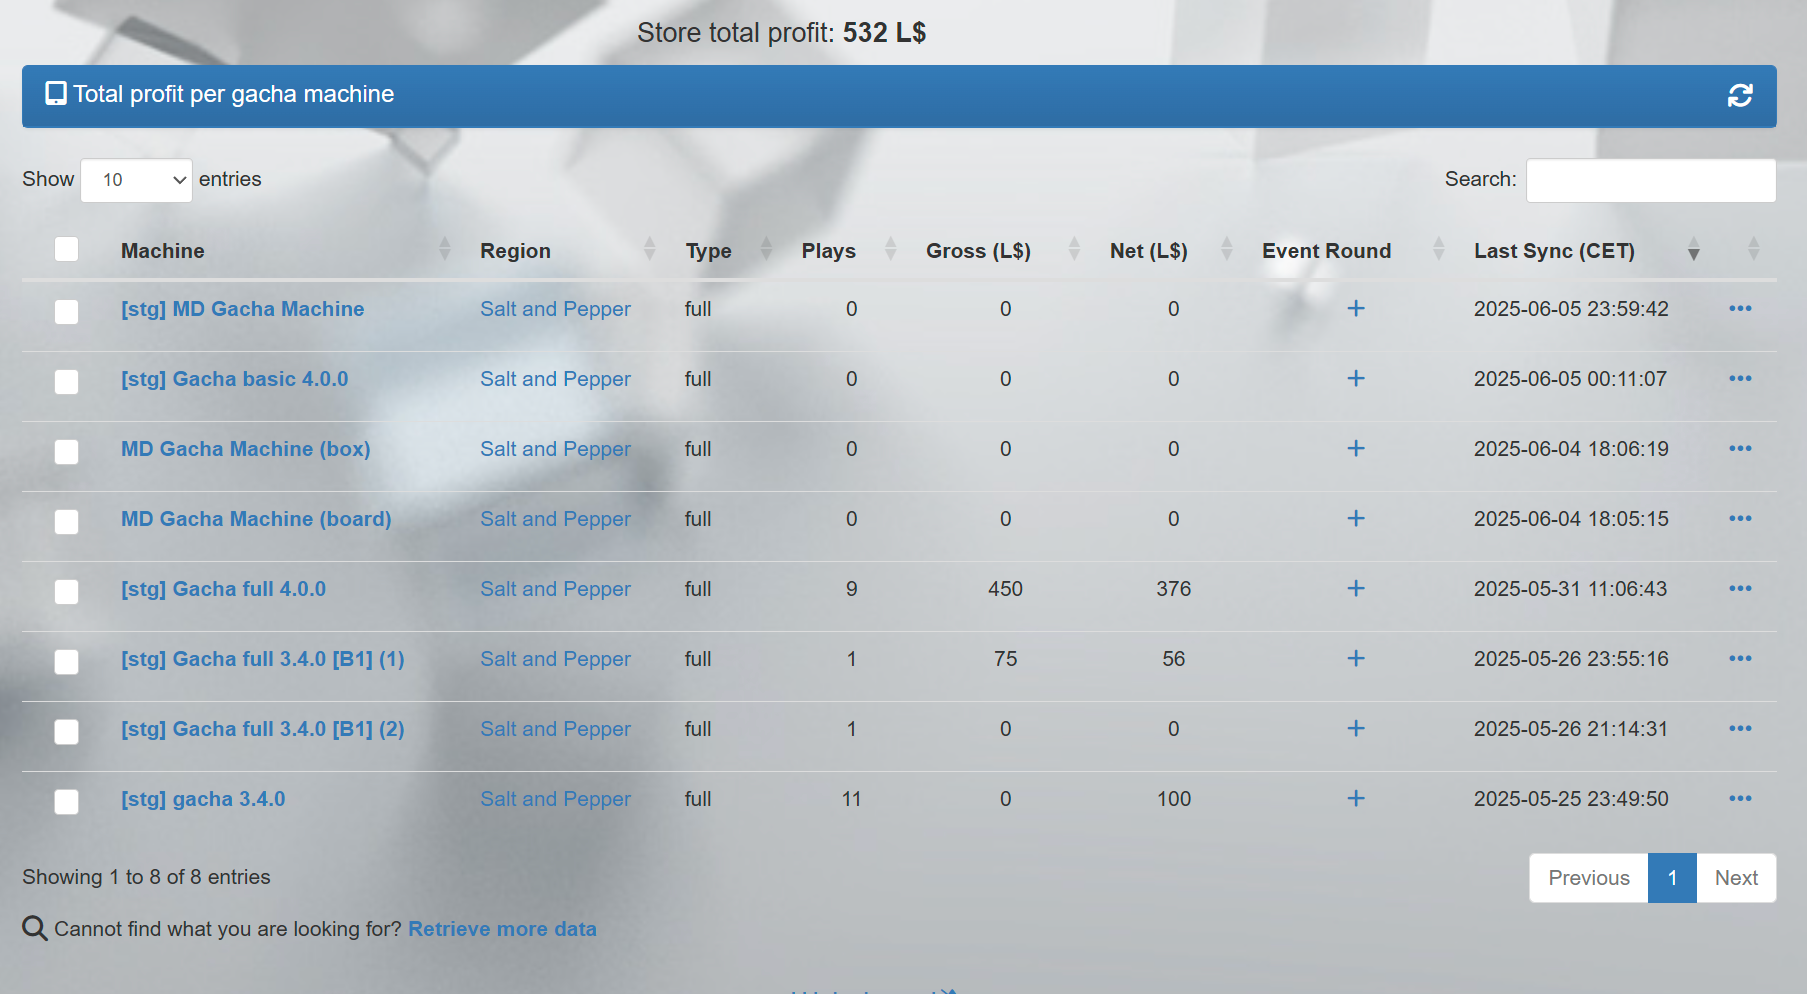
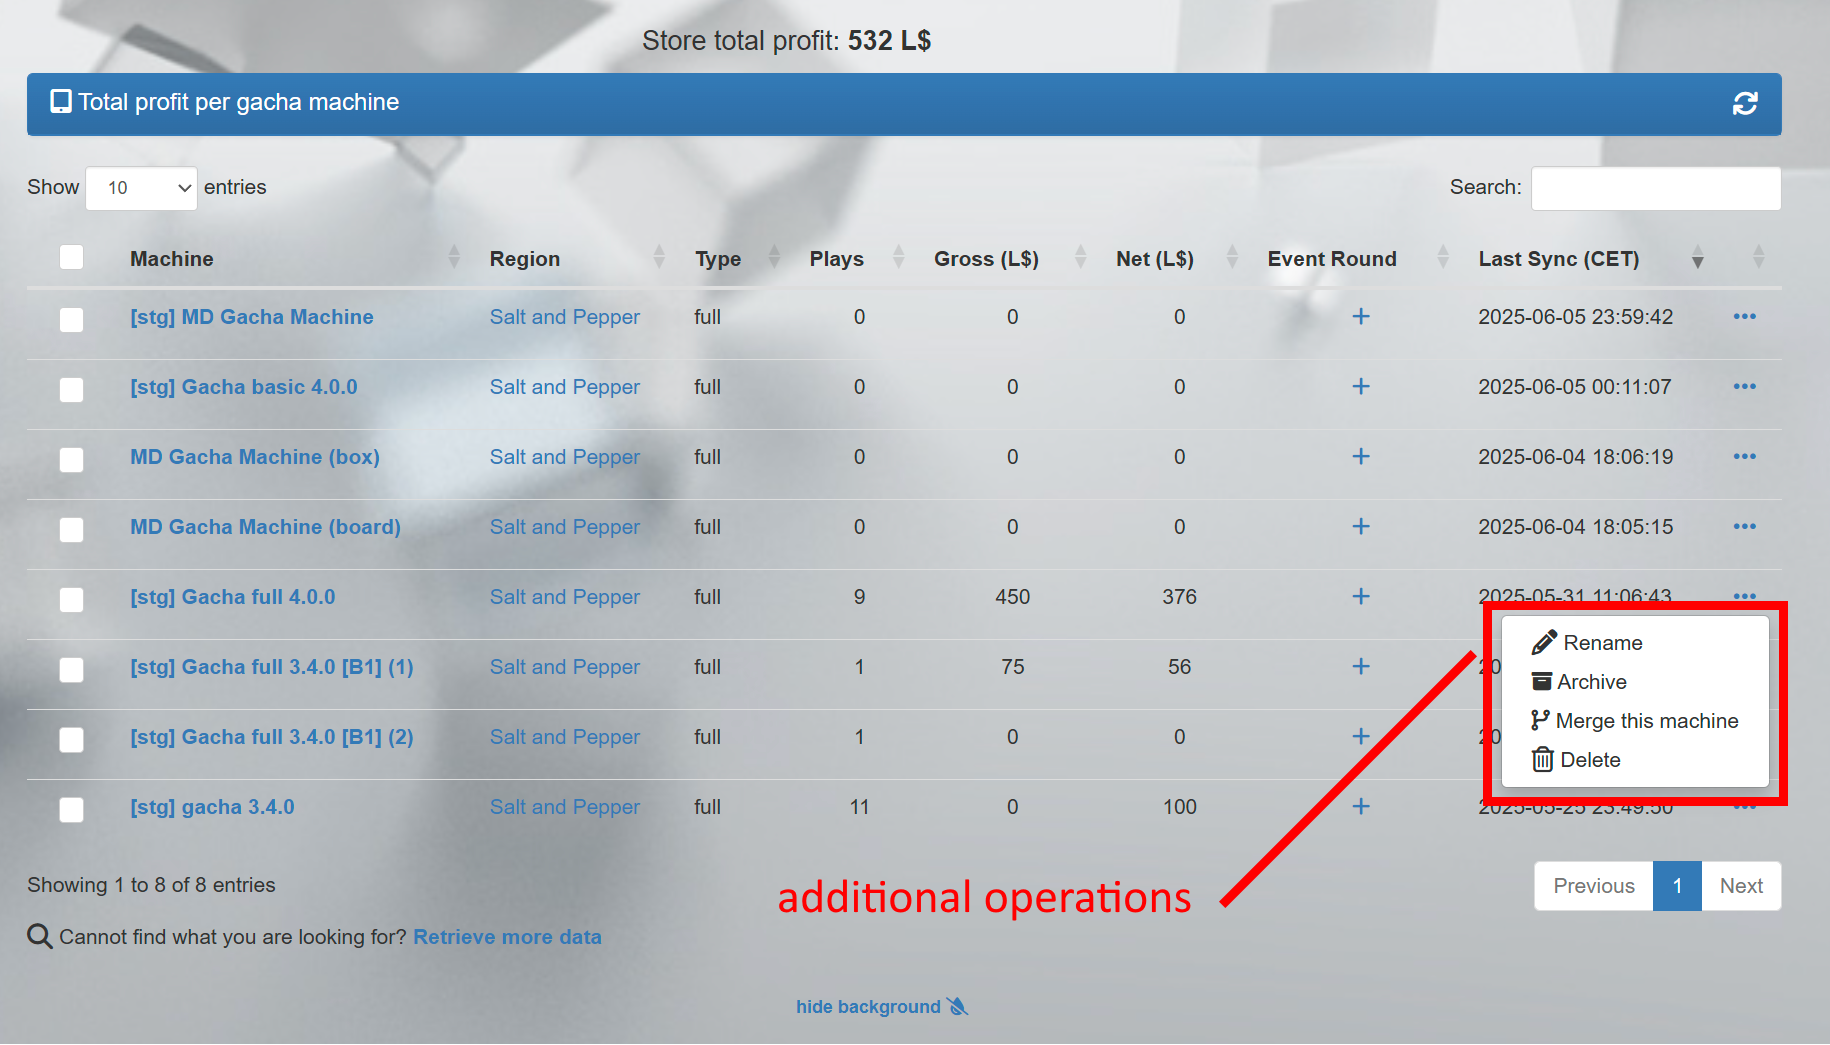
Below the Gacha Explorer panel there is the last – and most important – section of the gachas tab: the gachas list. Here all rezzed machines are displayed, each one with several useful information and ways to interact with them:
- Machine: the name of the gacha in-world. Clicking on the name will load the details page for the corresponding machine, containing both the complete transactions list, play stats and settings.
- Region: the region where the gacha is rezzed in world. Clicking on the region’s name will load the details page for the corresponding region, listing all the transactions occurred in the region by all machines rezzed there.
- Type: the machines type – basic or full – corresponding at the version of the gacha machine script
- Plays: the number of pull made on the corresponding gacha.
- Gross (L$): the gross amount in L$ made by the machine.
- Net (L$): the net amount in L$ made by the machine.
- Event Round: this feature allows the owner to assign a machine to a specific event/round previously created. The event feature is a very handy and useful way to keep track of the income made by participating at SL events, allowing to see the most profitable ones at a glance. Clicking on the event’s name will load the details page for the corresponding event, listing all the transactions made by gachas which were assigned to it. More details can be found in the dedicated chapter. (MD Gacha Machine Script (advanced) only)
- Last Sync: the last time the machine contacted the MD Labs server to update its status.
- Additional operations: clicking on the three-dots icon will open a secondary menu containing several additional operations to perform on the corresponding gacha. These operations include delete, rename, merge. More details about it in the the dedicated chapter.
Chapter #7.6: gachas tab – additional operations
While the data view is set to ‘by gacha‘, is possible to perform some additional operations to the machines; all these features are accessible by clicking the 3-dot icon (…) on the right of the gacha’s list. A drop down window will appear with the following options:
- Rename: rename the corresponding machine in-world and on MD Labs Online Services;
- Archive: archive the corresponding machine, removing it from in-world (if present);
- Merge: merge the corresponding machine with another one, associating all the transactions to the new machine and removing the old one from in-world and from MD Labs Online Services;
- Delete: delete the corresponding machine in-world and from MD Labs Online Services, removing also all the transactions and settings;
Chapter #7.7: machine’s details: play list
As said in the previous chapters, depending on the data view chosen it will be possible to view and analyse different kind of data; the most important is the data view ‘by gacha‘, which is also the default one. When this data view is selected a list of all machines rezzed is presented along with the region and total pulls and profit. By clicking on the gacha’s name the details page for that specific item will load.
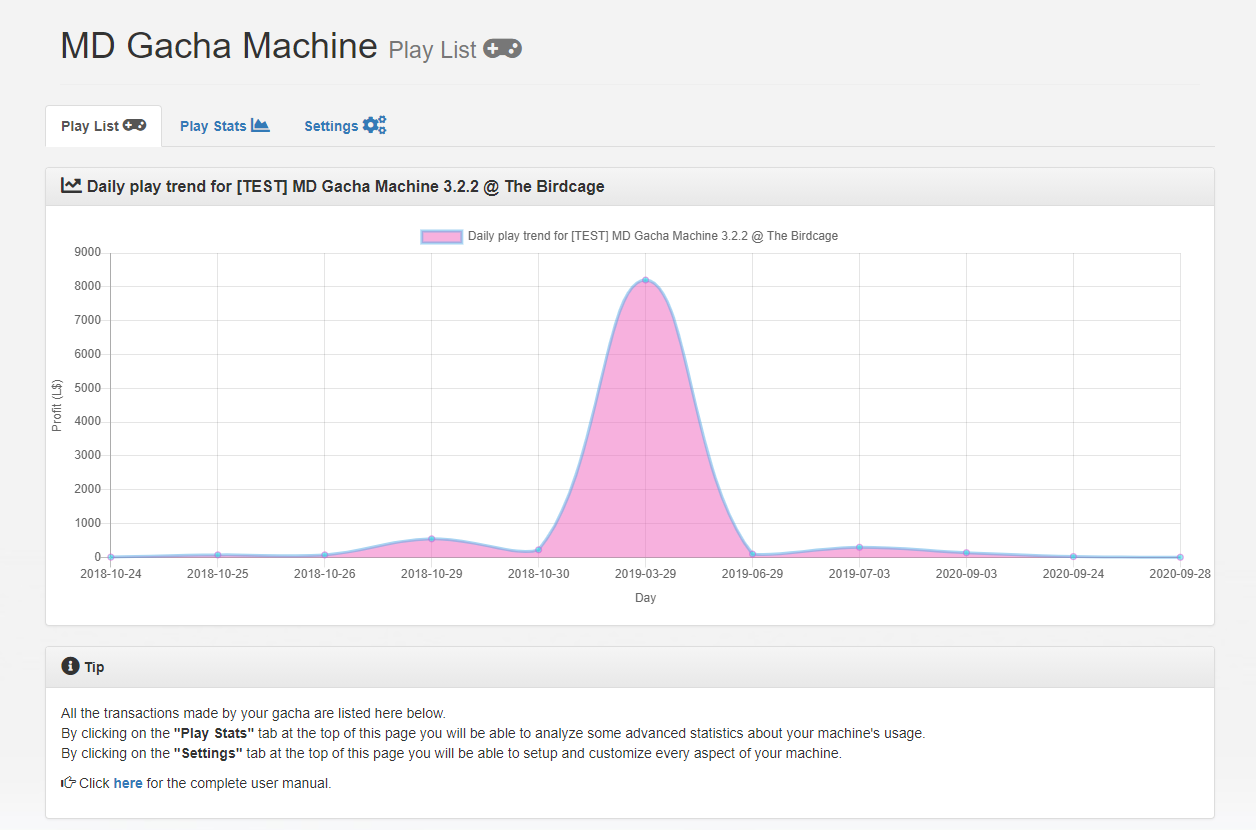
The page is divided into three tabs:
- play list: this tab contains the complete list of the machine’s transactions;
- play stats: this tab contains several statistics about how the machine is used, such has top players, most given prizes and so on;
- settings: this tab holds the machine’s settings;
The first part of the Play List tab presents a handy graph showing the gacha’s daily trend; below it the ‘tools‘ panels provides some useful instruments to filter, manage and analyse the machine’s data; it is possible in fact to filter and see only the pulls performed during a specific period, delete multiple pulls at the same time and export the transactions list.
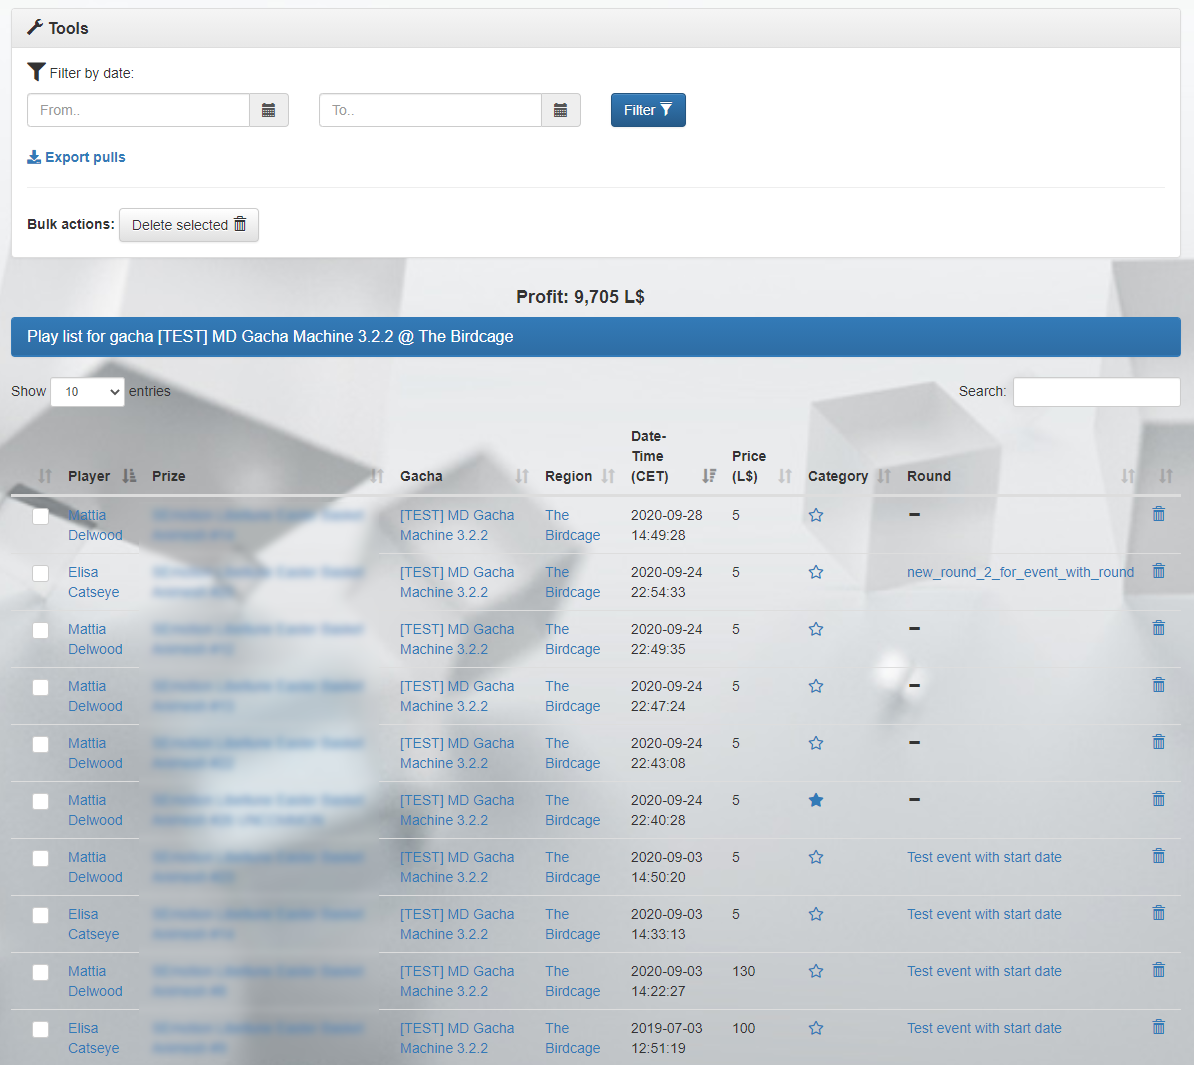
The ‘transactions‘ panel is the main panel of this page and presents a complete list of all the transactions (or pulls) made on the machine; for each transaction the following data is displayed:
- Player’s name;
- Item won as prize;
- Machine’s name;
- Machine’s region;
- Play’s date & time;
- Price paid for the play;
- Rare category of the item won;
- Event / Round which the pull is associated to;
- Delete button: this feature allow the owner to completely remove the corresponding transaction, updating also the machine’s statistics (total plays and total profit);
Chapter #7.8: machine’s details: play statistics
When the data view is set to ‘by gacha‘ a second tab is present inside the detail page, name ‘play stats‘. There are three main panels in this tab, each one presenting different statistics about the gacha’s usage; it is important to notice and keep in mind that the data presented in this tab is calculated from the machine’s utilization and not taken from the machine’s settings.
The first panel presents the top players for the corresponding gacha:
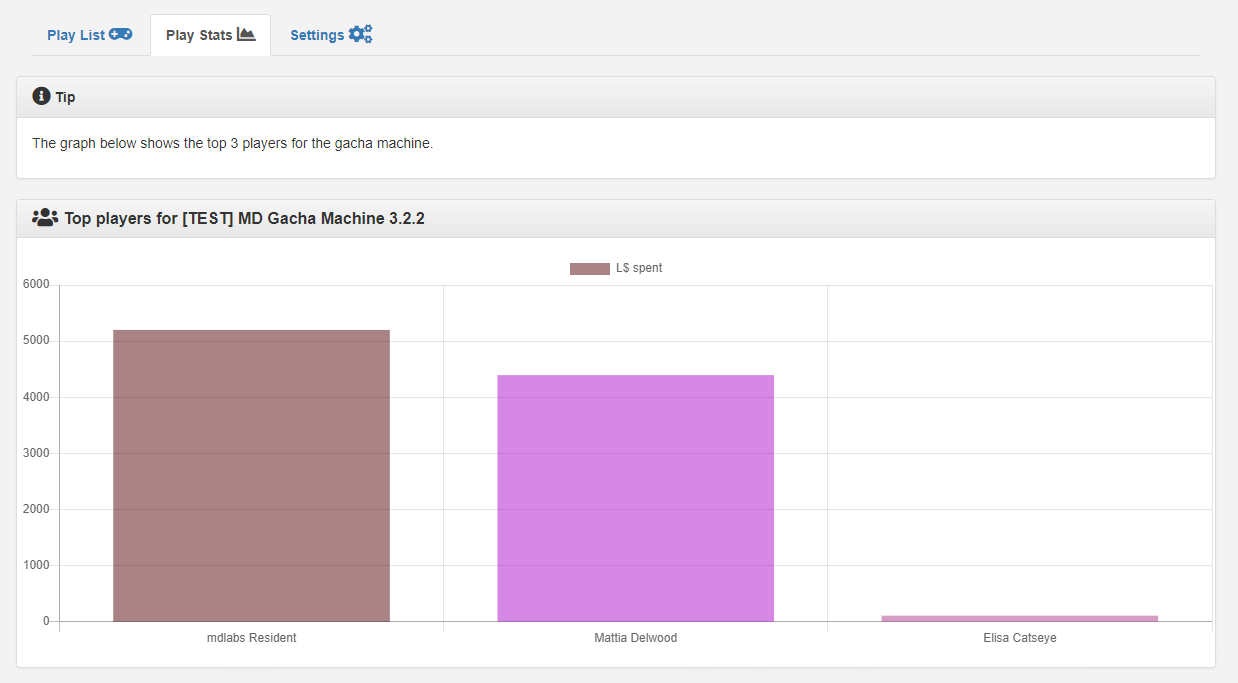
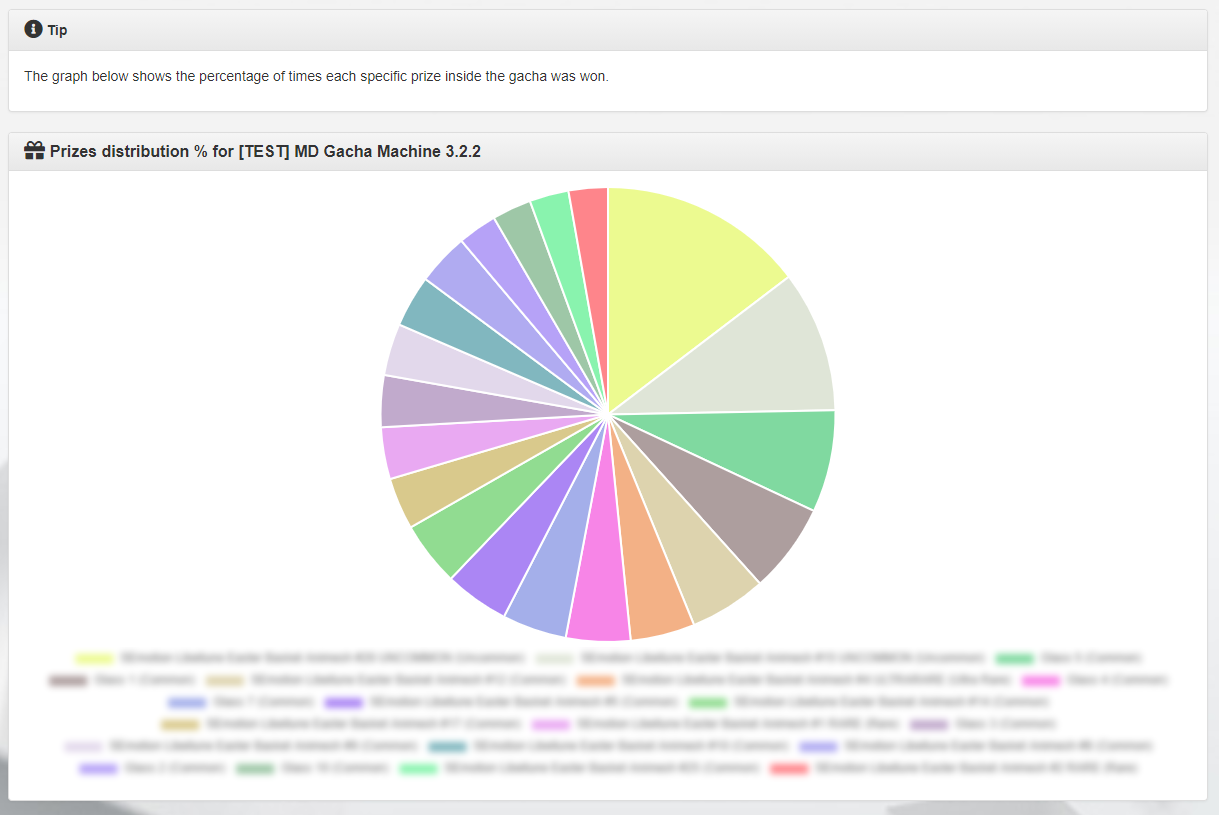
The second panel presents the prize distribution for the corresponding gacha, showing the percentage of extraction for each prize related to the overall pulls made:
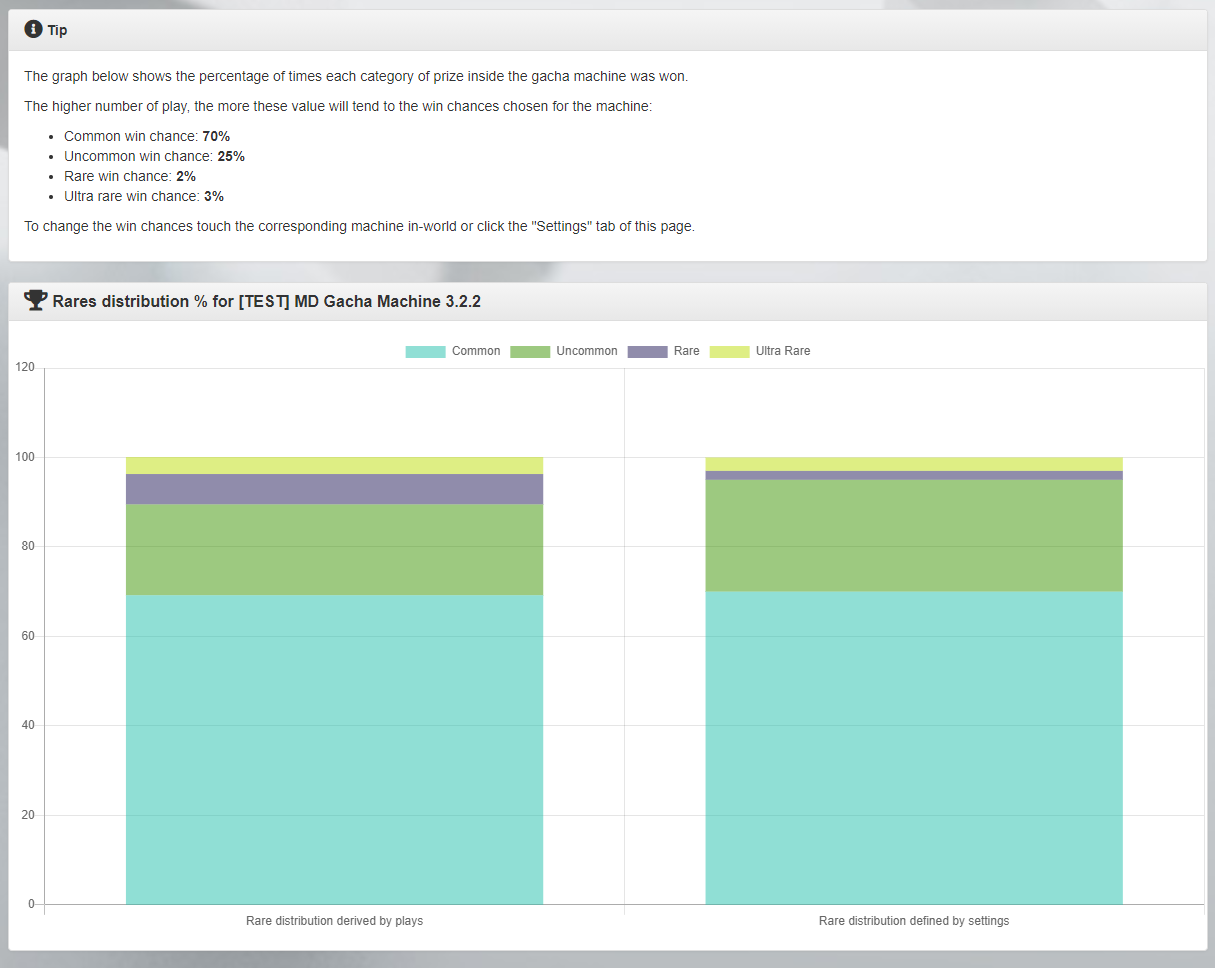
The third panel shows the rares distribution for the corresponding gacha. For an high number of pulls, the value shown here – uncommon / rare / ultra rare win chance – should approach the ones defined in the machine’s settings.
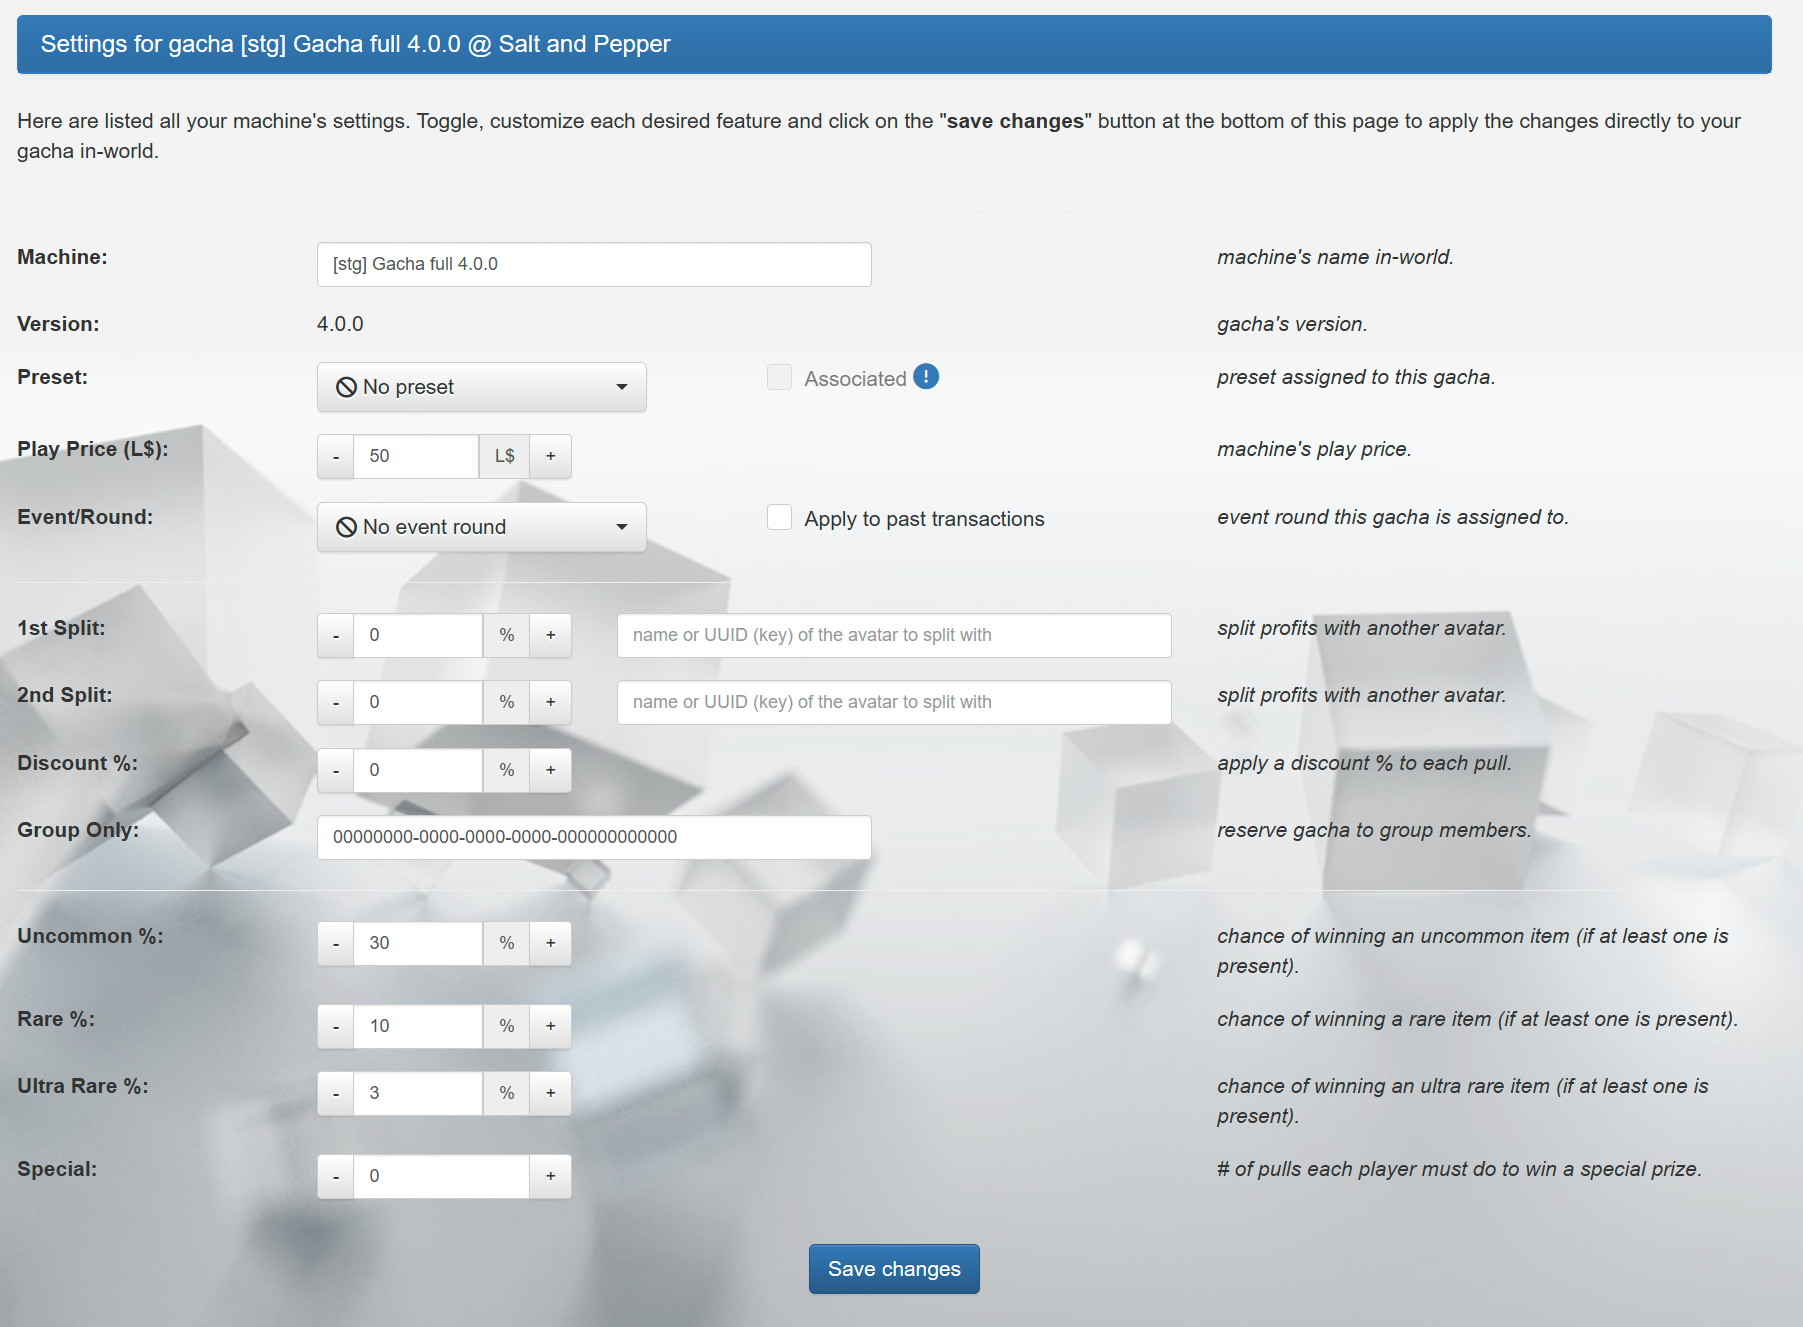
Chapter #7.9: machine’s details: settings
The third and last tab in the gacha’s details page is called ‘Settings‘ and contains a view of the machine’s setup, including all its settings. From this tab it is possible to change and configure the gacha machine, toggling features and changing the settings and – once clicking on the “Save Changes” button, applying those settings directly to the gacha in-world.
Chapter #7.10: events tab
!IMPORTANT: events and rounds are available ONLY for MD Gacha Machine Script (advanced).
Another tab present on the MD Gacha Machine homepage is called ‘Events‘ and offers a view of the events and rounds created by the owner with some useful statistics.
Before going through all the features of this tab it is very important to understand what a events and rounds are.
An event is a virtual tag that can be created and assigned to one or more gachas.
A round is a second-level virtual tag that can be created as part of an event, and represents an instance of the event of which is part.
While an event’s round can have an unlimited number of gachas associated, each gacha can be assigned only one round per time.
Why events and rounds are useful? The feature was created to meet the growing need of organising and managing gachas in an era where SL events are more and more often on everyone’s agenda. Often a store owner participates to several events monthly and it is very important to understand which ones are the most profitable and which aren’t. MD Gacha Machine’s events feature does all this and much more.
In order to make this feature even more useful, a second-level entity has been created and added to the event hierarchy: rounds. If events can be considered as ‘parents’ then round are ‘children’. Events and rounds are organised in a hierarchy: one event is composed by one or more rounds and each gacha machine can be associated to one round per time; each round has specific information such as name, start/end date-time and collects data such as the total profit made by all machines associated to it.
Each round has a ‘parent’: the event. An event can hold one or more rounds and each event has a specific name and statistics, calculated as the sum of all the event’s rounds statistics.
The hierarchy can be thought like this:
- Event A:
- Round 1;
- Round 2;
- Round 3;
- Event B:
- Round 1;
- Round 2;
- Round 3;
- Round 4;
- Event C:
- Round 1;
A typical example that fits SL perfectly is having an event called “Uber”, composed by several rounds called “2020-01”, “2020-02”, “2020-03” and so on.
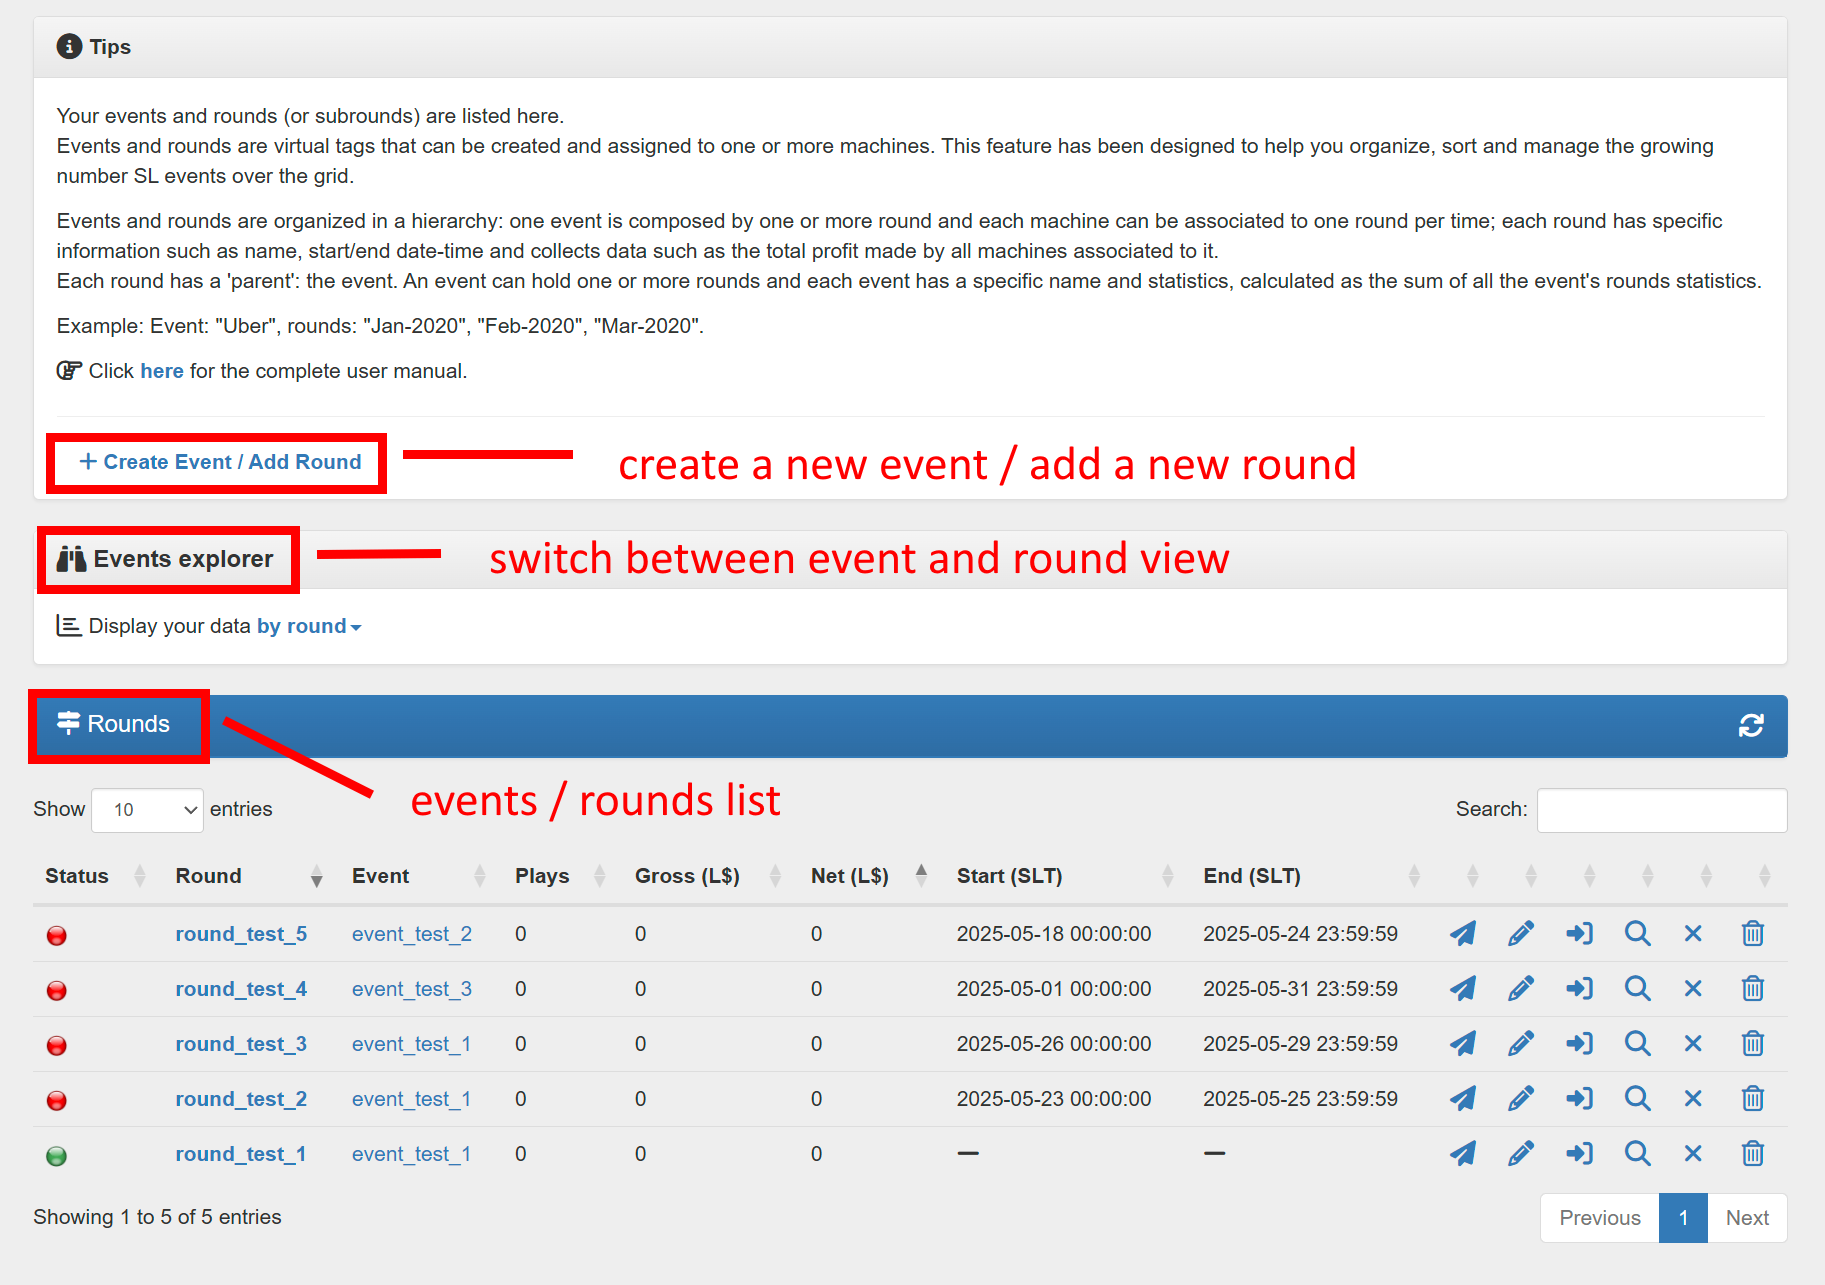
The Events tab is divided into four main panels:
- Graph: this panel shows the profit of each event or round, depending by which view is selected;
- Tips: this panel contains the link to create a new event or round;
- Event explorer: this panel allows the owner to switch view from ’round-based’ to ‘event based’;
- Events/rounds: this panel reports all the events or rounds – depending by the view selected – along with their statistics, such as total profit, number of items sold and much more;
The events/rounds panel is the main panel of this page and shows – depending by the view selected – a list of all events and rounds along with several statistics and additional operations.
Chapter #7.10.1: creating a new event
!IMPORTANT: events and rounds are available ONLY for MD Gacha Machine Script (advanced).
The first step to take in order to use the Events feature is create a new event: this will work like a ‘container’ or ‘parent’ for all the rounds that will be created later.
To create a new event the owner will have to click on the ‘create event/add round’ link that can be found in the ‘tips’ panel; an event creation wizard will appear.
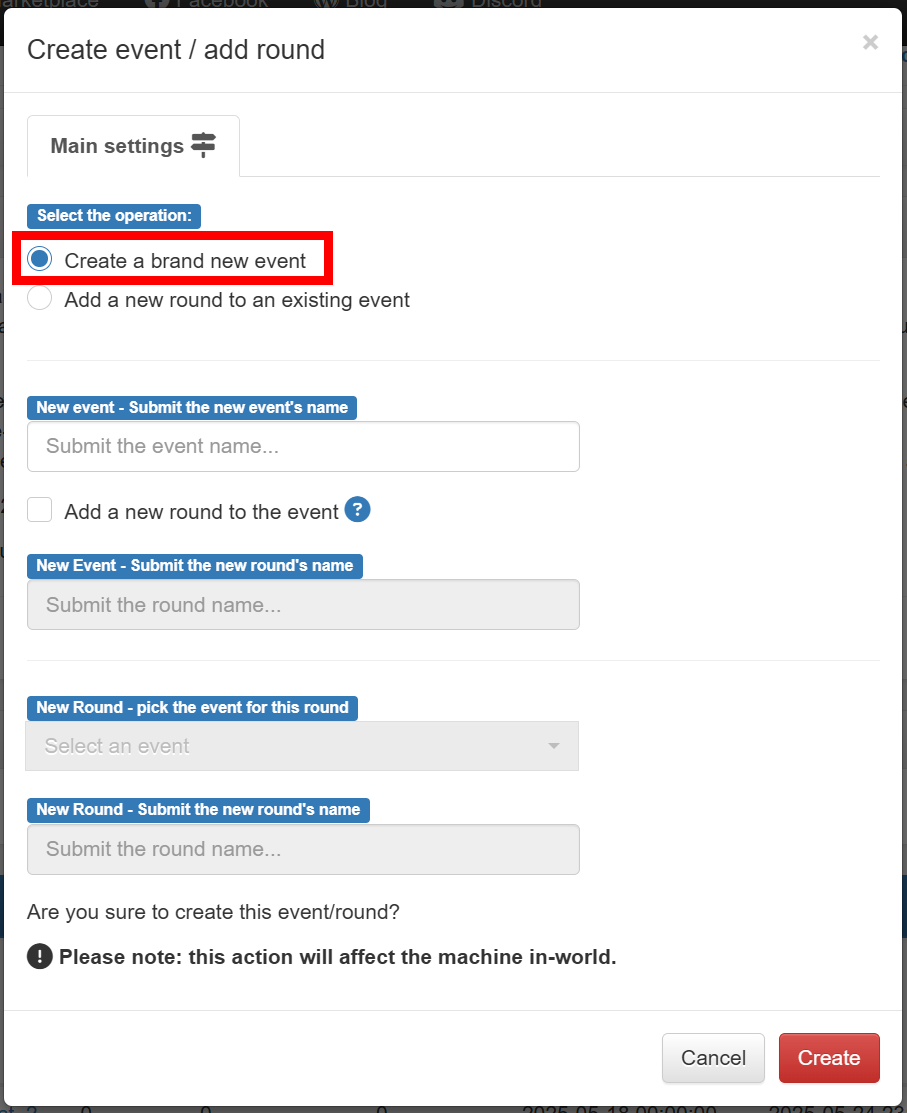
PLEASE NOTE: Since this wizard is used to both create a new event and create a new round, it will present some event-specific options and also some round-specific ones.
When creating a new event the owner will have to submit the event’s name: this will immediately create an event with no rounds in it. Eventually the owner can select the ‘add a new round to the event’ checkbox and provide a name for the round: this will immediately create an event with one round inside.
The event created will be listed into the panel below if the Event Explorer is set to ‘by event’.
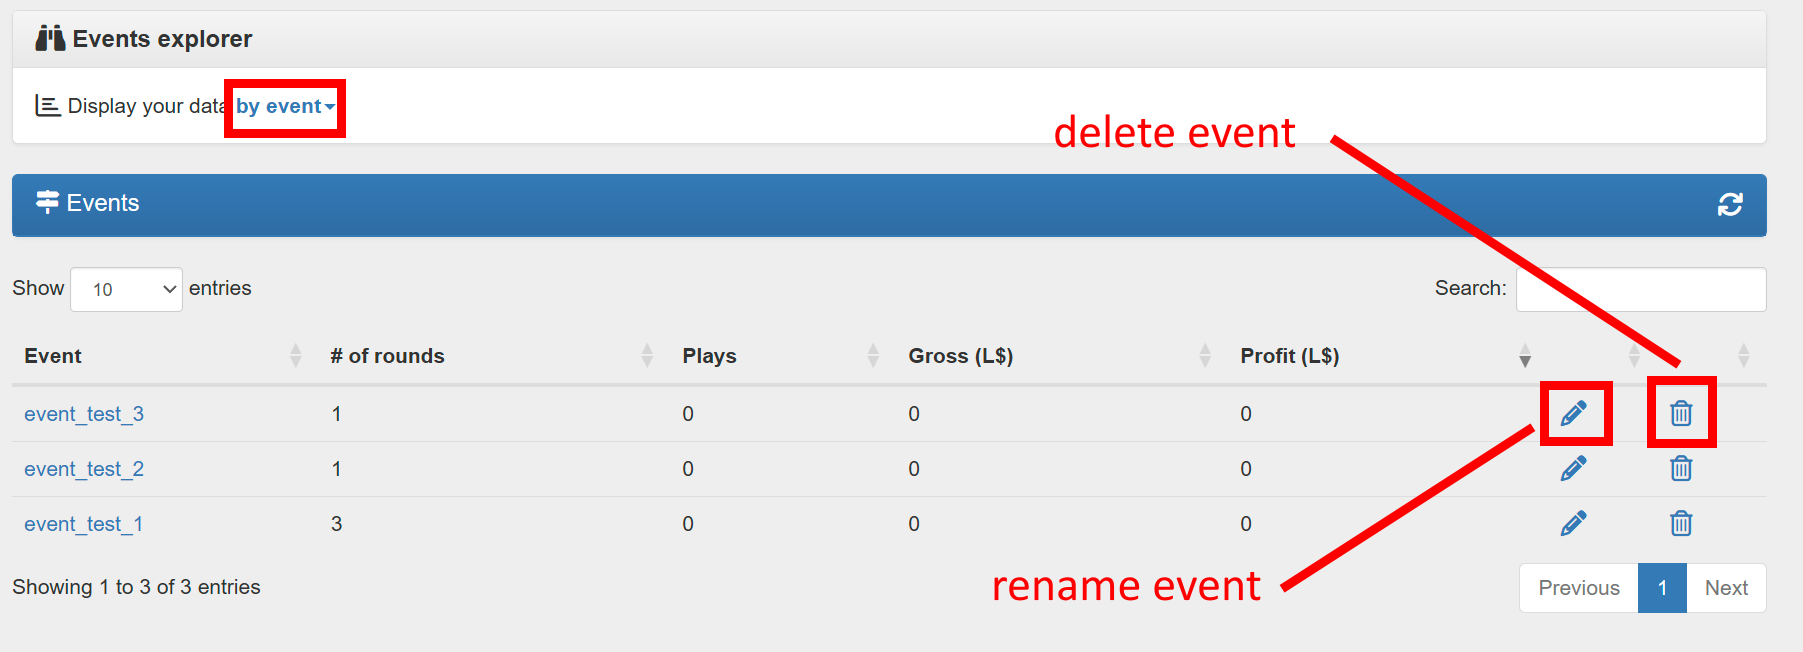
For each event listed, the following data is shown:
- Event: the name of the event;
- # of rounds: the number of rounds that are part of the event;
- Plays: the number of pulls performed in the whole event. This value is the sum of all the pulls made in all the rounds being part of the event;
- Gross (L$): the total gross profit of the event. This value is the sum of all the gross profit made in each round being part of the event;
- Profit (L$): the total profit of the event. This value is the sum of all the profit made in each round being part of the event;
- Rename event: this button will let the owner rename the current event;
- Delete event: this button will let the owner delete the event. This is only possible if all the rounds being part of the event have been deleted before;
Chapter #7.10.2: creating a new round
!IMPORTANT: events and rounds are available ONLY for MD Gacha Machine Script (advanced).
Once at least once event is created, the owner can easily add one or more rounds at it using the ‘create event/add round’ link that can be found in the ‘tips’ panel; an round creation wizard will appear.
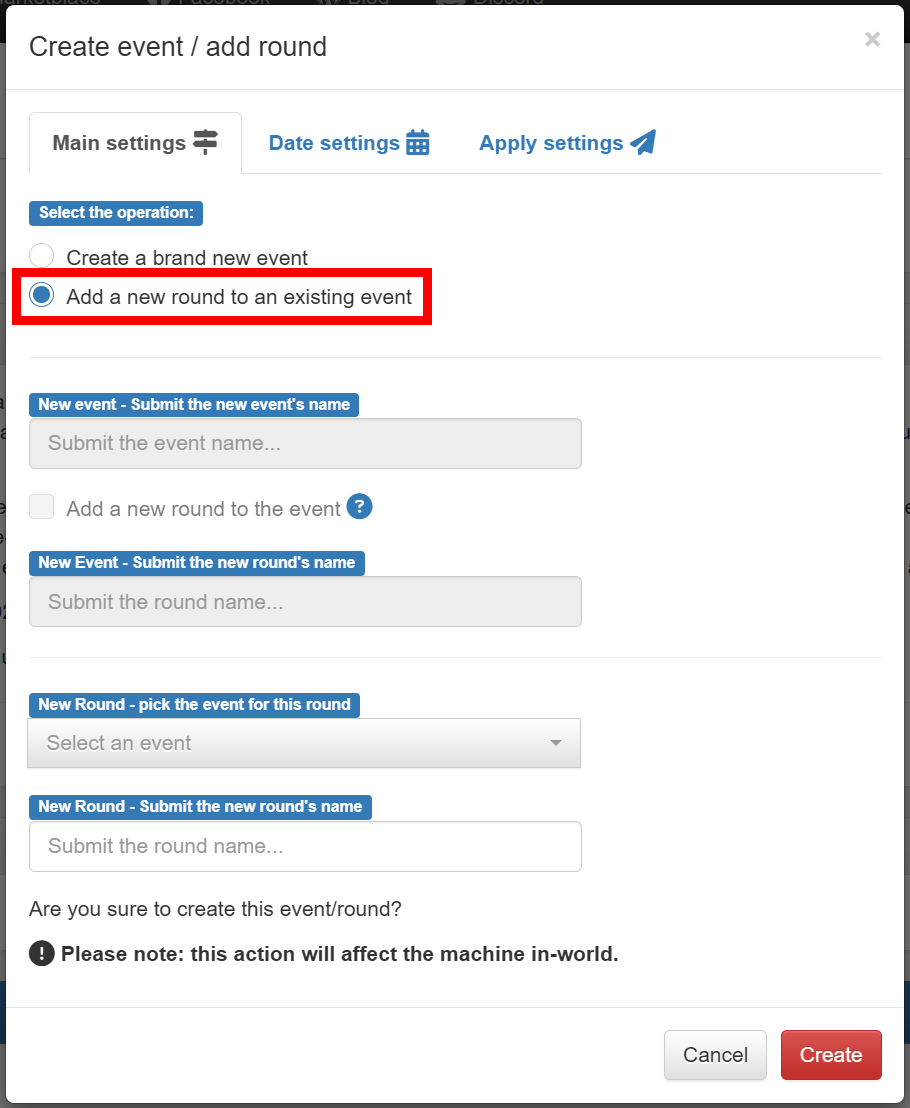
PLEASE NOTE: Since this wizard is used to both create a new event and create a new round, it will present some event-specific options and also some round-specific ones.
When creating a new round the owner will have to submit mainly two information: the round’s name and the ‘parent’ event for the round; at this point pressing the ‘create’ button will create a new round as part of the selected event.
The round feature – however – is very powerful and comes with several options that can be selected during the round creation: these options can be found in two tabs that will appear in the creation wizard, called ‘Date Settings’ and ‘Apply Settings’.
- Date Settings: this tab contains optional settings that are aimed to customise the round (and the machines assigned to it) depending on the time. Often in fact the SL events are time-sensitive and have a specific duration composed by a start date-time and a end date-time.
- round start date: providing a start date-time for the round will force all the in-world gachas associated to start working only from the moment specified;
- round end date: providing a end date-time for the round will force all the in-world gachas associated to stop working when the specified moment is reached;
- Apply Settings: this tab contains one optional setting aimed to speed up the application of the event round just defined. The setting allows the owner to automatically assign the event round to all gachas in-world rezzed in a specific region. Doing this, the machines will be associated to the newly created round and – if there is a start date-time or a end date-time – operate as scheduled.
IMPORTANT: when a machine is associated to an event having a start and/or end date-time, every attempt to play outside the allowed period will be aborted and the player refunded.
The round created will be listed into the panel below if the Event Explorer is set to ‘by round’. The data displayed per each round and the additional operations are explained in details in next chapter.
Chapter #7.10.3: managing rounds
!IMPORTANT: events and rounds are available ONLY for MD Gacha Machine Script (advanced).
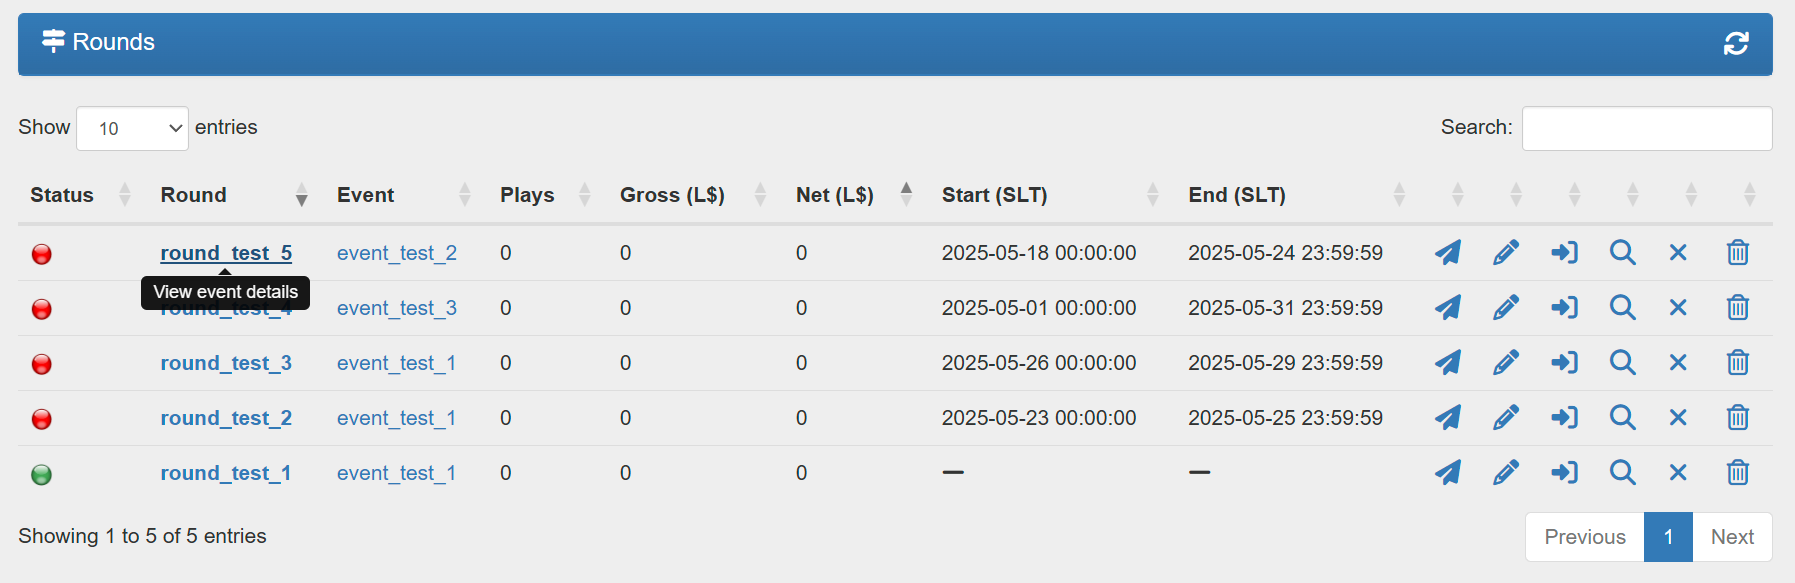
Once a round is created it will be displayed in the rounds list; for each of them several information are listed:
- Status: this icon is useful only for rounds which have a start date-time and/or a end date-time associated. The status icon is green for the rounds which are currently active (having at least one gacha working within the round’s validity period defined) and red for the ones not active (having validity period expired);
- Round: the name of the round. Clicking on the event name will open the round’s transactions list;
- Event: the event which the round is part of. One round can be associated to one event only, while one event can hold several rounds. Clicking on the event name will open the event’s transactions list;
- Plays: this value represents the amount of pulls done on all machines associated to the event, whether they are in the same region or in different locations.
- Gross (L$): this value is the total gross profit in L$ made by all machines associated to the event, whether they are in the same region or in different locations. If the event is associated to gachas participating to a SL event this number is the most important one to consider, as it gives the owner an idea of how much profitable the SL event is.
- Profit (L$): this value is the total profit in L$ made by all machines associated to the event, whether they are in the same region or in different locations. If the event is associated to gachas participating to a SL event this number is the most important one to consider, as it gives the owner an idea of how much profitable the SL event is.
- Start Date-Time (SLT): this value – optional – shows the start date-time for the round. If the value is present, all gachas associated to the round will start working and selling goods at that specific moment.
- End Date-Time (SLT): this value – optional – shows the end date-time for the round. If the value is present, all gachas associated to the round will stop working at that specific moment.
Next to this data there are several icons that implement different additional features to manage the event rounds:
- Apply Event Round (paper plane icon): pressing this button will load a wizard to apply (or assign) the corresponding event round to one or more gacha machines. More information about this process in the next chapter;
- Edit Event Round (pencil icon): this button let the owner edit the corresponding round’s parameters, such as name, start time and end time. Clicking on the pencil icon will load a floating window where the owner will be able to adjust the round’s settings; in particular the start time and end time are automatically calculated/guessed analysing the transactions from the gachas associated to the event round and suggested to the owner. While the values suggested may not be completely accurate, it gives the owner an useful hint simplifying the editing.
- Move Event Round (arrow icon): this feature let the owner move the round from one event (source) to another (destination); this will update the source event’s statistics removing the round’s total and adding it to the destination’s event;
- Lookup Event Round (magnifier icon): clicking on this button will provide a list of gachas that are currently associated to the selected round;
- Unassign Event Round (“X” icon): this feature let the owner unassign (or remove) the round from all the machines that are set to it. More information about this process in the next chapter;
- Delete Event Round (trash bin icon): this feature let the owner delete the selected round completely, removing it from being part of the event and also removing its association to the in-world machines. More information about this process in the next chapter;
Chapter #7.10.4: assign, unassign and delete rounds
!IMPORTANT: events and rounds are available ONLY for MD Gacha Machine Script (advanced).
The most important and critical features about event rounds are the ones that let the owner assign, un-assign and delete rounds. These feature, which can be used on multiple machines at once, are very handy but can easily lead to mistakes if not understood and used properly. This chapter is written to explain how to use this features and the impact they have on the gachas and their transactions.
! IMPORTANT: since events and rounds are virtual tags, assigning or un-assigning machines to an event rounds results in adding or removing a tag to machines and transactions and apply those data to rounds. No gacha or transaction will be deleted.
Both features to apply an event round and remove it operate on two different levels: gacha level and transaction level. The first level affects only the gacha without touching the transactions, while the second level affects also the transactions (already) performed by the selected machines.
The first operation is Apply Event Round (paper plane icon): once clicking on the icon a wizard will appear:
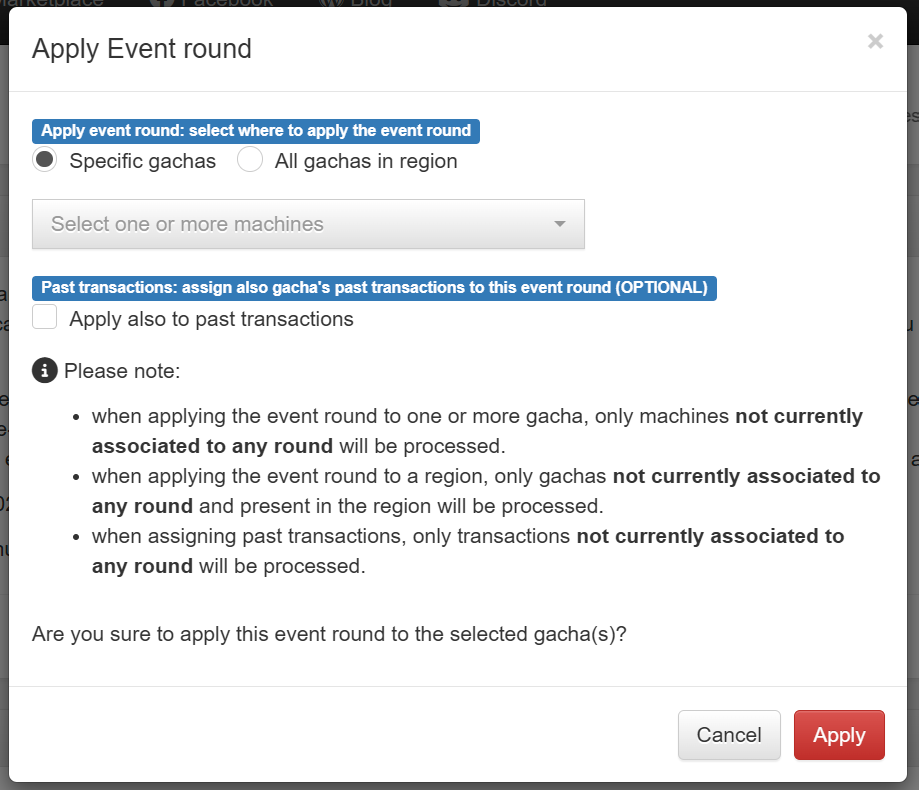
For the first level the owner is asked to choose whether apply the event round to one or more specific gachas or to all gachas in a region:
- if the ‘specific gachas’ option is chosen, only machines currently not associated to any round will be displayed as available.
- if ‘all gachas in region’ option is chosen a list of all available regions is displayed and the round will be applied to all machines in the selected region which are currently not associated to any round.
The second level is an optional setting that can be chosen whilst applying a round to one or more machines: the ‘apply to past transactions’. This setting is very important and also critical because it affects the past transactions of the gacha(s) that are going to become part of the round. When the ‘apply to past transactions’ box is checked also transactions made by the gacha(s) prior to the moment the round is being applied will become part of the round; this means the profit made by the gacha(s) before becoming part of the event round will be used as part of the round’s statistics.
! IMPORTANT: if the gacha(s) was used already and moved through different locations, using the ‘apply to past transactions’ will affect also the transactions performed at those different locations and this may lead to inconsistent data: the round statistics will in fact include the sales made at different locations that most likely should not be considered part of the round. In this case – if the event round has a start date – the owner should consider using the ‘apply to past transactions since round start’.
A second important operation to be performed with rounds is Unassign Event Round (“X” icon):
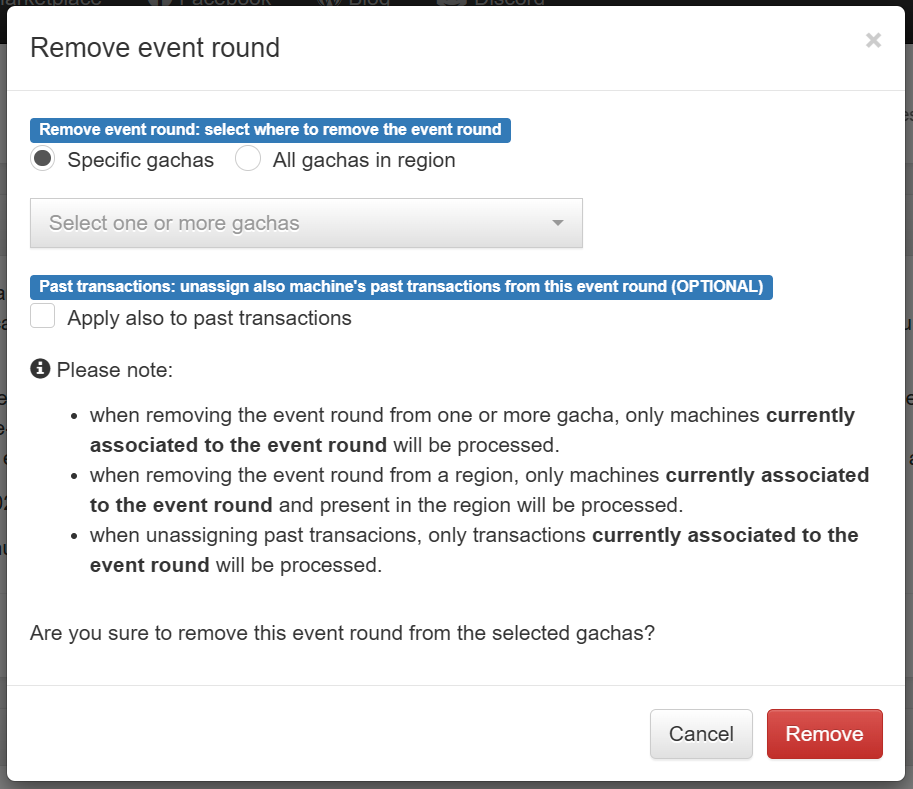
The wizard to remove an event round assignment is very similar to the one used to apply an event round, but of course working in the opposite way. As first level the owner will have to choose if to remove the event round only from one or more specific gachas or to all gachas in the region. As for the apply event round feature, removing the event round will work only on machines currently assigned to the round the owner is removing.
The second level is an optional setting that can be chosen whilst removing a round from one or more gachas: the ‘apply to past transactions’. This setting is very important and also critical because it affects the past transactions of the gacha(s) that are going to be removed from the round. When the ‘apply to past transactions’ box is checked the transactions made by the gacha(s) prior to the moment of the round removal will be removed from the round too and not considered as part of the round’s statistics.
! IMPORTANT: if the gacha(s) was used already at an event and then moved to a different location, using the ‘apply to past transactions’ will affect also the transactions performed during the event and this may lead to inconsistent data: the round statistics will in fact be deducted by the sales made at the event location and that most likely should be considered part of the round. In this case – if the event round has an end date – the owner should consider using the ‘apply to past transactions since round end’.
The last important operation which can be performed with rounds is Delete Event Round (trash bin icon):
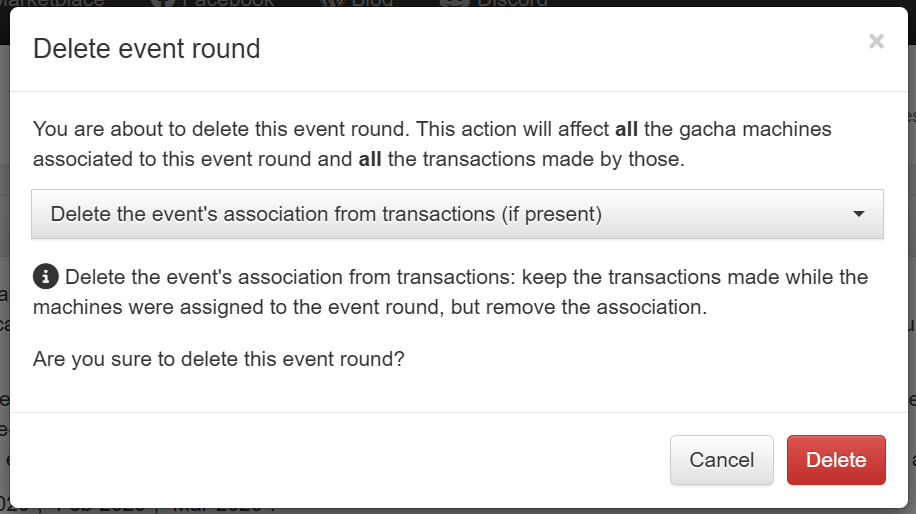
This operation performs again both at gacha and transaction level; when deleting an event round, it will be removed from every gacha associated to it and the owner will be asked to choose how to manage the transactions being part of the round among:
- Delete the round’s association from the transactions: this option will keep the transaction in the system, but remove it from the round being deleted;
Chapter #7.11: Players tab
!IMPORTANT: this feature is available ONLY for MD Gacha Machine Script (advanced).
The ‘Players‘ tab is made to help the owner find and manage gacha players: the tab includes several tools, features and views allowing the owner to analyse and manipulate the player data.
The tab in divided into three main panels: tips, player explorer and players list.
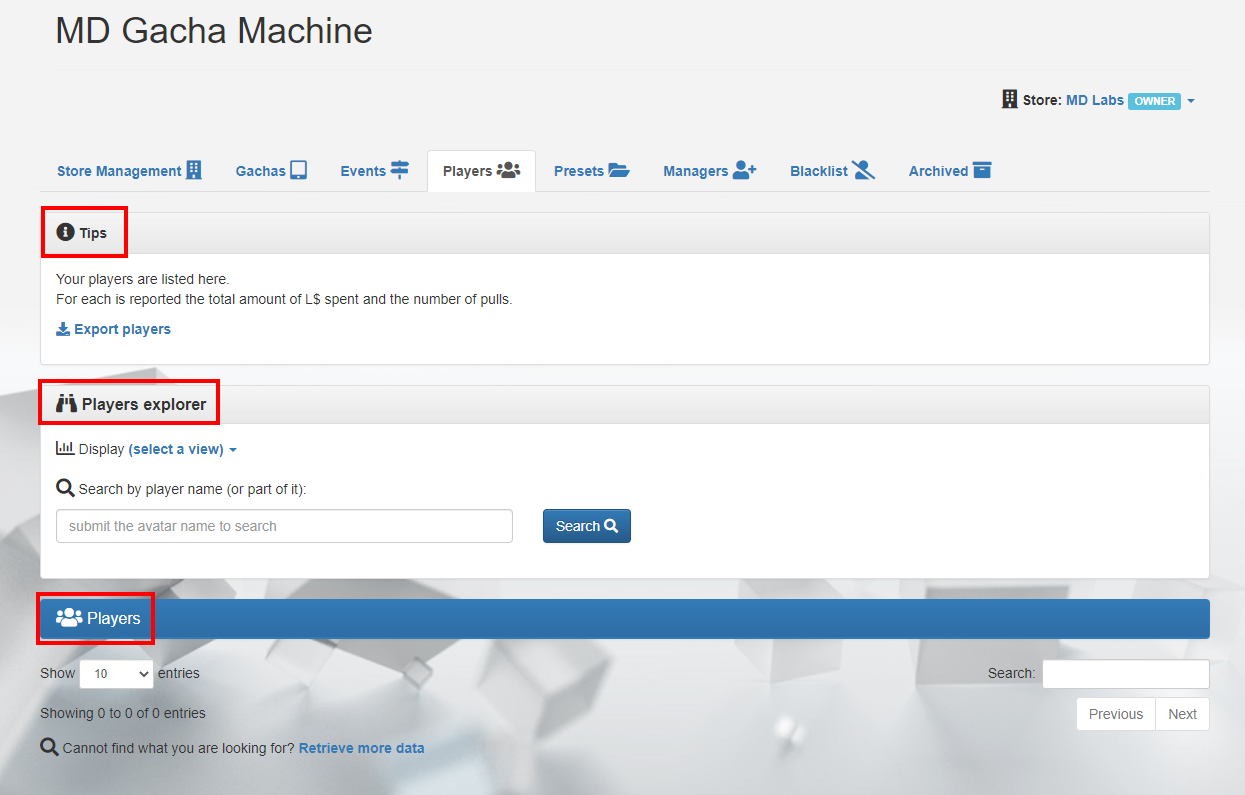
The ‘Tips‘ panel contains the feature called ‘Export players’: this link let the owner export the store’s players list.
The ‘Players Explorer‘ is a panel provided two important tools for the owner to analyse and search for store players. The first tool is the ‘view selector’, which provides several default views used to list players; these views are:
- last active players: this view will list all the players ranking them by the last play performed; (MD Gacha Machine Script (advanced) only)
- top players of the current month: this view will list all the players ranking them by the total amount spent in the current month; (MD Gacha Machine Script (advanced) only)
- top players of the previous month: this view will list all the players ranking them by the total amount spent in the previous month; (MD Gacha Machine Script (advanced) only)
- top players: this view will list all the players ranking them by the total amount spent at the store; (MD Gacha Machine Script (advanced) only)
The second tool present in the ‘Players Explorer’ panel is the search tool, allowing the user to find a specific player by searching for the name or part of it.
The last panel – called ‘Players list‘ – will list all the store’s players sorted depending on the view selected:
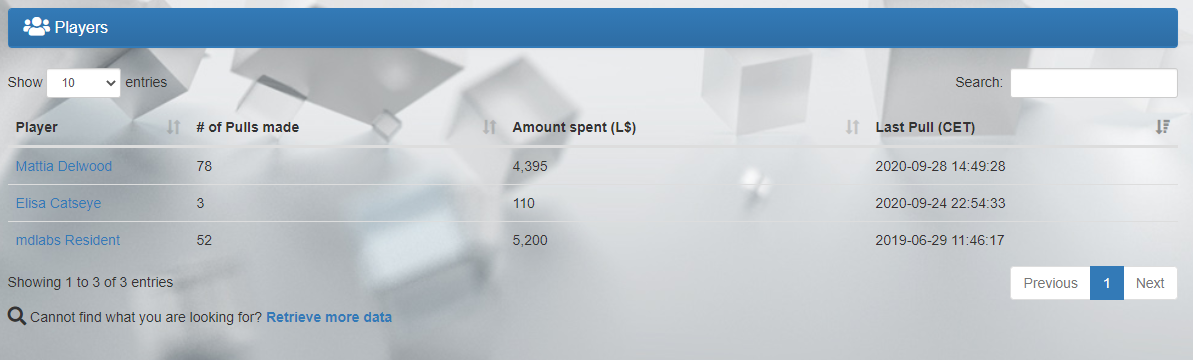
For each player reported in list, several information is provided:
- Player name: the name of the user playing. Clicking on the name will load the player’s detail page containing all the pulls performed by the user;
- # of pulls made: the number of pulls performed by the user;
- Amount spent (L$): the amount of L$ spent by the user;
- Last pull: the last time the user played any machine from the store;
Chapter #7.12: Presets tab
!IMPORTANT: this feature is available ONLY for MD Gacha Machine Script (advanced).
Another tab present in the MD Gacha Machine homepage is called ‘Presets‘ and contains the list of all presets created; from here is also possible to create, manage and apply presets to machines in-world.
A preset is a defined group of setting – a configuration – that can be applied to one or more gachas; this configuration contains all the settings necessary for the device to work correctly.
Presets can be very useful because they are time-saving: if multiple machines are configured in the same way (i.e. same price, rares, option, ..), then creating a preset with the configuration and apply it to to the corresponding gacha will speed up the setup, as well as reduce the chance to setup machines with wrong settings. This because – generally speaking – there is a tendency to setup the gachas always with the same parameters (price, rares, etc..), and in this case presets become very handy.
The tab is composed by two main panels: ‘Tips‘ and ‘Presets‘; the first one contains a link that will load the wizard to create new presets, while the second one listing all the presets created.
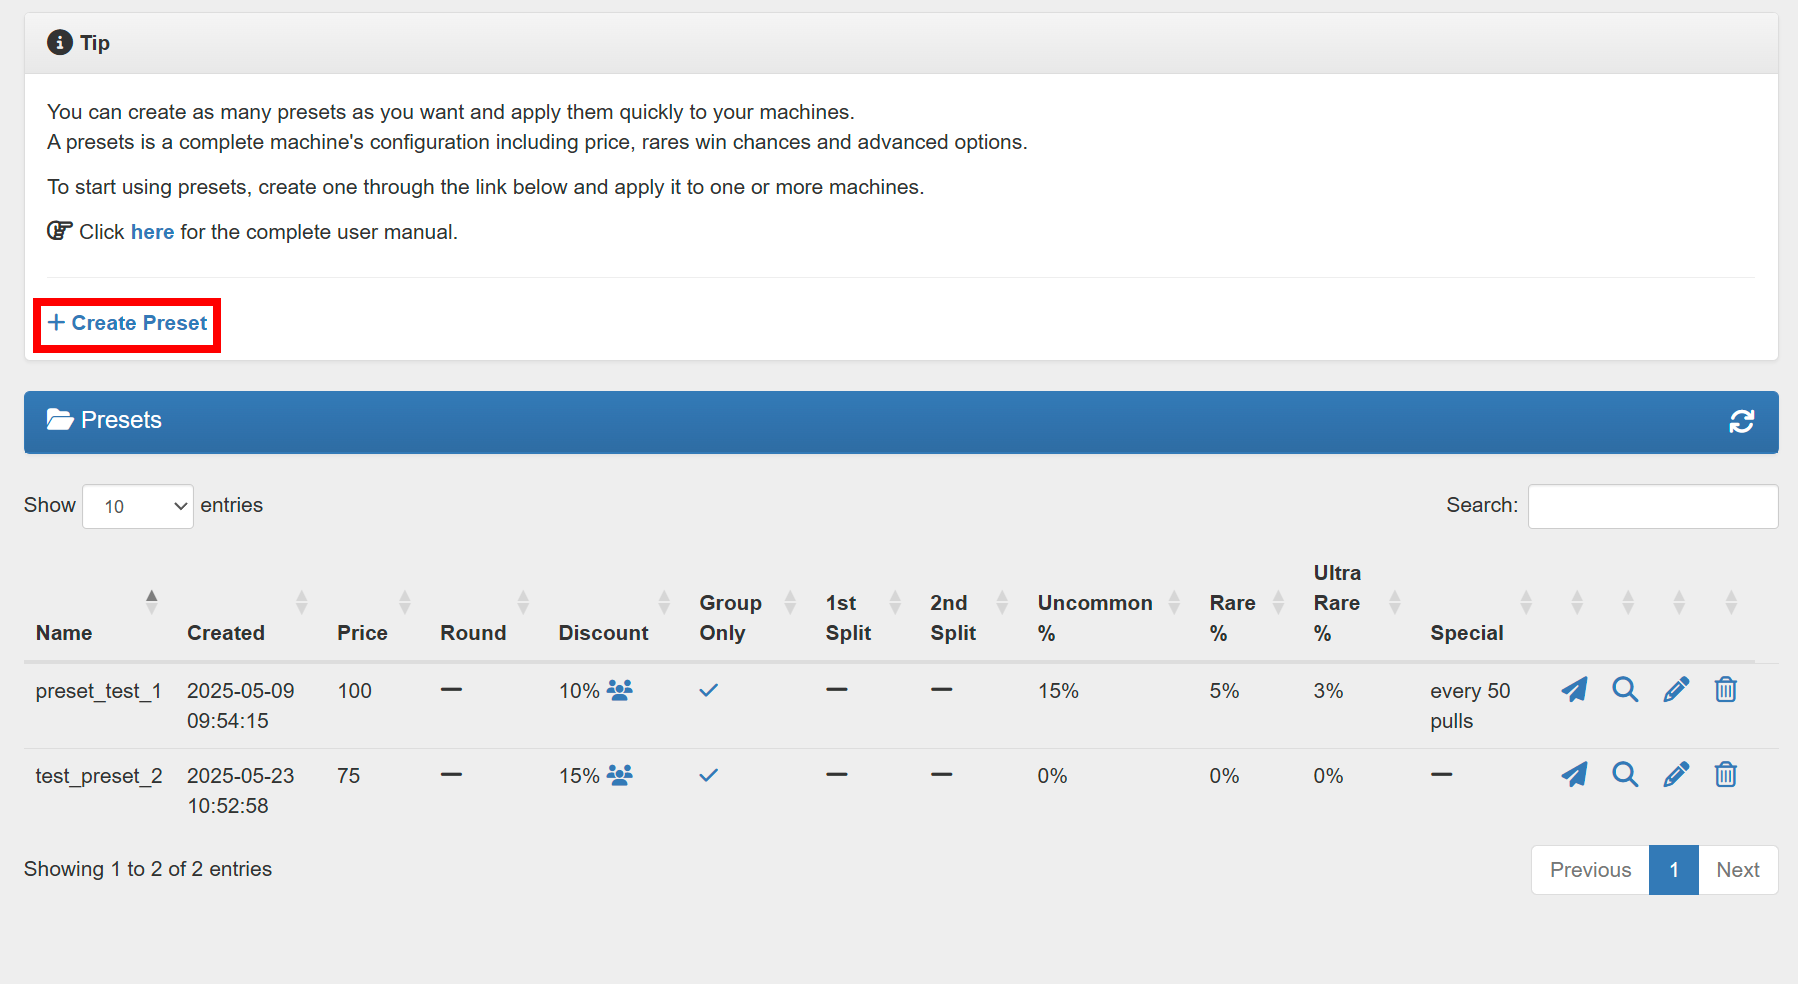
Clicking on the ‘Create Preset’ link will open the preset creation wizard and guide the owner to create new presets; the wizard itself is divided into three main tabs each one containing a different set of options useful to customise the preset generated. Below here is reported – for each tab of the wizard – which options are available, however no detailed explanation of those options will be given as they were already vastly discussed in the previous chapters.
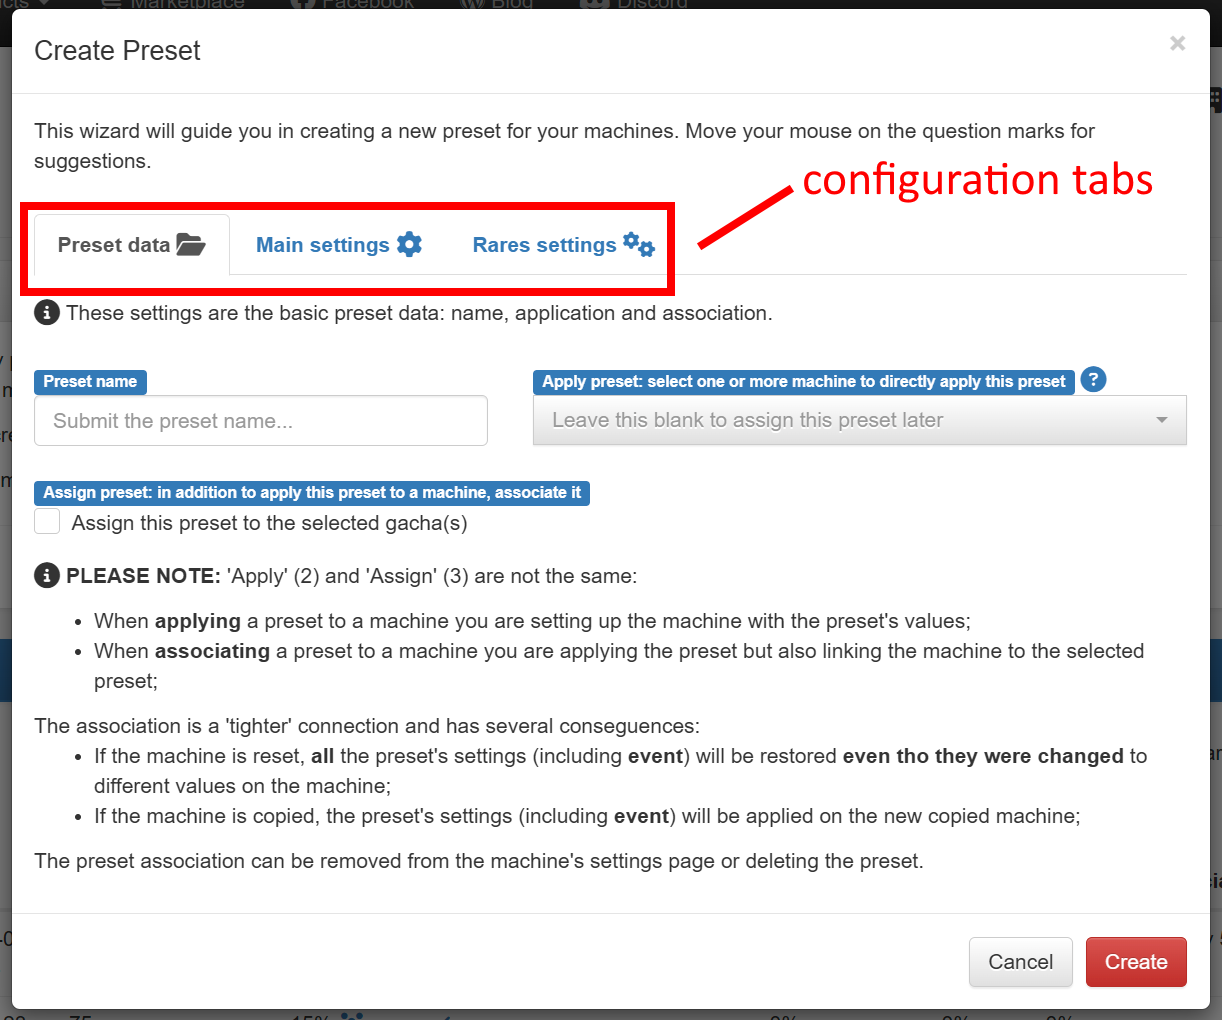
The first tab present into the preset creation wizard is called ‘Preset Data‘ and contains the following options:
- Preset name;
- Apply preset;
The second tab present into the preset creation wizard is called ‘Main settings‘ and contains the following options:
- play price;
- gacha’s event round;
- 1st Split %;
- 2nd Split %;
- Discount;
- Group only;
PLEASE NOTE: it is not mandatory to fill all the fields, but only the ones corresponding to the features that will be used by the machines. If – for example – there is no need for the split feature, then the split fields will have to be left empty and ignored.
The third tab is called “Rares settings” and contains all the features regarding the rare items:
- uncommon items win chance;
- rare items win chance;
- ultra rare win chance;
- special item’s number of pull required;
Once all the required settings are provided, clicking the “Create” button will create the preset defined as specified in the wizard. All the presets are listed under the ‘Presets‘ panel.
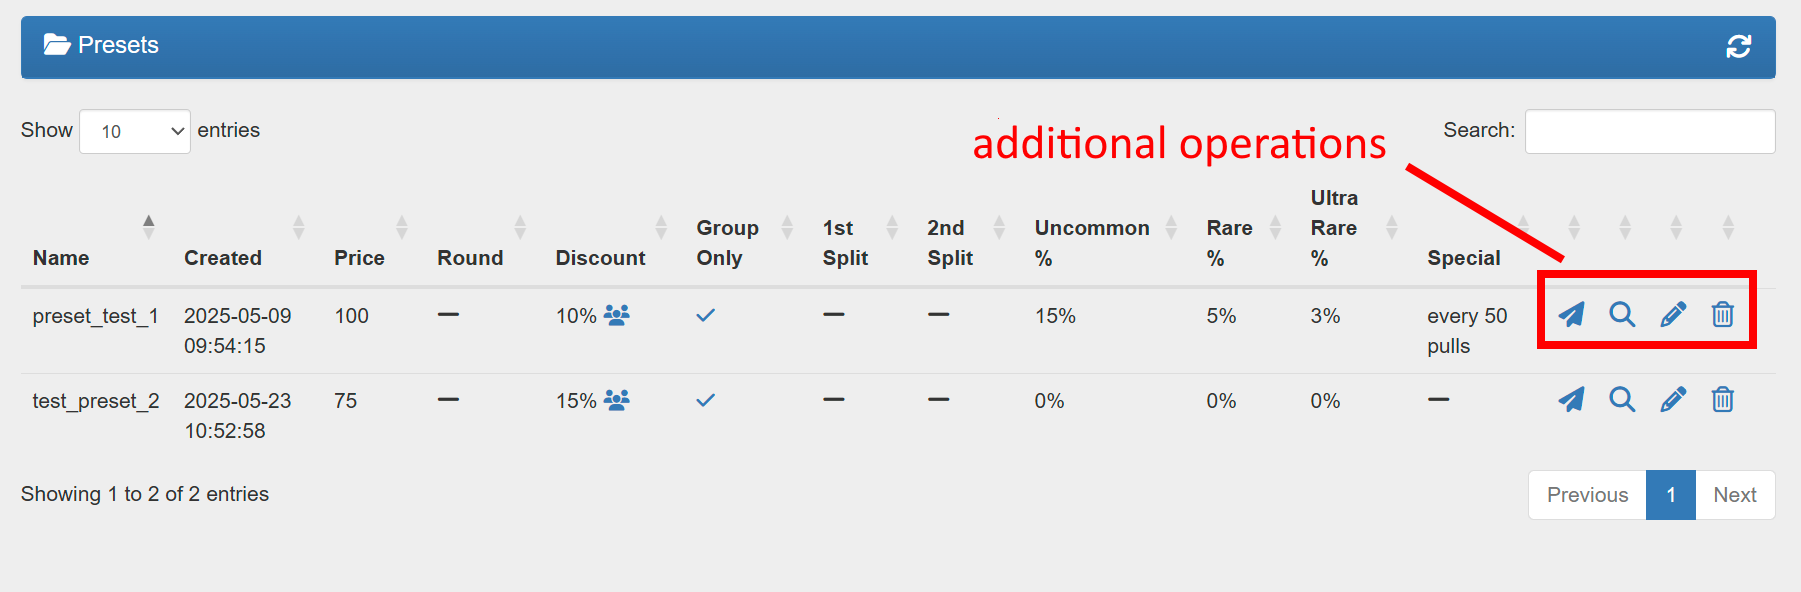
For each preset listed there is a three-dot icon allowing the owner to access additional operations to perform on the corresponding preset:
- Apply Preset (paper plane icon): apply the corresponding preset to one or more gachas. Optionally the owner can decide to associate the preset to all the selected gachas;
- Find Associated Gachas (magnifier icon): this button will list all the machines associated to the corresponding preset;
- Edit Preset (pencil icon): this button will open the edit wizard. The owner can edit the preset configuration and once saved it will be applied automatically to all associated gachas;
- Delete Preset (trash bin icon): this button will delete permanently the preset from the system. Moreover, if the preset has one more gachas associated to it, the association will be removed as well;
Chapter #7.12.1: Understanding presets – apply vs associate
When creating, editing or applying a preset to one or more gacha the owner is asked to choose how the bound between gachas and preset should be performed between two options: ‘apply‘ and ‘associate‘.
Understanding the meaning of these actions and the effects having on the machines is very important to avoid wrong setup and mistakes.
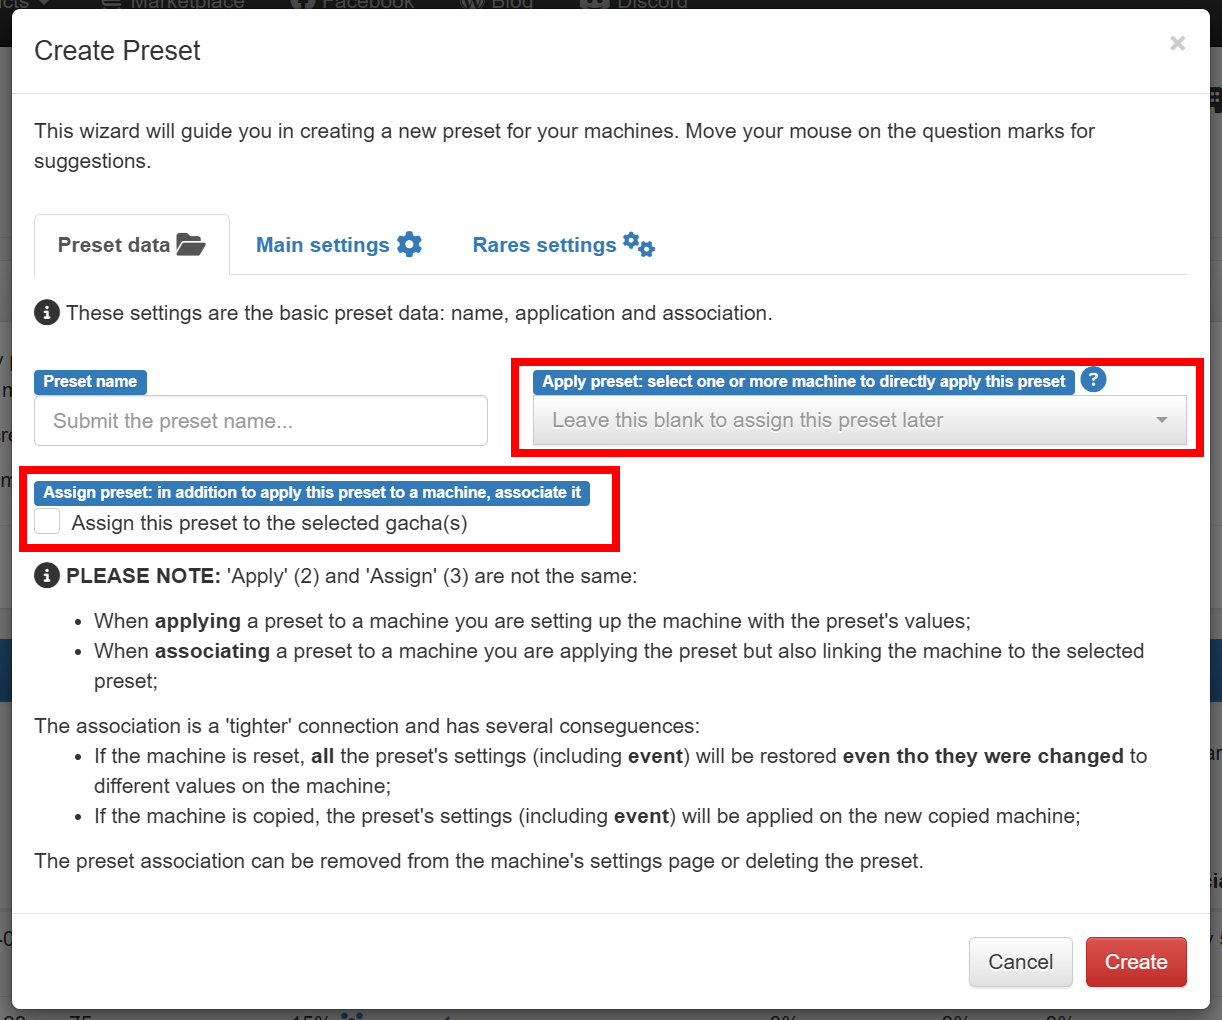
Apply a preset: when the owner applies a preset to a gacha the preset’s configuration (price, rares, options, etc) is sent to the machine and the values applied to it. The gacha will keep using the preset’s configuration until it will be reset; the machines will revert its configuration to the one prior of the preset in case of reset.
Associate a preset: on top of applying a preset to a gacha, the owner can also associate it. In this case the preset’s configuration (price, rares, options, etc) is sent to the machine and the values applied to it and also saved as the gacha’s default configuration. In case of reset, the machine will not restore its prior configuration but restore the preset’s configuration.
Two more aspects about gachas associated to a preset must be considered since very important:
- even if the owner will edit the gacha’s configuration (i.e. price), once the gacha is reset, the preset’s configuration will be applied again overwriting the changes the owner made.
! IMPORTANT: it is a good practise to avoid applying a preset to a gacha – associating it also – then change the machine’s settings leaving the gacha associated to the preset because the machine’s configuration will be reverted to the associated preset in case of reset.
2. if the owner creates a copy of a gacha having a preset associated, the new copy will have exactly the same configuration as the preset the original gacha was associated to.
! IMPORTANT: it is a good practise to avoid creating copies of machines being associated to a presets.
Chapter #7.13: Managers tab
!IMPORTANT: this feature is available ONLY for MD Gacha Machine Script (advanced).
The next tab on MD Gacha Machine homepage is called ‘Managers‘ and allows the owner to add, manage and remove one or more store’s managers; a manager will be able to access the MD Gacha Machine homepage just like the store’s owner and – depending on the permissions granted – interact in several ways with the machines.
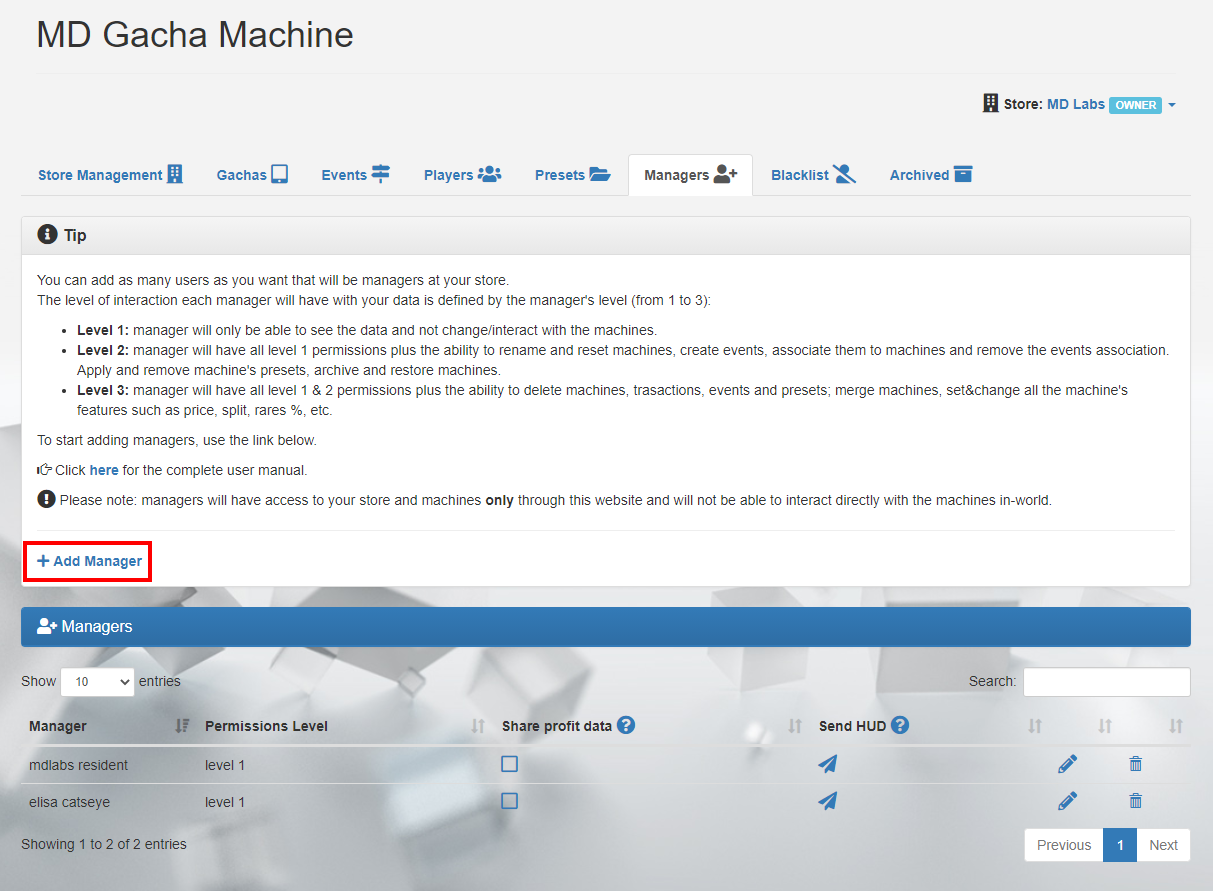
This tab is composed my two main panels ‘Tips’ and ‘Managers’; the first one contains a link to add a new manager while the second panel lists all the managers. Each manager has a specific level of permissions that can vary from level 1 to level 3. Lower level (1) means less permissions, while higher level (3) means more permissions; also, some actions can be performed only by the owner or the store partner. The next chapter reports the complete list of all permissions divided by level.
In order to add a new manager the owner will have to click on the ‘Add Manager‘ link in the ‘Tips’ panel; a wizard will appear and require a few simple steps:
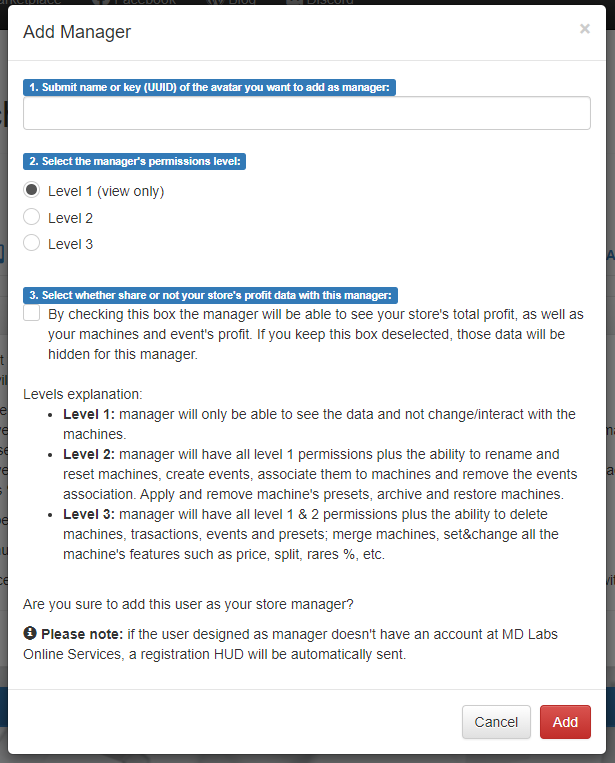
The first thing is provide the manager’s name or key (UUID); then select a permission level and whether share or not the store’s profit data. Once these info are provided, clicking on the ‘Add’ button will add the selected user as store’s manager. The manager will be immediately listed in the ‘Managers ‘ panel which can be found into the ‘Managers’ tab; from here it will be possible to change the manager’s level, toggle the share store’s profit and also remove the manager.
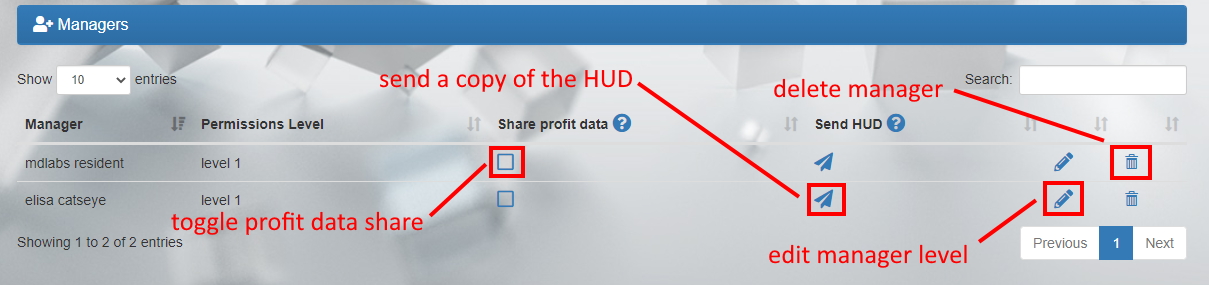
The ‘Managers’ panel – located into the Managers tab – contains the following data:
- Manager Name: the name of the manager;
- Permission Level: the permission’s level of the corresponding manager;
- Share profit data: this button acts as a toggle, enabling and disabling the share of the store profit with the corresponding manager;
- Send HUD (paper plane icon): this button delivers a new copy of MD Gacha Machine registration HUD to the corresponding manager. More info further down on this page;
- Edit Manager Level: this button opens a wizard that allows the owner to change the manager’s permission level;
- Delete Manager (trash bin icon): this button removes completely the manager from the store’s managers list, forbidding the deleted manager to access the store’s page;
Independently by the permissions level, there is another important setting that characterizes each manager: the share profit data. As said, this option does not depend by the permissions level, but the store owner has to declare it when adding a new manager, and can optionally change it anytime. The share profit data is a flag that can either be set to true or false:
- if true, the manager will be allowed to see the store’s total profit, and all the machines’s profit.
- if false, the manager will not be able to see the store’s total profit and all the machines’s profit.
This is made to protect the owner’s privacy, since not always a store owner is willing to share the store’s profit data with the managers. The share profit data setting can be changed anytime by the owner only, and the changes will be applied immediately to the corresponding manager.
Is important to spend a few more words on the registration HUD for MD Labs Online Services. In order to login and access the store, the managers must be registered to MD Labs Online Services; if the user selected as manager already uses MD Gacha Machine then an account is already registered and the users will be able to use the same credentials to login to the store to manage. Conversely, if the user selected as manager doesn’t use MD Gacha Machine then the creation of an account is required and a registration HUD will be automatically sent to the user once added as manager. It is also possible to repeat the HUD dispatch in another moment through the corresponding option in the managers list.
Once added as manager, the user will be able to switch between stores through the “Store” drop down present into the ‘MD Gacha website‘; from here the drop down will present a list of all stores owned and managed by the user, and a click on them will start the switch process to the selected store.

Chapter #7.13.1: Manager levels and permissions
Every manager – when added – has a specific level of permissions which reflects the various operations that can be performed; the level can vary from 1 (lower level) to 3 (higher level). Moreover, some actions can be performed only by the owner or the store partner.
Here below are listed all the permission for managers along with the minimum level required:
| Permission | Minimum level required |
| rename machine | 2 |
| delete machine | 3 |
| delete multiple machines | 3 |
| create even/round | 2 |
| remove event/round | 2 |
| delete event/round | 3 |
| archive machine | 2 |
| restore machine | 2 |
| merge machines | 3 |
| apply preset to machines | 2 |
| delete preset | 3 |
| delete pull | 3 |
| delete multiple pulls | 3 |
| send HUD to manager | 2 |
| apply round to machine | 2 |
| add user to blacklist | 3 |
| remove user from blacklist | 3 |
| edit gacha’s settings | 3 |
| archive multiple gachas | 3 |
| edit round | 2 |
| remove round from machine | 3 |
| move round | 3 |
| rename event/round | 3 |
Chapter #7.14: Blacklist tab
The ‘Blacklist‘ tab allows the owner to block one or more users, preventing them to interact with the store’s machines; this feature is designed to help store owners against impolite or rude users having an unfair attitude, like copybotters or cheaters.
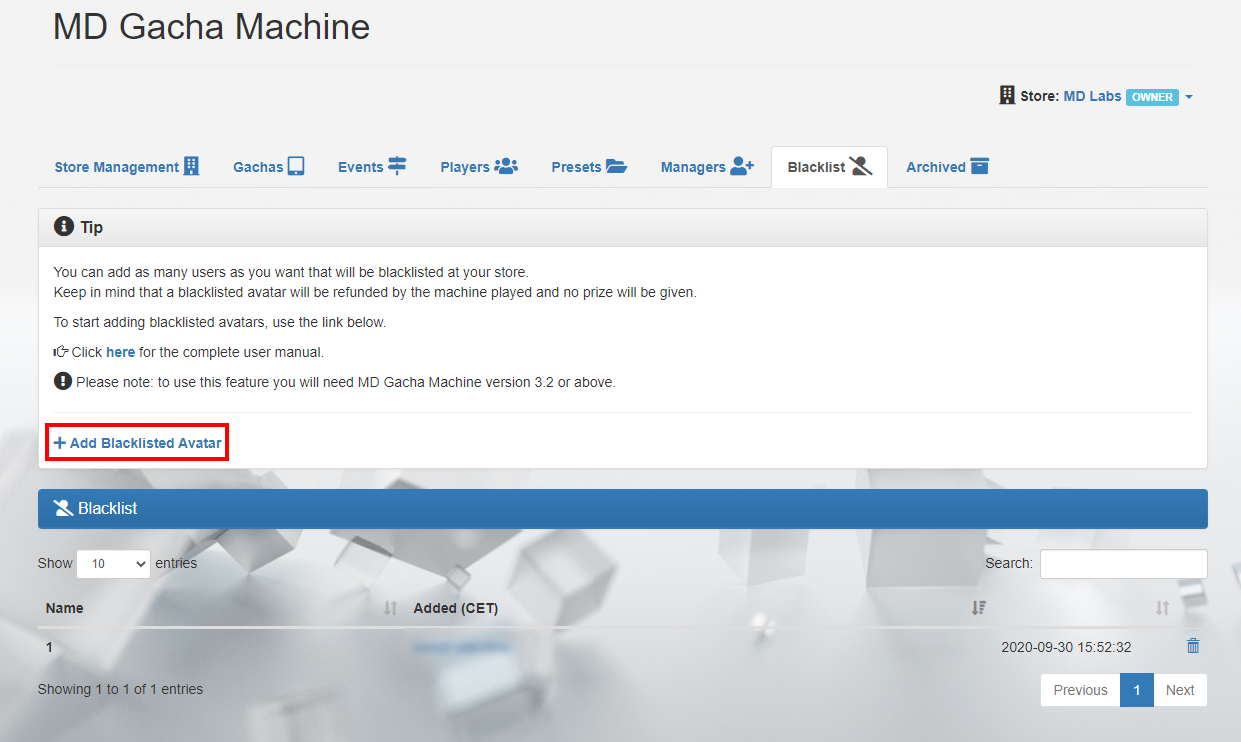
The tab is composed by two different panels called ‘Tips’ and ‘Blacklisted avatars’; the ‘Tips‘ panel contains a link called ‘Add Blacklisted Avatar’ that will open a simple wizard to add a new blacklisted avatar; the only required data in this process is the name or key (UUID) of the avatar to blacklist.
IMPORTANT: as described in the initial chapters of this manual if a blacklisted avatars tries to play a gacha machine the transaction will be canceled, no prize will be delivered and the avatar will be refunded of the amount paid.
Once the avatar is added as blacklisted it will be listed into the ‘Blacklisted avatar’ panel, this panel shows a few data about the blacklisted avatars:
- Avatar name: the name of the blacklisted avatar;
- Added: the date-time when the avatar was added into the blacklist;
- Delete avatar (trash bin icon): a button that will remove the corresponding avatar from the blacklist, allowing it to interact with again with MD Gacha Machine;
Chapter #7.15: Archived tab
The last tab which composes the MD Gacha Machine homepage is called ‘Archived‘ and groups together all the machines which are not rezzed anymore and which have been archived by the owner. The archive feature has been designed to help store owners to keep their data consistent while reducing the amount of information displayed; by archiving a gacha– in fact – it will be removed from in-world and from the ‘Gachas’ tab on MD Labs Online Services, but all the machine’s data such as total profit, total item sold and the complete transaction list is kept.
This action brings several benefits to the store owner:
- There will be less machines displayed into the ‘Gachas’ tab, making it easier to find the gacha desired;
- Since all the machine’s data is kept there will still be statistics about the archived gachas;
The main panel present in this tab is called ‘Archived Gachas’ and lists all the machines which have been archived by the owner.

The data showed for each gacha is very similar to the one present in the ‘Gachas’ tab, except the additional operations which are accessible clicking on the 3-dot icon. The first operation is called ‘Restore’ and it allows the owner to restore an archived machine, moving it from the ‘Archived’ tab to the ‘Gachas’ one; while this action moves the machine’s data from one tab to another on MD Labs Online Services website, it will not restore the gacha in-world if it has been already deleted. The second option, ‘Delete’, removes completely the machine’s data; once done all the statistics will be lost including the transactions lists.
2025 MD Labs