Summary:
- Chapter #1: Overview & Setup
- Chapter #2: Demo Item
- Chapter #3: Fatpack Item
- Chapter #4: Multi-item vendor
Chapter #1: overview & setup
! IMPORTANT: The following user manual presents and explains the usage and detailed features of:
- MD Vendor System Plugin – Demo & Items version 2.1.0
Demo & Items plugin extend the vendor’s ability to handle different type of items such as:
- Handle one or more demo items, that will be given for free to users clicking on the “Demo” button in the vendor’s user menu;
- Handle multiple “normal” items, that users will be able to select via the user menu and decide to buy or gift;
- Handle one fatpack item, with custom price, that users will be able to buy or gift using the user menu;
- Create a multi-item panel vendor able to display each product with its corresponding advertising. Users will be able to scroll and decide which product buy or gift;
Installing a plugin is very easy and quick: the owner will only have to drop the plugin script inside the vendor and the plugin will be automatically detected and initialized; a message sent on chat will notify the owner of the successful installation. From that moment, the plugin’s specific features will be available through the “Plugin” sub menu present in the vendor’s owner menu.
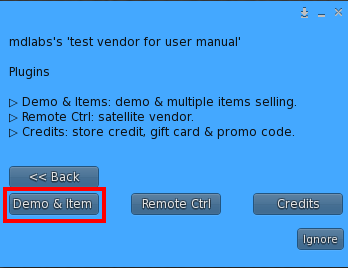
Once the plugin is successfully installed on the vendor the owner can access the plugin’s specific settings using the “Plugins” sub menu that can be found in the owner menu. By clicking on the corresponding ‘Demo & Items’ button, the plugin’s specific menu will load, presenting all the available options:
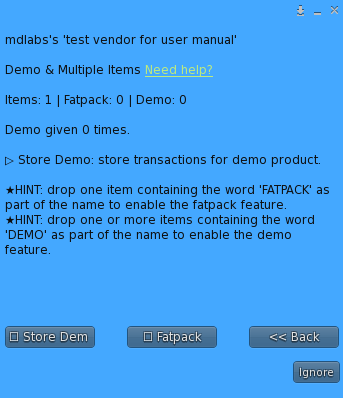
- Store Demo: when this option is enabled, MD Vendor System will store on MD Labs Online Services website also transactions for demo items.
- Fatpack: enabling this option will open a dialog window where the owner will be asked to provide the fatpack’s price in L$. Any integer value greater than 0 will be accepted.
- Back: this button navigate back to the main menu.
PLEASE NOTE: the plugin is aimed to expand the vendor’s feature, for this reason MD Vendor System ‘core’ script must always be present inside the vendor to use the plugin.
To uninstall the plugin simply remove it from the vendor’s content and the vendor will automatically update, removing the additional features.
Chapter #2: Demo item
One of the feature coming with the Item & Demo Plugin is the ability to add one or more demo items inside the vendor, which users can request and receive.
This feature rely on a naming convention to be respected in order for the script to automatically detect the products present inside the vendor’s content. A demo item in fact will have to contain the keyword ‘DEMO‘ in its name in order to be automatically identified by the MD Vendor System and used properly.
PLEASE NOTE: the keyword can be in any part of the item’s name, but it’s mandatory to write it with capital letters and without quotes.
As reference, here’s a couple of examples for demo items:
- DEMO Mesh rigged hair; (correct)
- Mesh rigged hair DEMO; (correct)
- (DEMO) Mesh rigged hair; (correct)
- Mesh rigged hair [DEMO]; (correct)
- DEMO! MESH RIGGED HAIR; (correct)
- Mesh hair DEMO rigged; (correct)
- demo Mesh rigged hair; (wrong)
- Mesh rigged hair Demo; (wrong)
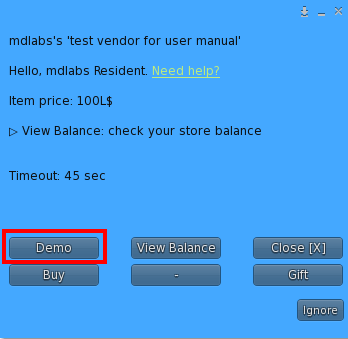
Once one or more valid demo items are dropped inside the vendor, an additional button named “Demo” will appear inside the user menu; by clicking it, the user will receive a folder containing all the demo items.
Chapter #3: Fatpack item
Demo & Items Plugin is also able to automatically detect and manage one fatpack item inside the vendor and sell it along with one or more ‘normal’ item; of course the fatpack price will differ from the other item’s price.
PLEASE NOTE: when it comes of selling a fatpack within a vendor, MD Vendor System – Demo & Items Plugin is required only if the vendor iteself contains at least another ‘normal’ (non-fatpack) product. If the vendor is supposed to sell only the fatpack item the plugin is not required and the vendor can be setup as a single-product one, with the fatpack item inside and simply making sure the fatpack item is not named using the reserved keyword. This chapter covers the scenario where a vendor contains one fatpack item and one or more ‘normal’ item.
Similarly as for the Demo, this feature rely on a naming convention to be respected in order for the script to automatically detect the products present inside the vendor’s content. A fatpack item in fact will have to contain the keyword ‘FATPACK‘ in its name in order to be automatically identified by the MD Vendor System and used properly.
PLEASE NOTE: the keyword can be in any part of the item’s name, but it’s mandatory to write it with capital letters and without quotes.
As reference, here’s a couple of examples for fatpack item:
- FATPACK Mesh rigged hair; (correct)
- Mesh rigged hair FATPACK; (correct)
- (FATPACK) Mesh rigged hair; (correct)
- Mesh rigged hair [FATPACK]; (correct)
- FATPACK! MESH RIGGED HAIR; (correct)
- Mesh hair FATPACK rigged; (correct)
- fatpack Mesh rigged hair; (wrong)
- Mesh rigged hair Fatpack; (wrong)
- FatPack Mesh rigged hair; (wrong)
Once the fatpack item is dropped inside the vendor and correctly detected, the owner should set the price for it through the “fatpack” toggle into the Demo & Items Plugin menu.
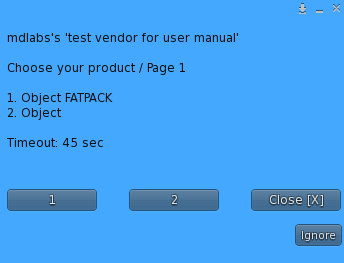
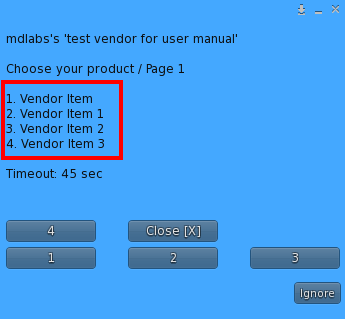
As this last step is complete and the vendor is set for sale, the users clicking on the vendor and selecting “Buy” or “Gift” will be prompted to a product selection dialog listing all the items inside the vendor, including the fatpack:
HINT: To disable the fatpack feature owner will have to either remove the corresponding fatpack item from the vendor’s content or uncheck the “Fatpack” option present inside the Demo & Items plugin configuration menu.
Chapter #4: Multi-item vendor
The last feature added by the Demo & Items plugin is the ability to sell multiple “normal” (not fatpack, nor demo) products within the same vendor.
PLEASE NOTE: when selling multiple “normal” items within the same vendor, all of them will have the same price set using the “Price” button present in the owner menu. MD Vendor System does not support different prices for different “normal” items.
IMPORTANT: the plugin is aimed to expand the vendor’s feature, for this reason MD Vendor System ‘core’ script MUST always be present inside the vendor to use the plugin.
The owner can take advance of the multi-item vendor feature in two ways:
- using the MD Vendor System and Demo & Items plugin inside a third-party vendor;
- using the MD Vendor System and Demo & Items plugin inside the MD Multi-Item Vendor Panel, provided with MD Vendor System;
When using a third-party vendor as multi-item vendor, the owner should just drop all the items inside the chosen device/vendor, select a price and set the vendor for sale. The users will have to click to access the vendor’s menu and they will be asked to select which item to buy or gift. Once the choice is made, the purchase flow goes on as described in the previous chapters.
Chapter #4.1: Multi-item vendor with MD Multi-Item Vendor Panel
MD Multi-Item Vendor Panel offers a very efficient way to sell multiple products within one vendor, adding a few extra features such as:
- product’s image preview;
- scrolling through products;
- dedicated menu & demo button;
MD Multi-Item Vendor Panel is included inside the MD Vendor System (Full Pack) and it has a land impact (LI) of 3 prims.
IMPORTANT: in order to take advantage of the features listed above, MD Multi-Item Vendor Panel is required. MD Vendor System Demo & Items plugin is not compatible with other multi-item panel vendors other than MD Multi-Item Vendor Panel. AO maps are provided for a deeper customization of the vendor panel.
MD Multi-Item Vendor Panel looks like the following:
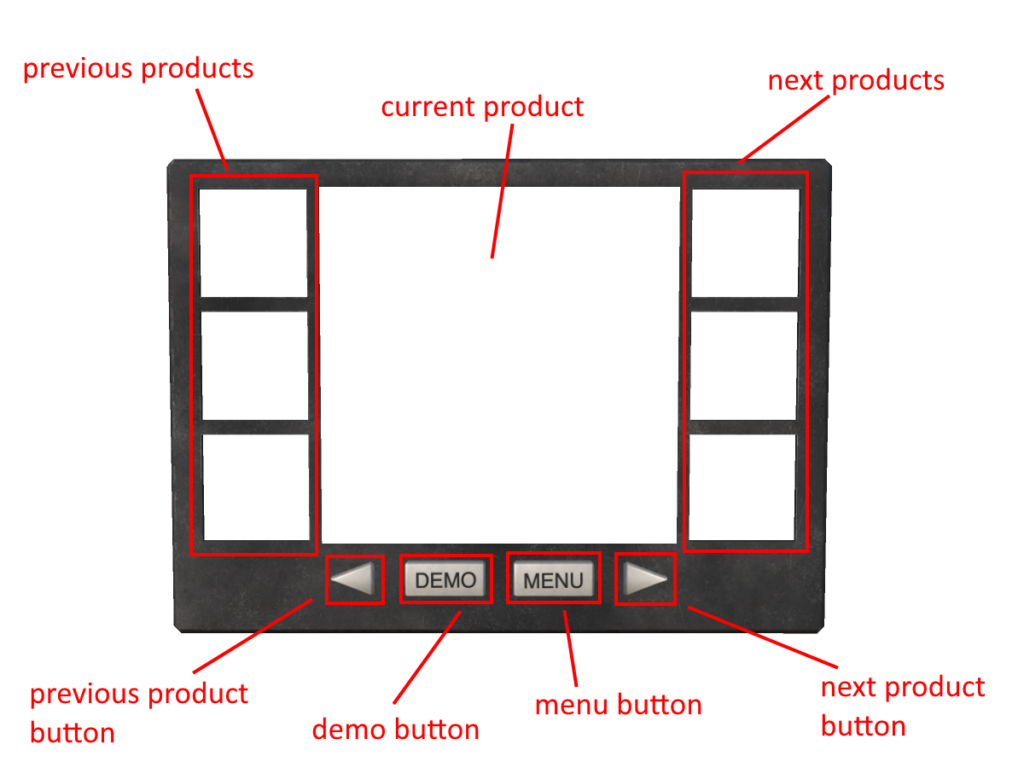
- previous/next product button: scroll through the products;
- demo button: give the demo item (if present);
- menu button: open the user’s menu;
- previous/next products: display the preview of previous/next products. These panels are clickable and will bring the selected product in the main frame;
- current product: product selected by the user;
The user can either use the scroll buttons to select the desired product and make it appear in the central frame, or directly click it from the previous / next products preview frames. Once the selected product is displayed on the central frame, the user can pay the vendor directly using the right click>Pay option or click on the menu button to get the vendor’s menu and proceed with the purchase.
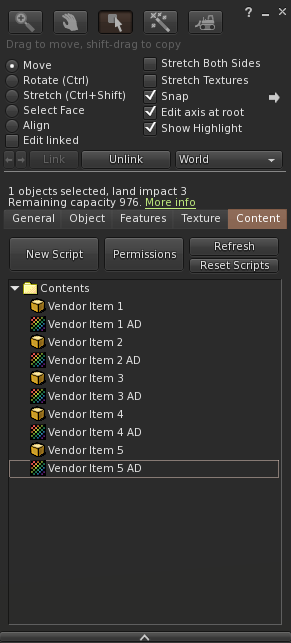
MD Multi-Item Vendor Panel is able to automatically display the image of both the selected product and the previous/next ones in the corresponding frames; in order to benefit of this feature a simple naming convention has to be followed: the product image has to be named the same as the product but ending with “ AD” (no quotes). So, for example, if a product is named “Product 1”, the corresponding advertising image must be called “Product 1 AD” in order to be displayed automatically when the product is selected.
Given as example the products named “Vendor Item 1”, “Vendor Item 2”, etc, the MD Multi-Item Vendor Panel’s content would be looking like this:
2020 MD Labs ©