Summary:
- Chapter #1: initial setup
- Chapter #2: owner menu
- Chapter #3: basic usage
- Chapter #4: greeter
- Chapter #5: options
- Chapter #6: users
- Chapter #7: appearance
- Chapter #8: MD Labs Online Services
- Chapter #8.1: register an account and activate the product
- Chapter #8.2: MD Visitors Tracker homepage
- Chapter #8.3: Basic info & additional operations
- Chapter #8.4: Tracker’s details: arrivals
- Chapter #8.5: Tracker’s details: statistics
- Chapter #8.6: Tracker’s details: managers&whitelist
- Chapter #8.7: Tracker’s details: settings
- Chapter #8.8: Visitors tab
- Chapter #8.9: Managers tab
- Chapter #8.10: Whitelist tab
- Chapter #8.11: Smartbots tab
- Chapter #8.12: Archived tab
Initial notes
! IMPORTANT: The following user manual presents and explains the usage and detailed features of:
- MD Visitors Tracker & Greeter version 3.2.0
- MD Visitors Tracker & Greeter (Bulb) version 3.2.0
- MD Visitors Tracker & Greeter (Notepad) version 3.2.0
- MD Visitors Tracker Board & Greeter version 3.2.0
When some of the features are available only for a specific version, will be clearly stated.
Chapter #1: initial setup
The setup of MD Visitor Tracker is very easy and quick: the owner will have to simply rez the tracker in-world and wait a few seconds for the automatic setup to complete; after that when the owner clicks on the tracker a dialog menu will appear, called “owner menu”: this dialog -accessible by the owner and the designed managers only – allows to enter the visitor tracker’s configuration settings and features.
The basic setup for the visitor tracker is complete.
Chapter #2: owner menu
Once the MD Visitors Tracker’s setup is complete, a click of the owner on it will open a menu called ‘owner menu’; this dialog is accessible by the owner and managers and contains all the settings and options of the tracker.
This menu is divided in many section, some of them leading into other sub menus:
- Active: this button turns the tracker on/off, enabling or disabling the scan of the area specified;
- Greeter: this button leads to a sub-menu where it is possible to define how the tracker will greet new visitors. More details in the dedicated chapter;
- Options: this button leads to a sub-menu where it is possible to find all the additional settings, from how often the tracker will can the area (scan time), to the definition of the area to scan (scan area), to notifications and automatic reporting. More details in the dedicated chapter;
- Users: this button leads to a sub-menu where it is possible to define and manage a list of avatars who can interact with the visitors tracker and also who should be excluded from the area scan. More details in the dedicated chapter;
- Appearance: this button leads to a sub-menu containing several options to change the tracker’s appearance, from hover text to visibility; depending on the type of tracker, some options may or may not be available. More details in the dedicated chapter;
- List Visitors: clicking on this button will present a list of all the latest visitors;
- Update: pressing this button will start the update module and search for a new product update;
- Reset: pressing this button will reset the MD Visitors Tracker;

Chapter #3: basic usage
The basic usage of the MD Visitor Tracker is very simple: once rezzed it’s immediately ready to work and clicking on the ‘Active’ button will start the scan of the area for visitors. By default, the tracker will work with these settings, that can be customised anytime:
- Scan area type: spheric area;
- Scan area range: 20 meters;
- Scan time: 30 seconds;
- Visitors greeting: off;
- Notifications: owner only;
- Report: daily at midnight SLT;
With these values the tracker will scan every 30 seconds a spheric area of 20 meters; if new avatars are found, an IM will be sent to the owner, reporting the name of the visitor and the visit date-time; also, at midnight SLT the daily visitors list will be sent to the owner via IM.
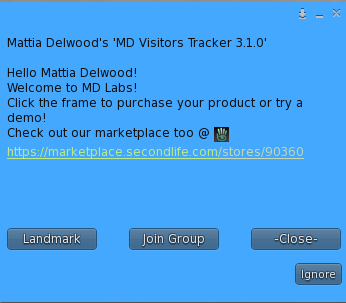
Please note: by default, no greet message nor item (landmark, notecard, object) is sent to the visitors. You can change this behaviour through the corresponding features in the ‘Greeter’ sub menu.
Chapter #4: greeter
The greeter submenu can be reached from the owner menu and is used to define every aspect about how the tracker will greet the new visitors: from the greet message sent to the type of items to offer to new visitors, from how often the same visitor should be greeted again after the first time.
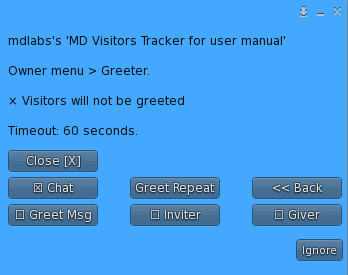
- Greet Msg: enabling this feature allows the owner to define a message that will be sent as greeting to every new visitor. Due to several limitations, messages set from the in-world tracker can be maximum 160 characters long;
- Inviter: once this option is enabled the visitors tracker will include a group invitation message when greeting new visitors; the group is retrieved automatically from the tracker’s current group and the owner can change this setting anytime simply by changing the tracker’s group which can be found under right-click > Edit >General tab. The group invitation will be sent only to avatar who aren’t currently wearing the same group tag;
- Giver: this button will open a secondary menu where the owner is asked to select one or more type of item which the tracker will offer to each new visitor; the choice can be make among three different item types: notecard, object and landmark.
- IMPORTANT: before enabling this feature the owner has to drop one item of the corresponding type into the tracker’s content.
- Chat/Window: this button acts as toggle and lets the owner define whether new visitors should be greeted receiving a local message or a dialog window to interact with.
- In case the toggle is set to “Chat” each new visitor will receive:
- The greeting message on local (if set);
- A group invitation message on local chat (if set);
- A notecard offer (if set);
- An item offer (if set);
- A landmark offer (if set);
- In case the toggle is set to “Window” each new visitor will be prompted a dialog window containing:
- The greeting message (if set);
- A “Join Group” button (if set);
- A “Notecard” button (if set);
- An “item” button (if set);
- A “Landmark” button (if set);
- In case the toggle is set to “Chat” each new visitor will receive:
- Greet Repeat: this last feature of the “Greeter” module allows the owner to define an interval (in hours) before which the same avatar visiting is greeted again; this setting is useful to avoid ‘spamming’ returning visitors with constant greeting messages and item offers. To enable this feature the owner is asked to submit a value – in hours – between 0 (every time) and 168 (once a week);
Chapter #5: options
The options submenu contains several specific options and features to customise even more MD Visitors Tracker and increase the overall experience.
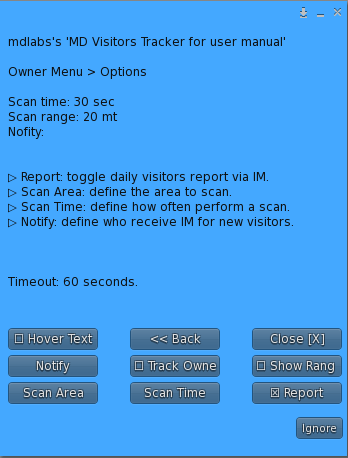
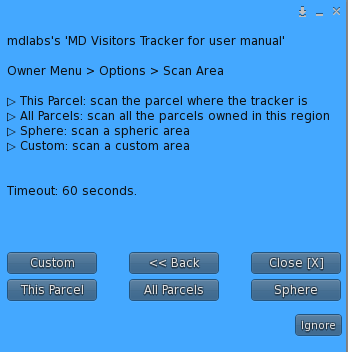
- Scan Area: the scan area defines the type and dimension of the area under tracking; MD Visitors Tracker is able to manage four different types of area:
- Current Parcel: selecting this option the tracker will scan the whole parcel where the MD Visitors Tracker is currently rezzed;
- All Parcels: selecting this option the tracker will scan all the parcels – belonging to the owner – in the region where the MD Visitors Tracker is currently rezzed;
- Sphere area: this option configures the tracker to scan a spheric area and the owner is asked to submit the sphere’s dimension in meters, from 1 to 4095; Please note: when using a spherical shape, the effective scan area distance consist of the radius, which is at max scan range/2.
- Custom area: this option allows the owner do define a custom-sized area for the tracker to scan; more information on how to create a custom scan area can be found in the dedicated chapter.
- Scan Time: the scan time defines how often the MD Visitors Tracker will scan the area for new visitors; by default, the scan time is set to 30 seconds. Using this button the owner can change the scan time to any value between 20 and 300 seconds. !IMPORTANT: minimum scan time is 20 seconds and it cannot be set to a lower value.
- Report: this button is a toggle to enable or disable the report feature, which sends the owner an automatic IM containing the daily visitors list. To enable this feature the owner will have to select a specific hour (in SLT) for the tracker to send the daily report, picking among:
- Midnight (SLT);
- 3AM (SLT);
- 6AM (SLT);
- 9AM (SLT);
- Noon (SLT);
- 3PM (SLT);
- 6PM (SLT);
- 9PM (SLT);
- Notify: through this option is possible to define who among the owner and managers will receive notification IM when one or more visitors are found by the tracker; when activating this feature, the owner is asked to choose among several options:
- Owner: only the owner will receive notifications about new visitors;
- Managers: only the designed managers will receive notifications about new visitors;
- Everyone: both owner and managers will receive notifications about new visitors;
- Track Owner: when this option is enabled, the MD Visitors Tracker owner will be greeted and tracked just as a normal user.
- Show Range: once enabled, this option will show the scan range as a semi-transparent sphere around the MD Visitor Tracker; this is useful to get a visual idea of the area under the tracker’s control. PLEASE NOTE: this option is available only if the scan area is set to spheric.
- Hover Text: through this option is possible to set a custom text to be displayed on the MD Visitor Tracker as hover text; after clicking, the owner will be asked to submit a valid text. Once the hover text is set, clicking on the button again will disable it.
Chapter #5.1: defining a custom scan area
Along with parcel, region and spheric area MD Visitors Tracker allows the owner to create a custom-sized scan area: this option is particularly useful when – for example – both a private platform/house and a public area (i.e. a store) are hosted on the same parcel and only visitors in the public area should be greeted and their visit tracked. In this case if the scan area is set to “parcel” the tracker will scan and greet also visitors coming to the private area, creating unwanted messages and confusion.
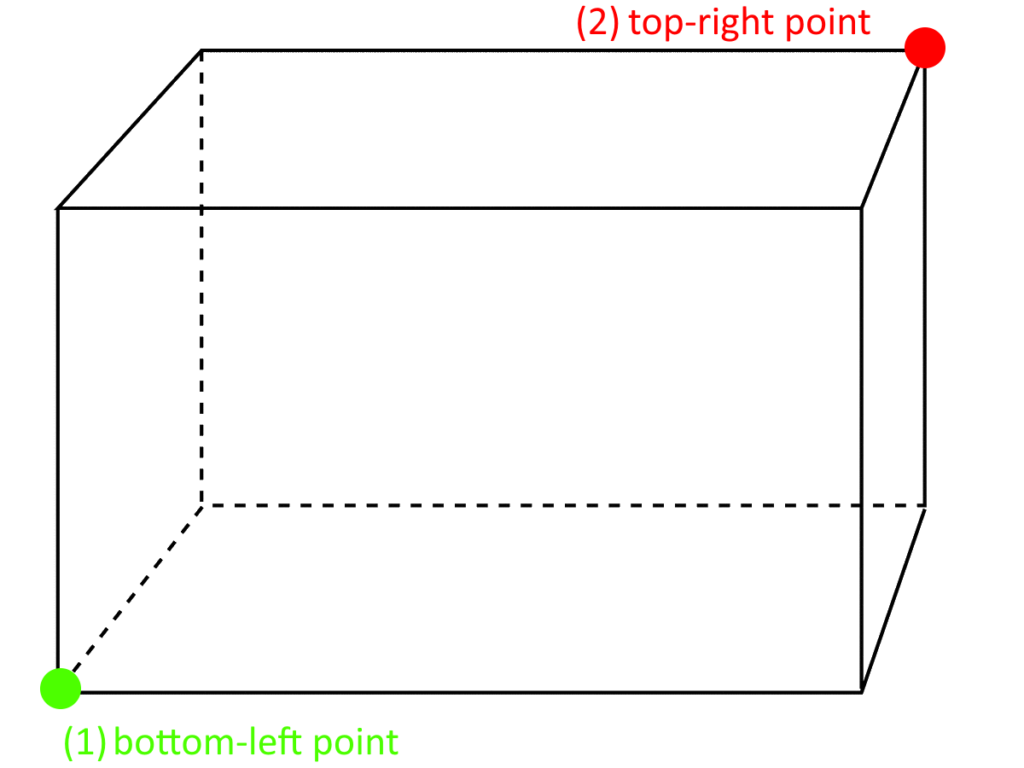
The owner is able to define a custom scan area: this area can be only square-shaped or rectangular-shaped and once created only avatars found inside the area will be greeted and tracked. The idea behind a custom area is that only two points in space (X,Y,Z) are required to define a 3-dimensional area:
- Bottom-left point;
- Top-right point;
Given these two point, the tracker is able to generate automatically a 8-point area which defines the 3D area to scan.
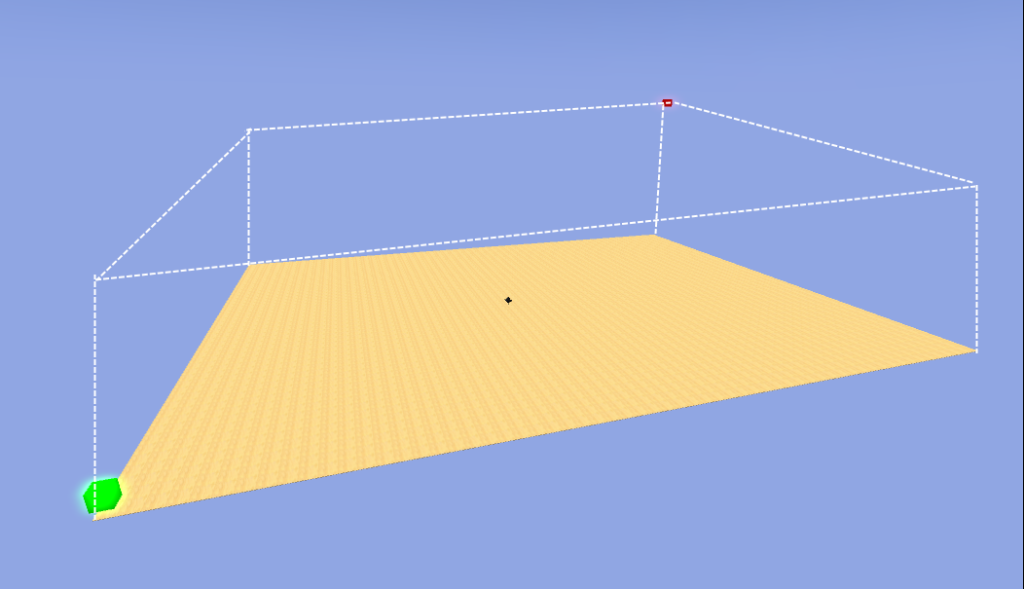
The creation of a custom scan area is guided by a simple setup wizard which can be summarised in the following steps:
- the owner selects “Custom” in the “Scan Area” submenu;
- MD Visitors Tracker will rez a green cube next to it which represents the marker for the bottom-left corner of the area;
- the owner will have to move and place the green cube in the bottom-left corner of the area to scan and click on it once satisfied with the position;
- a menu dialog will appear and the owner will have to click the “Set Marker” button;
- MD Visitors Tracker will rez a rede cube next to it which represents the marker for the top-right corner of the area;
- the owner will have to move and place the red cube in the top-right corner of the area to scan and click on it once satisfied with the position;
- a menu dialog will appear and the owner will have to click the “Set Marker” button;
- at this point, clicking on either the green cube or red cube again will display a dialog window and the owner will have to click on the “Create Area” to finalise the creation of the scan area;
- if the creation is done successfully, MD Visitors Tracker will automatically delete the marker cubes;
- the custom area is correctly defined and setup;
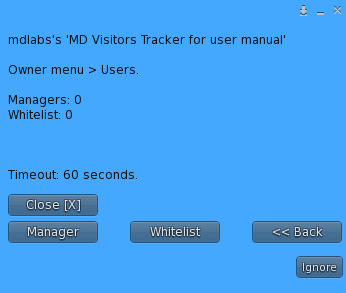
Chapter #6: users
The users submenu allows the owner to define and interact with groups of avatars whom will have a special roles and permissions for the MD Visitors Tracker: managers and whitelisted avatars.
There are two possible roles for MD Visitors Tracker users:
- Manager: an avatar designed as manager can interact with the MD Visitors Tracker in-world just as the owner and also access the dedicated MD Labs Online Services website;
- Whitelist: when an avatar is added in whitelist is automatically excluded from the tracker’s scan and therefore it will not be greeted nor the visit notified to the owner. Differently from the manager, an avatar in whitelist cannot interact with the MD Visitors Tracker in-world nor access the MD Labs Online Services website;
The steps for adding an avatar as manager or whitelist are very similar: the owner – after clicking on the “users” button – will have to select the role to assign to the avatar among manager and whitelist; once the first selection is made the owner will have to provide either the key (UUID) or the name of the avatar to add. If the value submitted is valid, the corresponding avatar will be immediately added to the visitors tracker with the designed role.
PLEASE NOTE: when the owner is adding a new avatar as manager is also able to decide if also flag it as whitelisted: in this case, the newly added manager will be excluded from the visitors tracker scan and tracking.
The owner can also delete users – manager and whitelisted – simply by clicking on the “users” button and after selecting the role, click on the “remove” button; this action will load a dialog window containing the list of avatars being part of the group selected (manager or whitelist) and the owner will simply have to click on the one to remove.
Chapter #7: appearance
This submenu groups together all the features useful to change and customise the MD Visitor Tracker’s appearance.
PLEASE NOTE: depending on the version of MD Visitor Trackers, different options will be available inside this menu.
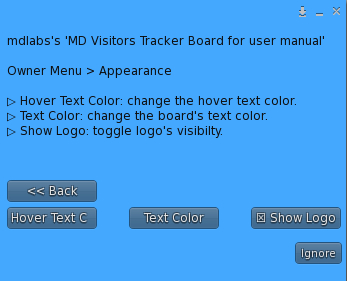
- Hover Text Color: this button allows the owner to change the hover text colour, picking among several tone options;
- Visible: this button toggles the MD Visitors Tracker’s visibility. PLEASE NOTE: this feature is available only for:
- MD Visitors Tracker & Greeter;
- MD Visitors Tracker & Greeter (Notepad);
- Text Color: this button – available only for MD Visitors Tracker Board & Greeter – changes the board’s text color;
- Show Logo: this button – available only for MD Visitors Tracker Board & Greeter – toggles the visibility of the board’s logo area;
Chapter #8: MD Labs Online Services
MD Labs Online Services is a responsive website, accessible from any platform from mobile devices to desktop computers, which allow to interact with the products released by MD Labs. Here’s a quick overview of what the the MD Visitors Tracker owner will be able to do:
- Get a quick overview of all the trackers, with locations where they are rezzed, total number of visit;
- View detailed graphs by tracker, date (day/month) , region or by visitor;
- Rename, delete, merge data from a specific tracker;
- See the visitors list for any tracker, including visitor name and visit date-time;
- Archive unused trackers;
- Delete a specific visit from a tracker;
- Add and remove managers and whitelisted avatars;
Chapter #8.1: register an account and activate the product
Before accessing the website for the first time, the owner must register an account and activate the service. In order to do so, an Online Services HUD is provided inside the MD Visitors Tracker pack.
Click here for the detailed instructions about how to register and activate your product for MD Labs Online Services.
Chapter #8.2: MD Visitors Tracker homepage
Once logged in the MD Labs Online Services website, it is possible to access the MD Visitors Tracker section from the ‘Products’ drop-down list on the top of the page. The page that will load is the MD Visitors Tracker homepage and will look similar to this one:
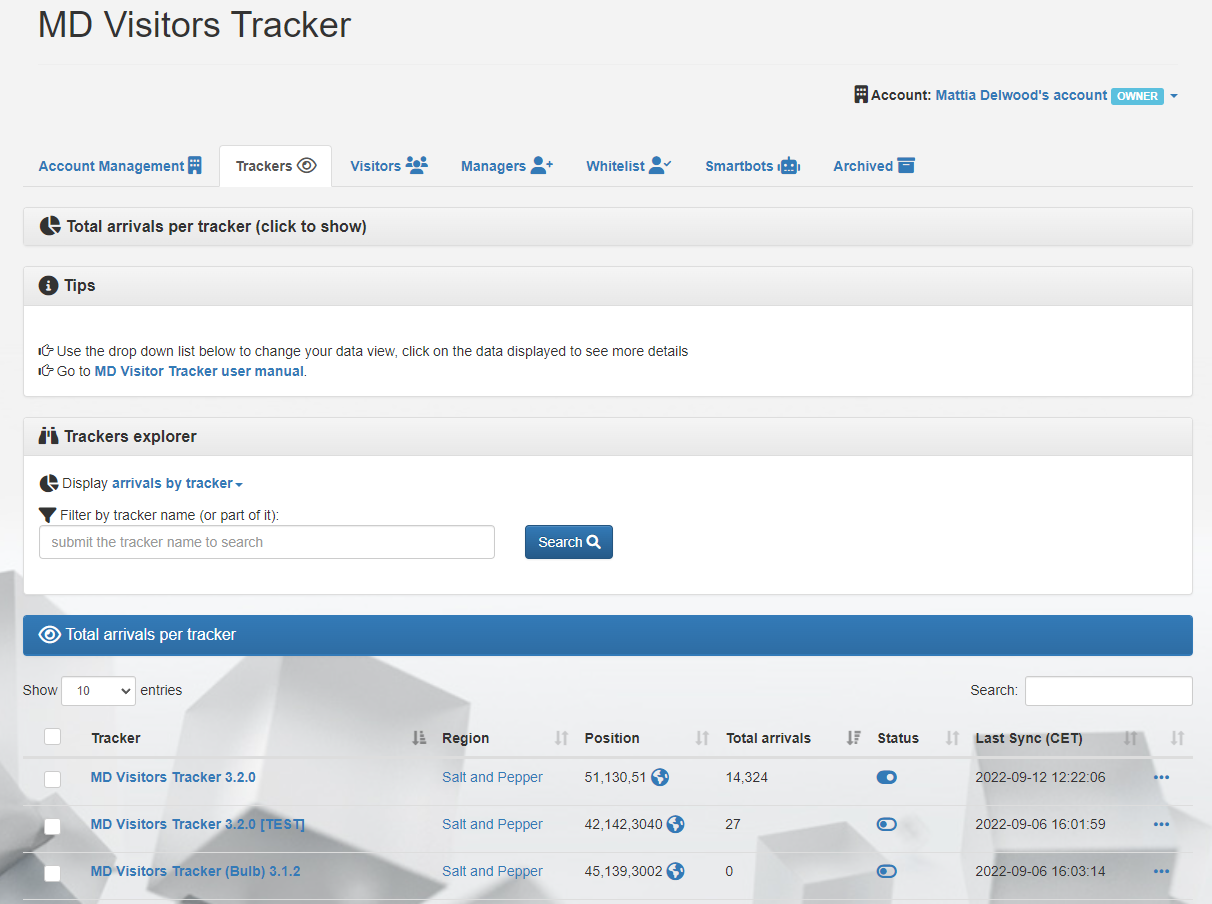
The webpage is divided into 6 different tabs (right under the top bar), each one containing specific features:
- Account Management: from this tab it is possible to export all the data from all the trackers.
- Trackers: it’s the main tab, from here is possible to access the data as well as to a list of all rezzed trackers and the arrivals list list of each of them.
- Visitors: this tab contains the list of all the avatars whom have been registered as visitors; different data-sorting are available, allowing the owner to conduct several types of analysis.
- Managers: this tab contains the list of all the managers and it is also possible to add or remove users from the manager role.
- Whitelist: this tab contains the list of all the whitelisted avatars and it is also possible to add or remove users from the whitelist.
- Smartbots: this tab contains the list of all the defined smartbots that can integrate with the trackers; from here it is possible to add, remove or edit each smartbot’s status.
- Archived: this tab lists all the archived trackers, the ones that are not used and/or not rezzed anymore in-world. Archiving the trackers help keeping data sorted and consistent.
The first element in the homepage is the graph panel: the data represented here will vary based on the current view selected. The default view is “by tracker” and the graph will show a pie chart with the total arrivals registered per tracker.
The Trackers Explorer panel groups together some useful tools to analyse and manipulate the tracker’s data. The most important tool of this section is the ‘display‘ drop down list which allow to group, sort and view the data in several ways:
- by tracker: this is the default view, useful to analyse the number of arrivals registered by each tracker;
- by region: through this view is possible to analyse which regions generate the most traffic;
- by day: this view is useful to analyse the daily arrivals trend by tracker;
- by month: this view is useful to analyse the monthly arrivals trend by tracker;
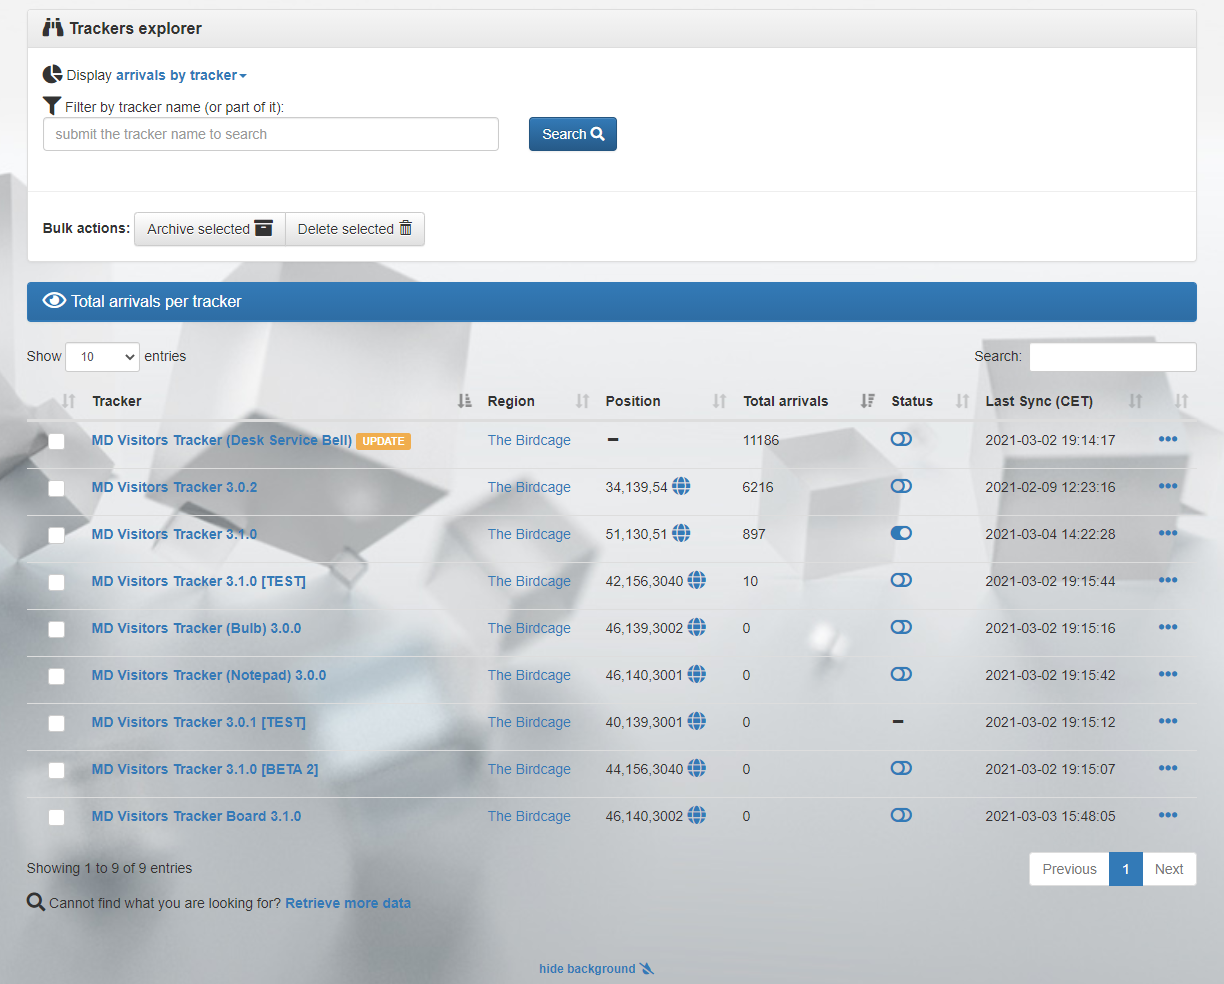
Other useful tools are the ‘bulk actions‘ buttons, which allow the deletion or archiving of multiple trackers at once.
Chapter #8.3: basic info & additional operations
When the data view is set to ‘by tracker‘ some basic information and operations will be accessible, to perform over every tracker listed. These information & operations are:
- Tracker: the name of each tracker in-world;
- Region: the region where the corresponding tracker is rezzed in-world;
- Position: the current X,Y,Z position of the tracker in-world;
- Total arrivals: the number of total arrivals registered by the corresponding tracker;
- Status: this switch toggles the tracker’s status in-world;
- Last Sync: the last time the tracker contacted the MD Labs server to update its status;
- Additional operations: clicking on the three-dots icon will open a secondary menu containing several additional operations to perform on the corresponding tracker. These operations include delete, rename, merge;
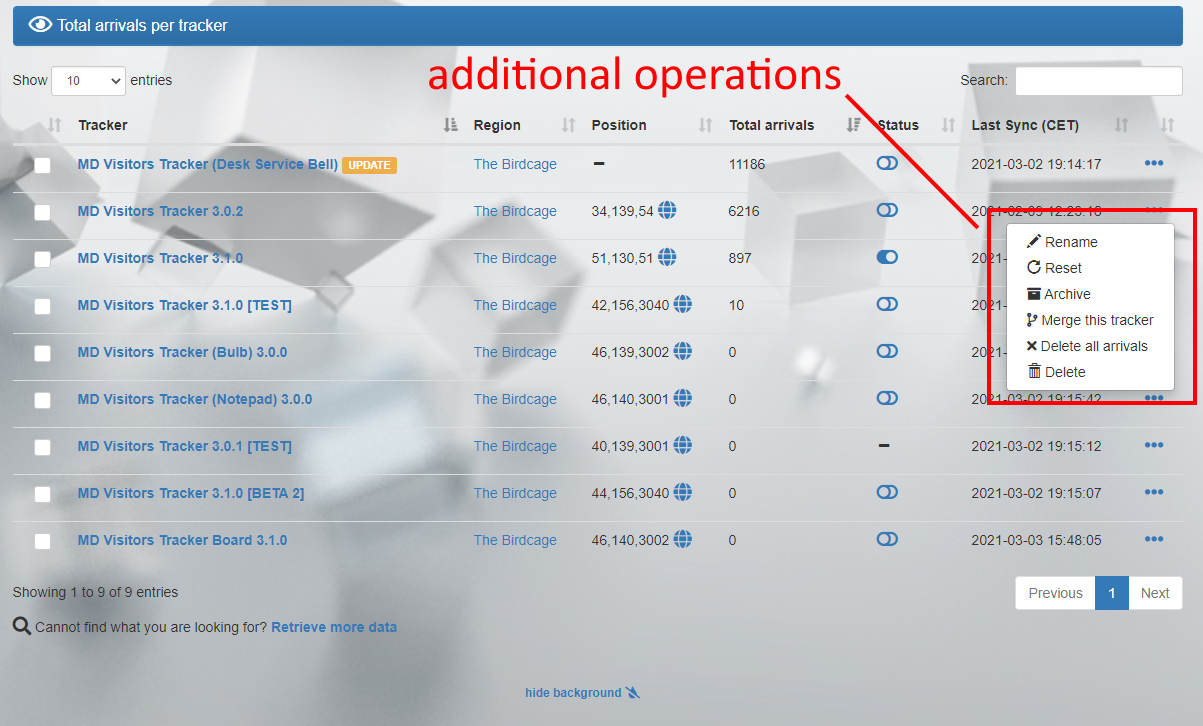
These are the additional operation which the owner can perform on each tracker:
- Rename: rename the corresponding tracker in-world and on MD Labs Online Services;
- Reset: reset the corresponding tracker in-world;
- Archive: archive the corresponding tracker, removing it from in-world (if present);
- Merge: merge the corresponding tracker with another one, associating all the arrivals to the new tracker and removing the old one from in-world and from MD Labs Online Services;
- Delete all arrivals: delete the tracker’s complete transactions list;
- Delete: delete the corresponding tracker in-world and from MD Labs Online Services, removing also all the arrivals and settings;
Chapter #8.4: tracker’s details: arrivals
As said in the previous chapters, depending on the data view chosen it will be possible to view and analyse different kind of data; the most important is the data view ‘by tracker‘, which is also the default one. When this data view is selected a list of all trackers rezzed is presented along with the region and total arrivals registered. By clicking on the tracker’s name the details page for that specific item will load.

The page is divided into four tabs:
- arrivals: this tab contains the complete list of the tracker’s registered arrivals;
- statistics: this tab allows the owner to conduct several analysis over the tracker’s arrivals;
- managers&whitelist: this tab contains a list of all managers and whitelisted avatars for the selected tracker;
- settings: this tab holds the tracker’s settings;
The first part of the Arrivals tab presents a handy graph showing the tracker’s daily arrivals trend; below it the ‘tools‘ panels provides some useful instruments to filter, manage and analyse the tracker’s data; it is possible in fact to filter and see only the arrivals registered during a specific period, delete multiple arrivals at the same time and export the arrivals list.
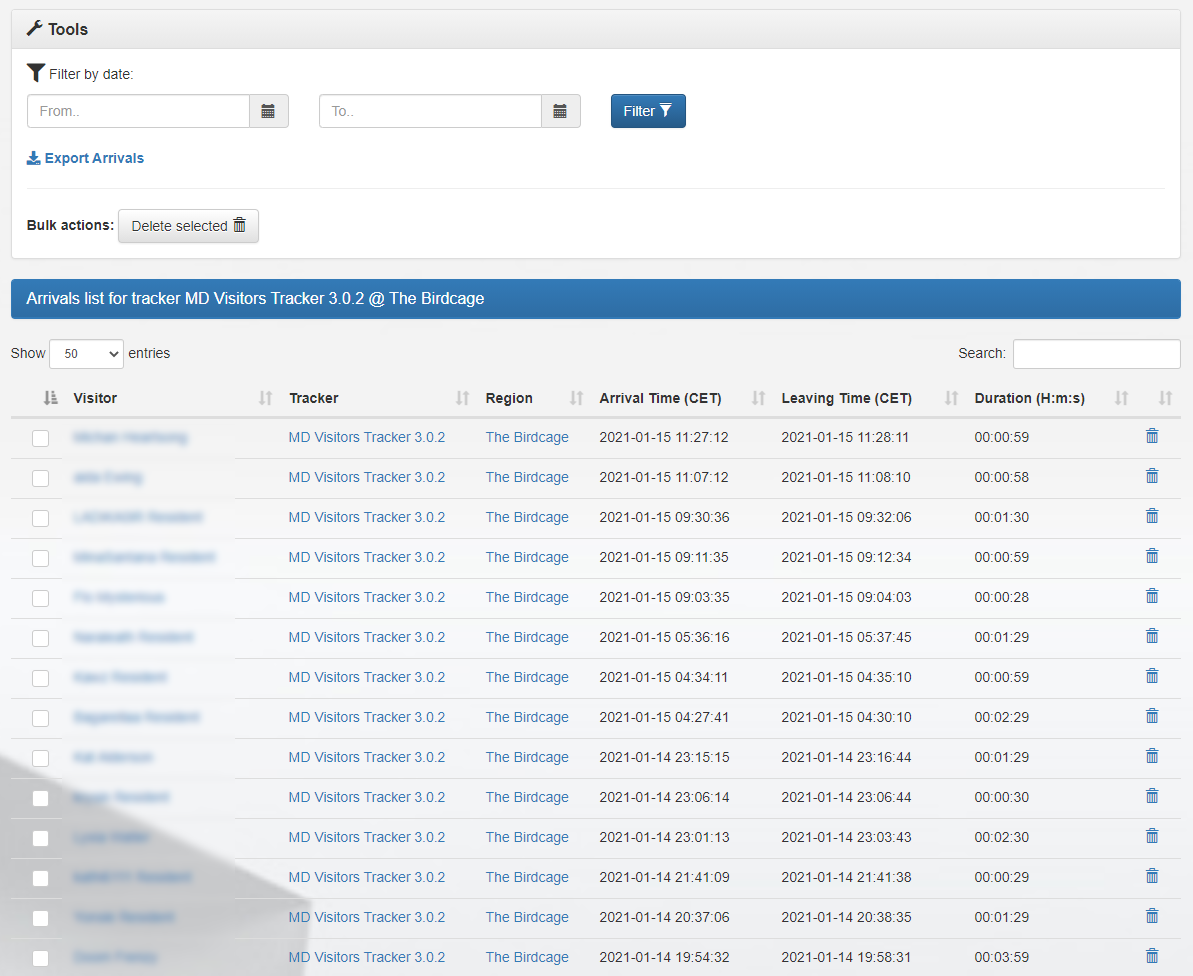
The ‘arrivals‘ panel is the main panel of this page and presents a complete list of all the arrivals registered by the tracker; for each of these the following data is displayed:
- Visitor’s name;
- Tracker’s name;
- Tracker’s region;
- Arrival date-time;
- Leaving date-time;
- Visit duration;
- Delete button: this feature allow the owner to completely remove the corresponding arrival, updating also the tracker’s statistics;
Chapter #8.5: tracker’s details: statistics
When the data view is set to ‘by tracker‘ a second tab is present inside the detail page, name ‘statistics‘; here is possible to start different types of data analysis and study the arrivals and visits trends. The page is composed by three main panels:
- the first one called ‘stats explorer‘ and allows the owner to define the type of analysis to conduct, picking from the available ones;
- the second panel displays a graph containing the output of the analysis;
- the third panel shows a table containing all the data of the analysis;
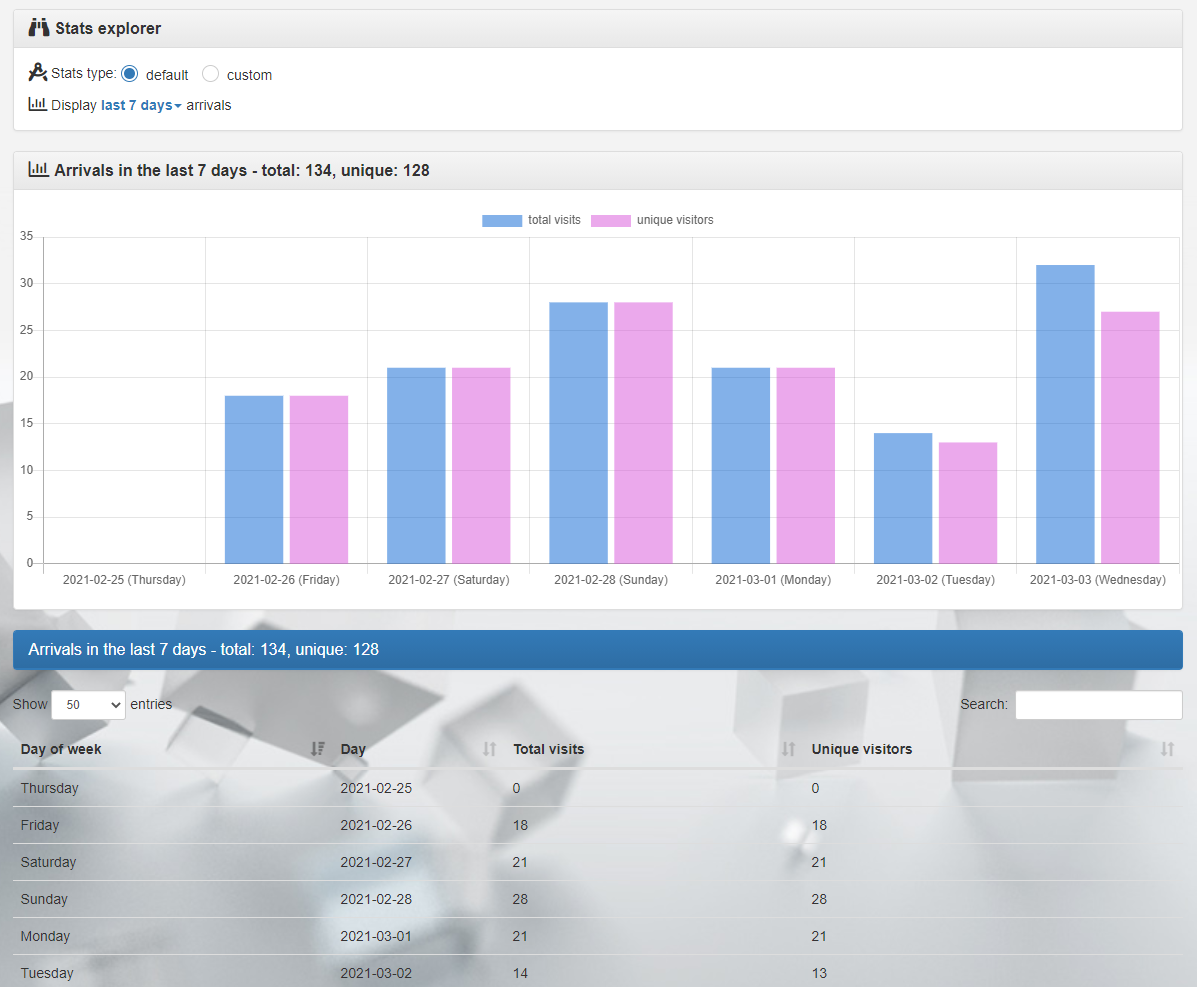
There are two main type of analysis that can be created: default and custom; the first category group together a serie of pre-defined data interrogation such as last 24 hour, last week, last month; the custom type of analysis on the other hand allows the owner to create daily, weekly and monthly data interrogation based on a custom time-frame.
Despite the type of analysis selected, the result provided will always contain two important indicators:
- total visits: the total number of visits registered, including returning avatars;
- unique visitors: the unique number of visitors registered, not counting returning avatars;
Chapter #8.6: tracker’s details: managers&whitelist
The third tab in the visitor tracker’s details page is called ‘Mangers&Whitelist‘ and contains the list of all the avatars whom have been added to the visitors tracker as managers or in whitelist.
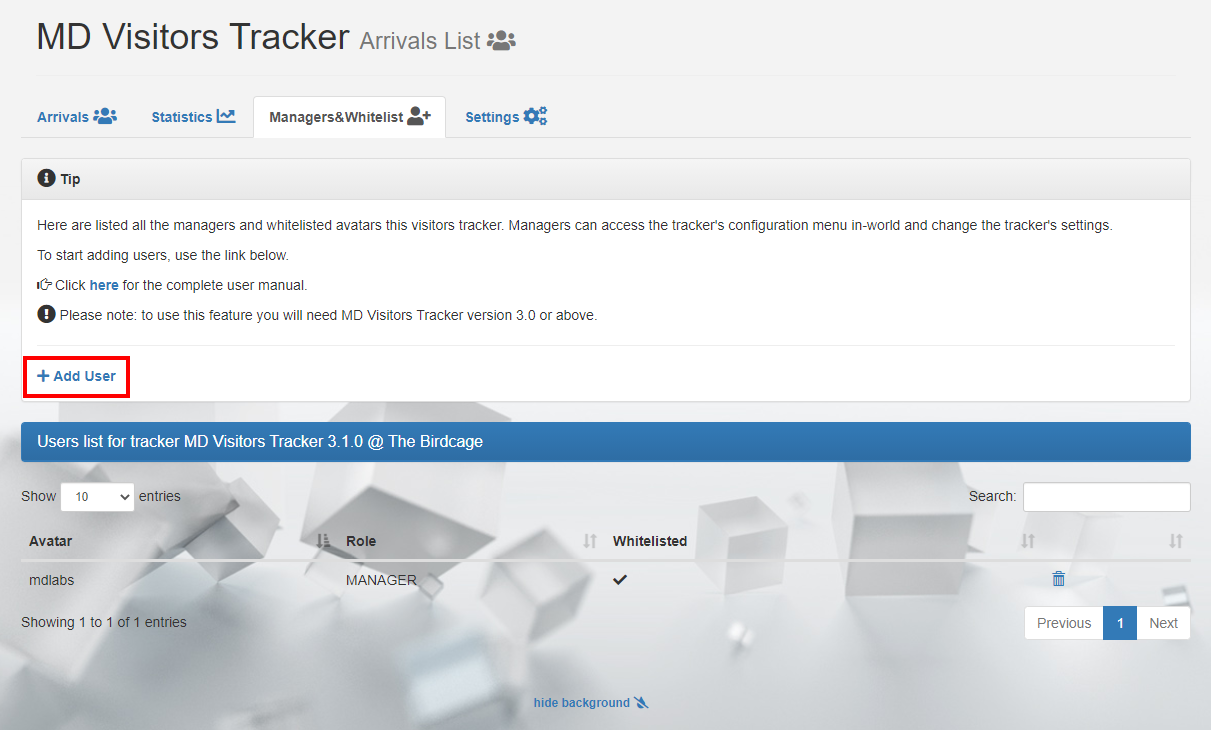
The page is divided into two main panels: the first one called ‘Tips’ contains the link to add a new avatar to the tracker’s list, while the second panel contains the list of the users associated to the visitors tracker.
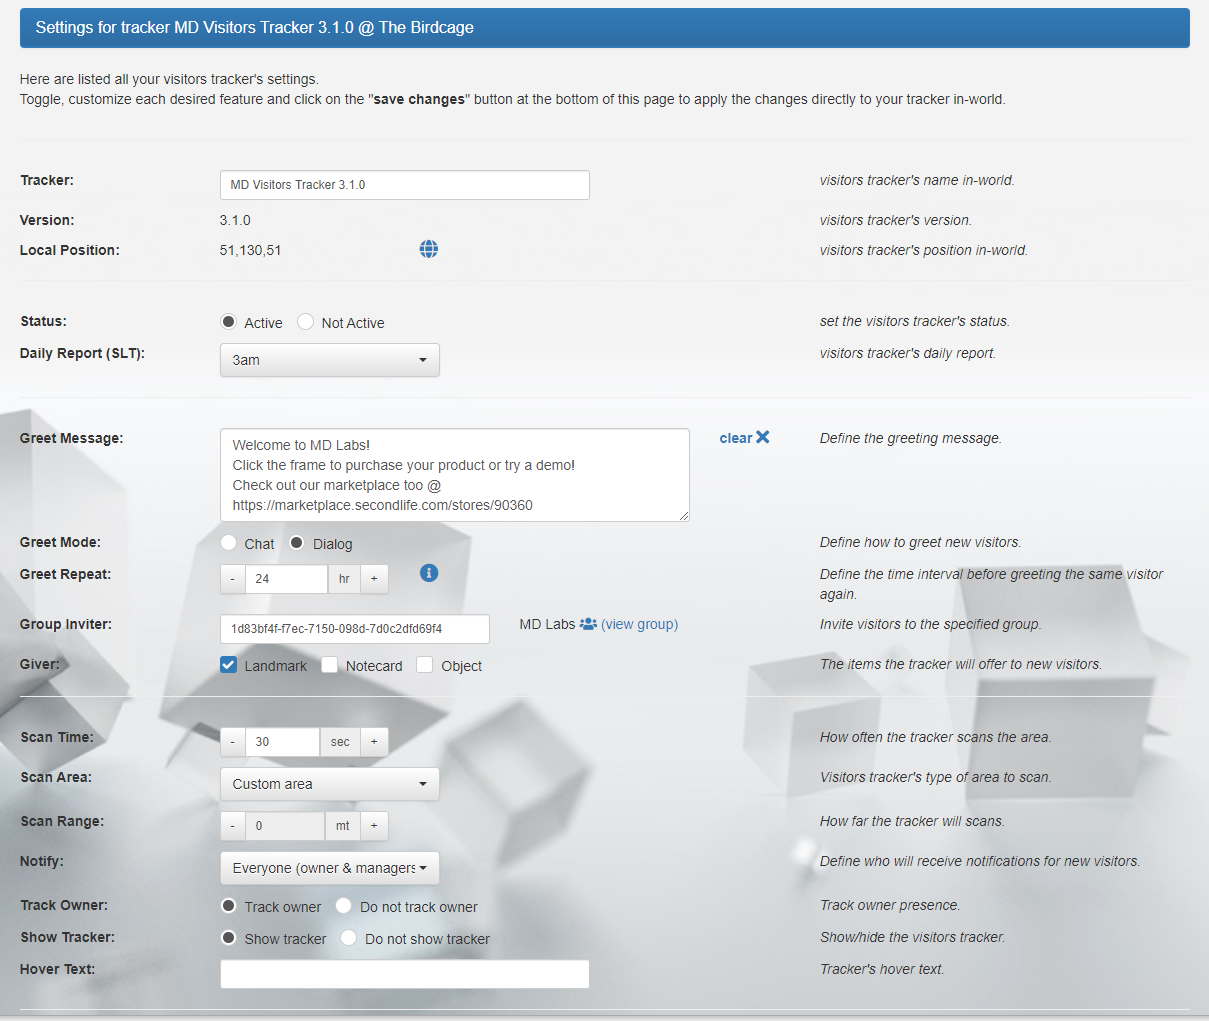
Chapter #8.7: tracker’s details: settings
The fourth and last tab in the tracker’s details page is called ‘Settings‘ and contains a view of the visitors tracker’s setup, including all its settings. From this tab it is possible to change and configure the tracker, toggling features and changing the settings and – once clicking on the “Save Changes” button, applying those settings directly to the device in-world.
Chapter #8.8: visitors tab
The ‘Visitors‘ tab is made to help the owner find and manage visitors: the tab includes several tools, features and views allowing the owner to analyse and manipulate the arrivals data.
The tab in divided into three main panels: tips, visitors explorer and visitors list.
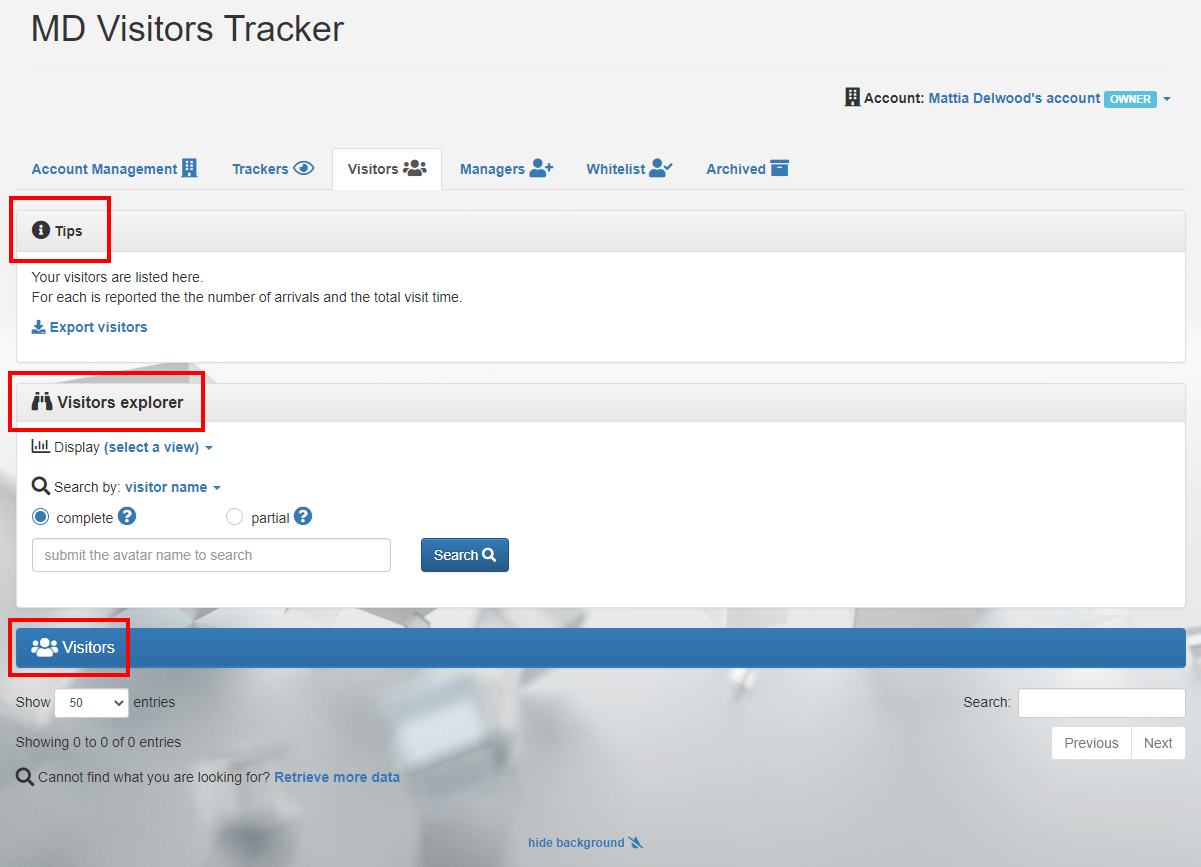
The ‘Tips‘ panel contains the feature called ‘Export visitors’: this link let the owner export the visitors list.
The ‘Visitors Explorer‘ is a panel provided two important tools for the owner to analyse and search for specific visitors. The first tool is the ‘view selector’, which provides several default views used to list visitors; these views are:
- last visitors: this view will list all the avatars registered ranking them by the last visit performed;
- top visitors of the current month: this view will list all the avatars registered ranking them by the total amount of time spent in the area during the current month;
- top visitors of the previous month: this view will list all the avatars registered ranking them by the total amount of time spent in the area during the previous month;
- top visitors: this view will list all the avatars registered ranking them by the total amount of time spent in the area;
The second tool present in the ‘Visitors Explorer’ panel is the search tool, allowing the user to find a specific avatar by searching for its key (UUID), name or part of it.
The last panel – called ‘Visitors list‘ – will list all the visitors sorted depending on the view selected:
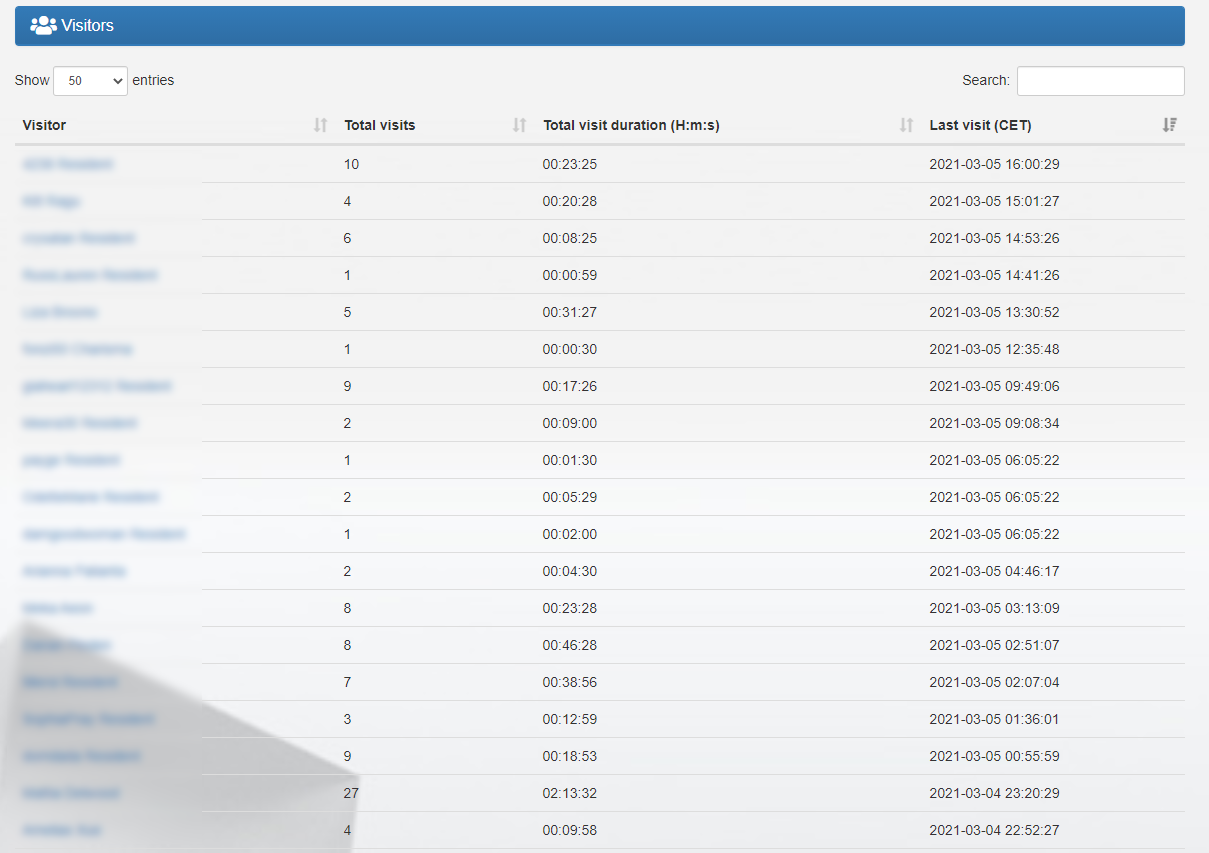
For each avatar reported in list, several information is provided:
- Visitor name: the name of the visitor. Clicking on the name will load the visitor’s detail page containing all the visits performed;
- # of visits made: the number of visits registered for the avatar;
- Total visit duration: the total amount of time spent by the user in the area and registered;
- Last visit: the last time the user was tracked by any visitors tracker belonging to the owner;
Chapter #8.9: managers tab
The next tab on MD Visitors Tracker homepage is called ‘Managers‘ and allows the owner to add, manage and remove one or more account managers; a manager will be able to access the MD Visitors Tracker homepage just like the owner and interact in several ways with the trackers. Managers will also be able to interact with the assigned trackers in-world, just like the owner.
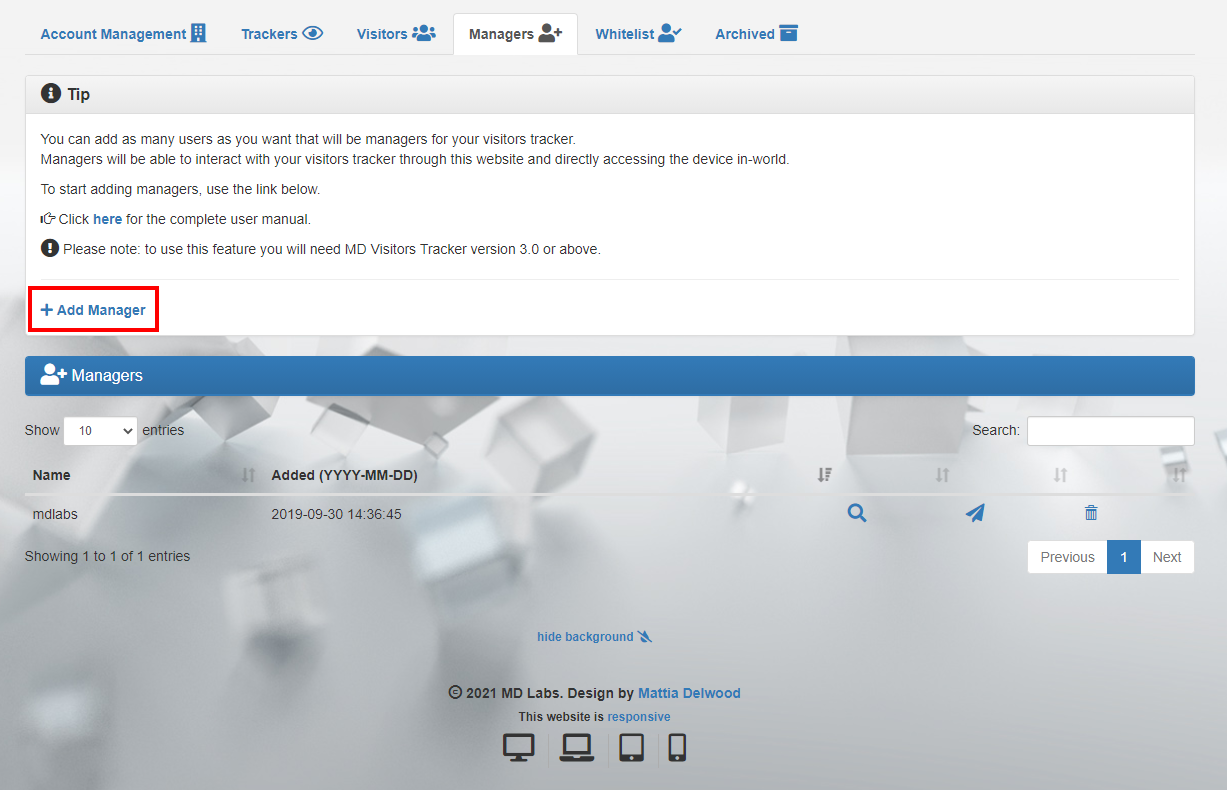
This tab is composed by two main panels ‘Tips’ and ‘Managers’; the first one contains a link to add a new manager while the second panel lists all the managers.
In order to add a new manager the owner will have to click on the ‘Add Manager‘ link in the ‘Tips’ panel; a wizard will appear and require a few simple steps:
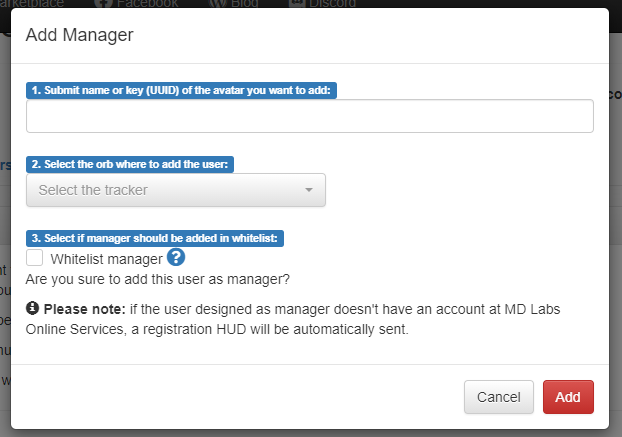
The first thing is provide the manager’s name or key (UUID); then select a the tracker on which add the avatar as manager; optionally, the owner can decide if automatically whitelist the newly added manager, to avoid this last one to get greetings and being registered as normal visitor. Once these info are provided, clicking on the ‘Add’ button will add the selected avatar as manager on the tracker selected. The manager will be immediately listed in the ‘Managers ‘ panel which can be found into the ‘Managers’ tab.
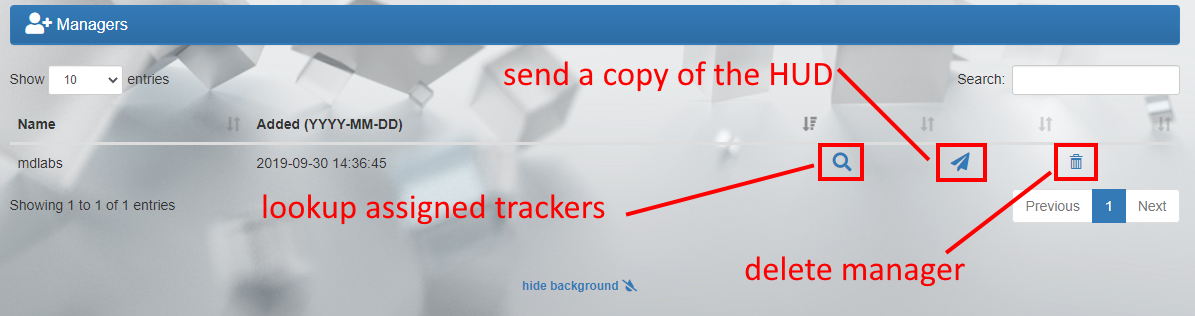
The ‘Managers’ panel – located into the Managers tab – contains the following data:
- Manager Name: the name of the manager;
- Lookup managed trackers (magnifier icon): clicking on this icon will load a floating window, presenting a list of all the trackers on which the corresponding avatar is assigned as manager;
- Send HUD (paper plane icon): this button delivers a new copy of MD Visitors Tracker registration HUD to the corresponding manager. More info further down on this page;
- Delete Manager (trash bin icon): this button removes completely the manager from the managers list, forbidding the deleted manager to access the tracker’s page and interact with the trackers in-world;
Is important to spend a few more words on the registration HUD for MD Labs Online Services. In order to login and access the tracker webpage, the managers must be registered to MD Labs Online Services; if the user selected as manager already uses MD Visitors Tracker then an account is already registered and the users will be able to use the same credentials to login to the store to manage. Conversely, if the user selected as manager doesn’t use MD Visitors Tracker then the creation of an account is required and a registration HUD will be automatically sent to the user once added as manager. It is also possible to repeat the HUD dispatch in another moment through the corresponding option in the managers list.
Once added as manager, the user will be able to switch between stores through the “Account” drop down present into the ‘MD Visitors Tracker website‘; from here the drop down will present a list of all accounts owned and managed by the user, and a click on them will start the switch process to the selected one.

Chapter #8.10: whitelist tab
The ‘Whitelist‘ tab allows the owner to add, manage and remove one or more avatar from the whitelist; a whitelisted avatar cannot interact with the tracker in-world nor access the MD Visitors Tracker website, but it will be ignored from the tracker scan engine, and therefore will not receive any greeting message, inventory offer and its presence will not be notified to the owner nor registered.
This tab is composed by two main panels ‘Tips’ and ‘Whitelist’; the first one contains a link to add a new avatar in whitelist while the second panel lists all the whitelisted avatars. In order to add a new avatar in whitelist the owner will have to click on the ‘Add Whitelist‘ link in the ‘Tips’ panel; a wizard will appear and the owner will have to provide the name or key (UUID) of the avatar to add and select a the tracker on which add the avatar will be added. Clicking on the ‘Add’ button will add the selected avatar in the whitelist of the selected tracker. The avatar will be immediately listed in the ‘Whitelist‘ panel.
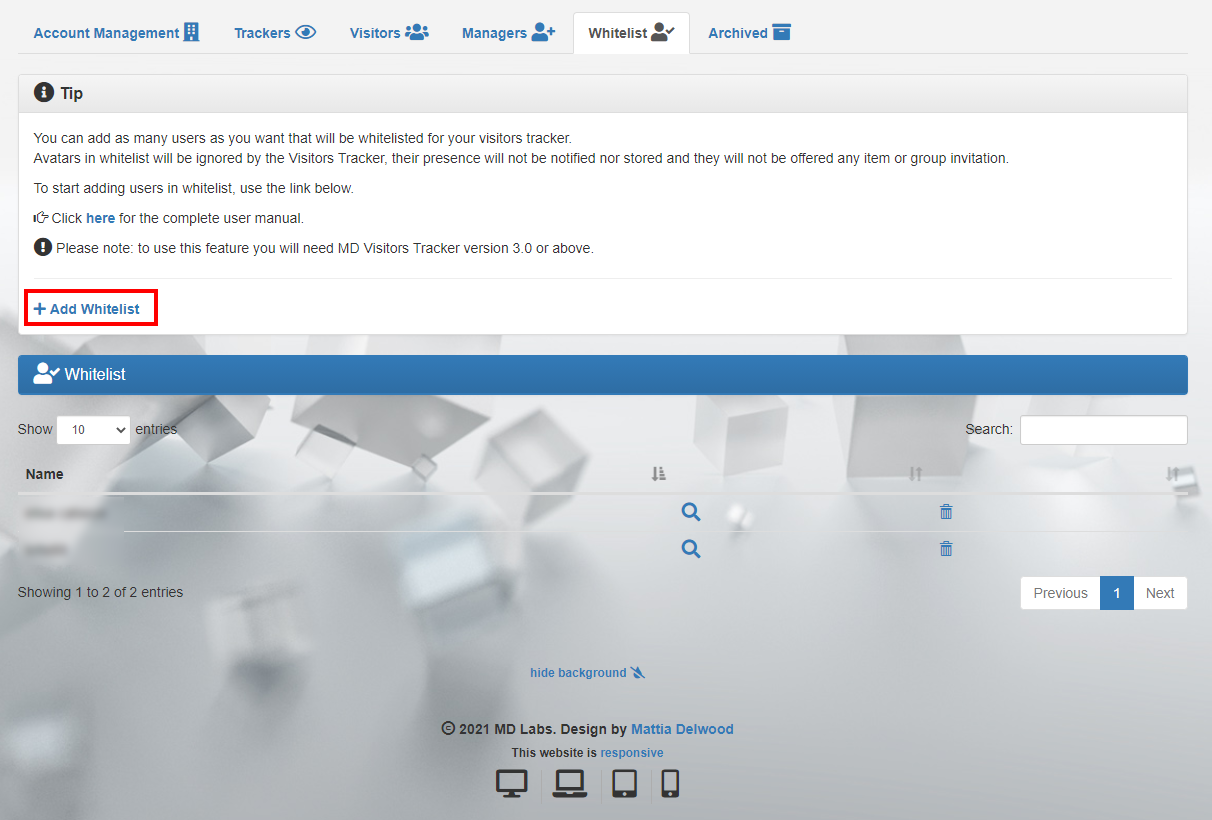
The ‘Whitelist’ panel – located into the Whitelist tab – contains the following data:
- Name: the name of the avatar;
- Lookup trackers (magnifier icon): clicking on this icon will load a floating window, presenting a list of all the trackers on which the corresponding avatar is present in whitelist;
- Delete avatar (trash bin icon): this button removes completely the avatar from the whitelist;
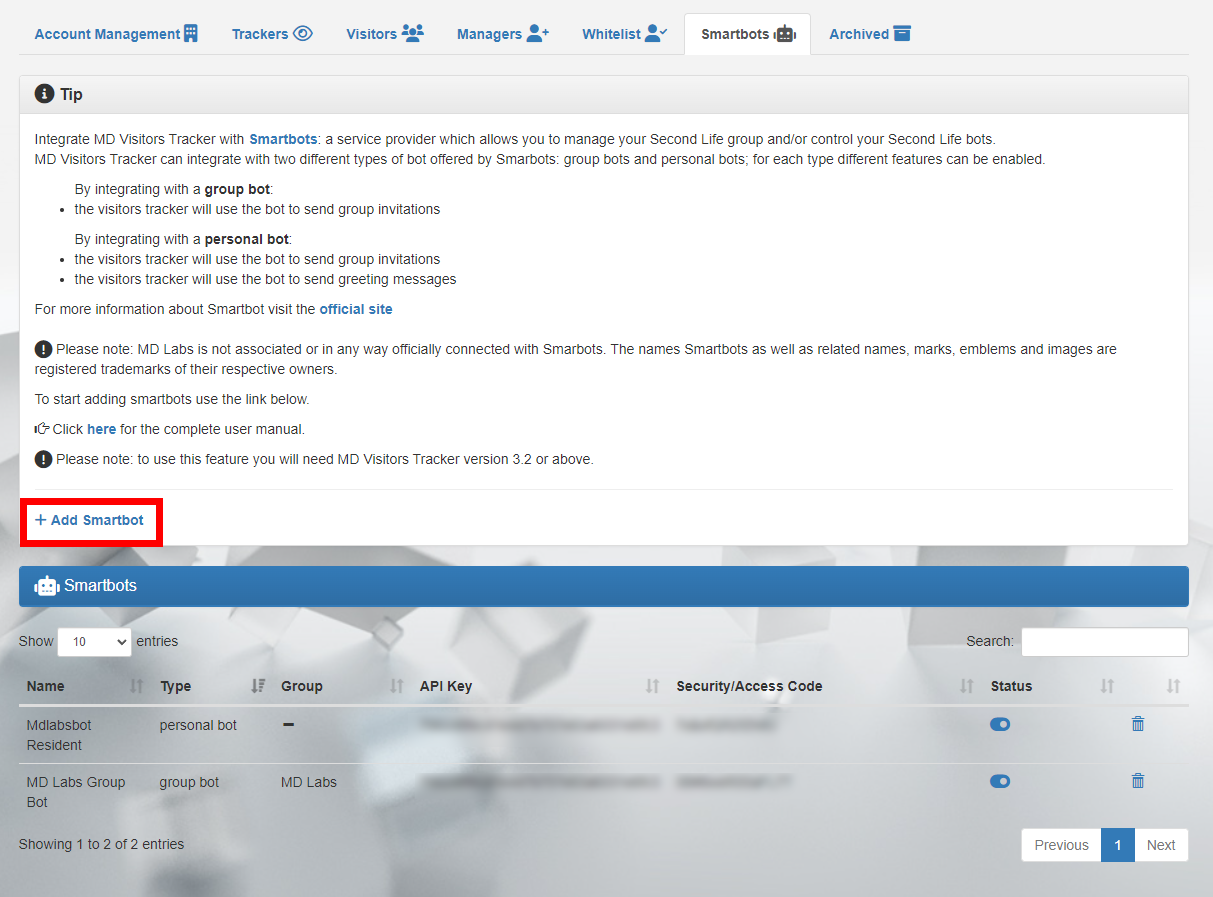
Chapter #8.11: smartbots tab
SmartBots is a service provider which allows you to manage your Second Life group and/or control your Second Life bots.
smartbot official website
MD Visitors Tracker can integrate with Smartbots bots to provide a wider and richer experience: for each visitor found, the tracker will interact with its associated bot and rely on it for some specific operations.
!IMPORTANT: MD Labs is not associated or in any way officially connected with Smarbots. The names Smartbots as well as related names, marks, emblems and images are registered trademarks of their respective owners.
Smartbots provides to the user two different types of bots:
- Group bots: a simplified bot which implements just a few group-oriented set of operations;
- Personal bots: they are real Second Life bots, able to perform a wide range of operations;
MD Visitors Tracker can integrate seamlessly with each type of bots: the set of features available will then be defined by the bot’s type.
!IMPORTANT: this is not indented to be a step-by-step tutorial on what smartbots are and this user manual will not explain the steps required to create and manage them. For specific information and instructions about Smartbots refer to the official website and documentation here; detailed instructions for bots setup can be found here for group bots and here for personal bots.
The rest of this chapter will assume the user knows what a SmartBot is and how to perform its setup.
The ‘Smartbots‘ tab allows the owner to add, manage and remove one or more smartbot from the list of the available ones; each visitors tracker can then be associated to one specific bot – among the available ones – and benefit from the specific bot’s features. This tab is composed by two main panels ‘Tips’ and ‘Smartbots’; the first one contains a link to add a new smartbot while the second panel lists all the defined bots. In order to add a new smartbot the owner will have to click on the ‘Add Smartbot‘ link in the ‘Tips’ panel; a wizard will appear and the owner will have to provide all the required info.
!IMPORTANT: before adding Smartbots to MD Visitors Tracker it is mandatory to have created/subscribed at least one Smartbot; this process can be done from the Smartbot official website.
The owner will first have to choose which type of smartbot to add among the two supported types: group bots and personal bots; after this first selection is made the data required to complete the process will differ based on the bot’s type:
- For group bots:
- smartbot name: the name chosen for your group bot during the setup;
- smartbot group key (UUID): the key (UUID) of the in-world group provided during the smartbot setup;
- smartbot API Key: the defined developer’s API Key for your smartbots account (more info here);
- smartbot Security Code: the chosen security code (more info here);
- For personal bots:
- smartbot key (UUID) or name: the name or key (UUID) of the personal bot;
- smartbot API Key: the defined developer’s API Key for your smartbots account (more info here);
- smartbot Access Code: the chosen access code for the personal bot (more info here);
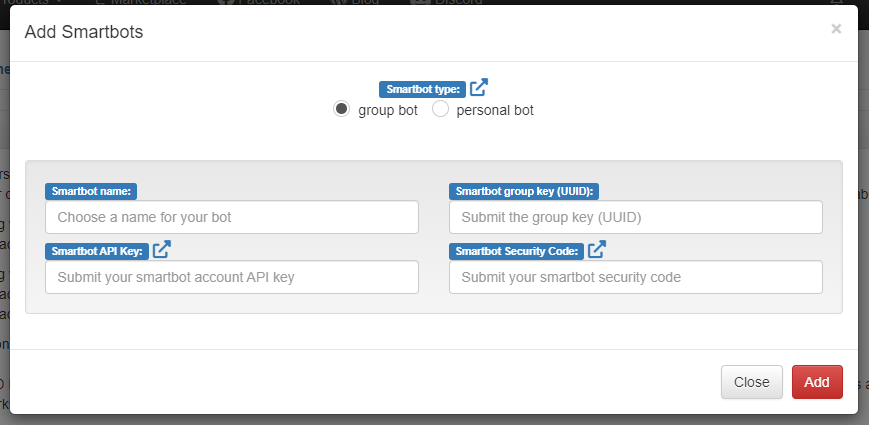
Clicking on the ‘Add’ button will add the selected smartbot in the pool of the available bots for the trackers; during this process several controls are performed to verify and check the validity of the data submitted: a final connection attempt will be performed to make sure the defined smartbot is up and reachable. If the connection tests are successful, the smartbot will be immediately listed in the ‘Smartbots‘ panel.
Once a smartbot is successfully added and listed in the MD Visitors Tracker bots list, it can be associated to one or more visitors tracker as explained in the next chapter.
Chapter #8.11.1: integrate smartbots
The last step required to successfully integrate MD Visitors Tracker with a smartbot is the association step; the owner will have to click on the ‘trackers’ tab to locate the specific tracker to integrate and click on its name to open the tracker’s details page where the settings are located. More information on the tracker’s detail page can be found in the corresponding chapter.
The tracker’s detail page will contain a ‘smartbots‘ section like shown below:

The section contains a list of all the smartbots which have been added in the system and the owner will just have to select the smartbot to integrate with the visitors tracker. As mentioned in the previous chapter, depending on the type of smartbot different integration features will be available:
- Group bots:
- if the tracker’s inviter group is set, the bot can invite each new visitor to the defined group;
- Personal bots:
- if the tracker’s inviter group is set, the bot can invite each new visitor to the defined group;
- if the tracker’s greeter message is set, the bot can send the greet message defined to each new visitor;
! IMPORTANT: the owner of a group cannot receive a group invitation to the same group.
Once the desired smarbot has been selected it is also possible to test the features using the corresponding links in the smartbot section; finally clicking on the ‘save changes’ button will complete the smartbot integration with MD Visitors Tracker.
Chapter #8.12: archived tab
The last tab which composes the MD Visitors Tracker homepage is called ‘Archived‘ and groups together all the trackers which are not rezzed anymore and which have been archived by the owner. The archive feature has been designed to help owners to keep their data consistent while reducing the amount of information displayed; by archiving a tracker– in fact – it will be removed from in-world and from the ‘Trackers’ tab on MD Labs Online Services, but all the device’s data such as total visits and the complete arrivals list is kept.
This action brings several benefits to the store owner:
- There will be less machines displayed into the ‘Trackers’ tab, making it easier to find the device desired;
- Since all the tracker’s data is kept there will still be statistics about the archived trackers;
The main panel present in this tab is called ‘Archived Trackers’ and lists all the trackers which have been archived by the owner.
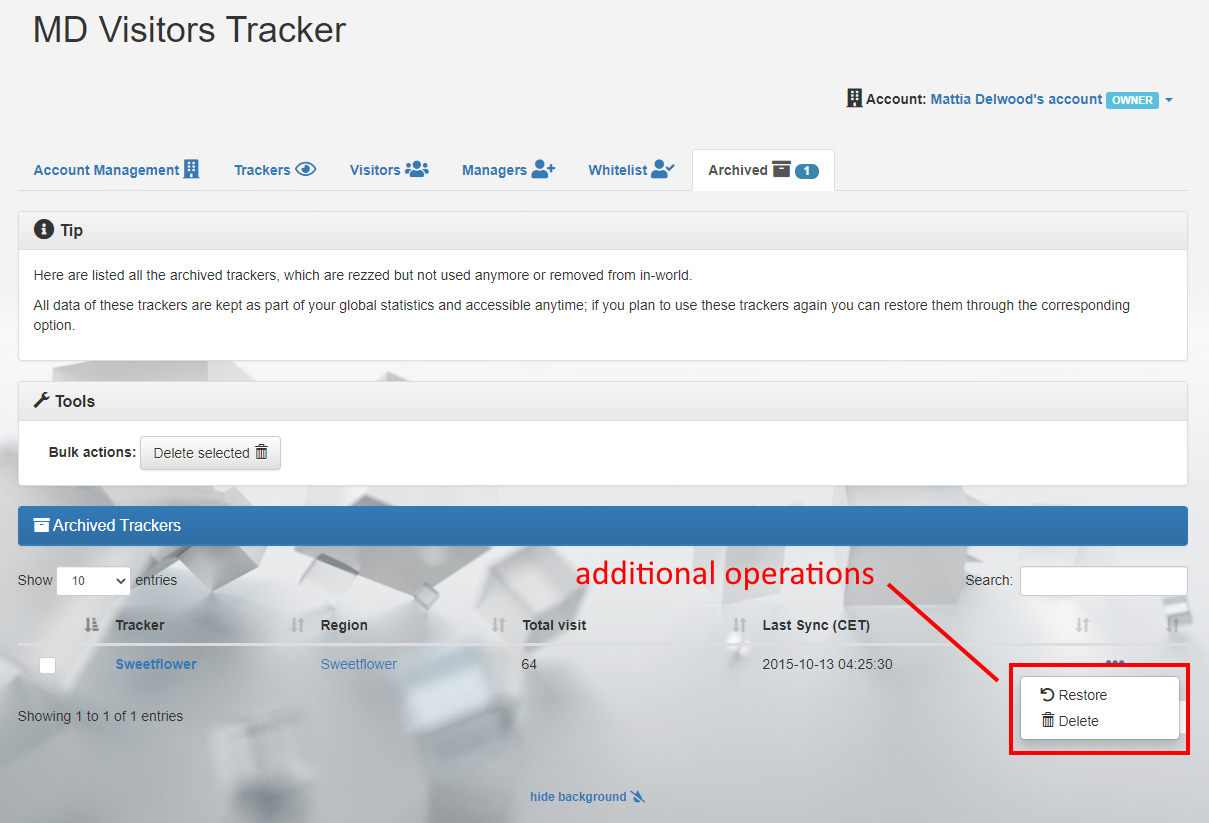
The data shown for each tracker is very similar to the one present in the ‘Trackers’ tab, except the additional operations which are accessible clicking on the 3-dot icon. The first operation is called ‘Restore’ and it allows the owner to restore an archived tracker, moving it from the ‘Archived’ tab to the ‘Trackers’ one; while this action moves the device’s data from one tab to another on MD Labs Online Services website, it will not restore the tracker in-world if it has been already deleted. The second option, ‘Delete’, removes completely the device’s data; once done all the statistics will be lost including the arrivals lists.
2022 MD Labs