Summary:
- Chapter #1: Initial setup
- Chapter #2: Owner menu
- Chapter #3: Item’s type & categories
- Chapter #4: Item’s permissions
- Chapter #5: Selective unpacking
- Chapter #6: Social link buttons for a “wear-to-unpack” HUD
- Chapter #7: Setup a single-prim box
- Chapter #8: MD Labs Online Services
Initial notes
! IMPORTANT: The following user manual presents and explains the usage and detailed features of:
- MD Smart Unpacker Script version 1.0.0
Chapter #1: initial setup
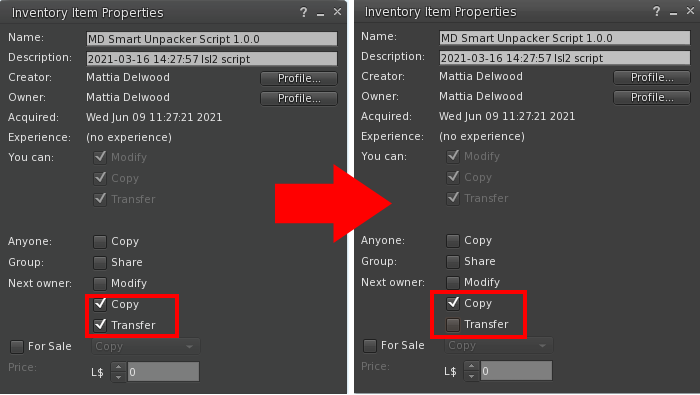
The first setup of MD Smart Unpacker Script is very quick and includes only one required step: changing permissions for next owner. MD Smart Unpacker Script comes with copy&transfer permissions for it to be used in product’s packaging, but the script has to be set as copy-only for next owner in order for the setup to be completed.
For doing so the owner will have to right-click on the MD Smart Unpacker Script directly from the inventory folder and select “Properties” from the drop-down menu; at this point, simply unchecking the “Transfer” box in the “Next Owner” section will update the script’s permissions correctly.
At this point the MD Smart Unpacker Script is ready to be drop inside the desired HUD or box; this step can be accomplished very quickly by simple dragging and dropping the script from the inventory to the designed object which will work as HUD or box.
PLEASE NOTE: just like for the script, also the object used as HUD or pack cannot have transfer permission set for the next owner; if so, the MD Smart Unpacker Script will notify the owner about the permission error and delete itself.
Chapter #2: owner menu
Once the MD Smart Unpacker Script has been set with the right permissions and dropped into the object which will function as HUD or box, the owner can click on it and the “Owner Menu” will load. This particular menu – accessible only by the script owner – contains all the settings and options needed to customise the product.
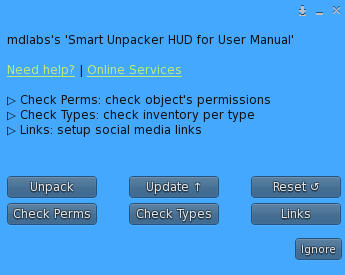
This menu presents several buttons, some of them leading into other sub menus:
- Check perms: this button will start the permission check module of the script, which will report the owner for possible item’s permission mistakes. More info about this feature can be found in the corresponding chapter.
- Check types: this button will start the type check module of the script, which will assign a specific category to every item and report to the owner the results for a final validation. More info about this feature can be found in the corresponding chapter.
- Links: this buttons leads the owner to a second menu, where it is possible to setup different types of links which the final user will be able to click and use, such as the major social media, SL Marketplace link, in-world store SLURL, and in-world group link for joining. PLEASE NOTE: to take advantage of this feature, a compatible HUD must be used, more info in the corresponding chapter.
- Unpack: this button will unpack the content of the object in the owner’s inventory, as if the owner was a final user. This feature is useful to test the unpack before releasing the product.
- Update: this button starts the update module, which will look online for a new update of the product and – if found – deliver it to the owner.
- Reset: this button will reset the script.
Chapter #3: item’s type and categories
Part of MD Smart Unpacker Script’s smartness is the ability to automatically detect, categorise and manage different types of Second Life items which are present inside the HUD or box along with the script itself.
When scanning the HUD or box’s inventory, MD Smart Unpacker Script is able to detect and process the following Second Life’s items type:
- Object;
- Clothing;
- Bodypart;
- Notecard;
- Landmark;
- Texture;
Every item detected is analysed by the MD Smart Unpacker Script and automatically assigned to a specific category, which will be used by the script to create the inventory map for the unpacking process.
Each Second Life’s item scanned is associated by MD Smart Unpacker Script to one of these categories:
- Product:
- HUD:
- Notecard:
- Landmark:
- Advertisement (AD):
To better comprehend this very important mechanism the table below lists the relations between Second Life’s items type and how they are mapped by the script into categories:
| Script’s Item Category | Second Life Item Type | Keyword requested in item’s name (without quotes) |
|---|---|---|
| Product | Object | – |
| Product | Clothing | – |
| Product | Bodypart | – |
| HUD | Object | “HUD” |
| Notecard | Notecard | – |
| Landmark | Landmark | – |
| AD | Texture | – |
As shown in the table – for example – every texture item dropped inside the HUD or box will be considered as an AD by the MD Smart Unpacker Script; in the same way every landmark or notecard will be categorised as landmark and notecard by the script. A different (and very important) rule is applied for objects: MD Smart Unpacker Script will consider all Second Life object items found in inventory as “product”, unless they contain the keyword “HUD” (in capital, without quotes) in their name; in this case the script will map the specific object item as a HUD and not as a “product”.
But why is this cataloguing process so important? Because every time an unpack request is performed by the user, MD Smart Unpacker Script will automatically go through its inventory map and create a folder containing:
- All the items present in the “Product” category (and matching the unpacking rule, but this will be explained in the next chapters);
- All the items present in the “HUD” category (and matching the unpacking rule, but this will be explained in the next chapters);
- All the items present in the “notecard” category;
- All the items present in the “landmark” category;
- All the items present in the “AD” category;
The folder created is then delivered to the user performing the unpack, as result of the unpack process.
Chapter #4: item’s permissions
Another important feature implemented in MD Smart Unpacker Script is the ability to check for item’s permission and warn the owner in case possible permission mistakes are identified. This process is applied in two different levels:
- owner-level: the script scans the object’s inventory where it was dropped and, while assigning every item to its corresponding category, will also perform a check on owner’s permissions over every single item found.
- next-owner-level: this specific feature – started when the owner click on the “Check Perm” button in the menu – will perform a check on the next owner’s permissions on every single item which has been scanned and assigned to a specific category.
When MD Smart Unpacker Script is performing the owner-level controls two conditions MUST be met in order for the script to consider the item as part of the inventory map and assign it to its specific category:
- item must have transfer permissions for the owner;
- item must have next-owner permissions set;
If any of the above conditions is not met then MD Smart Unpacker Script will warn the owner with a message in local chat and ignore the item, not including it in the inventory map and therefore not allowing it to be unpacked.
When performing the next-owner-level permissions control, each item being part of the inventory map is evaluated and its permissions are compared with the expected ones inherited from its category; in case of permission mismatch the owner is notified with a message in local chat and invited to review the specific item’s permission; in this case the item will however be kept in the inventory map.
MD Smart Unpacker Script will apply by default the following permission on every type of item’s category:
| Item’s Category | Expected permission |
|---|---|
| Product | Copy |
| HUD | Copy |
| Notecard | Copy&transfer |
| Landmark | Full perm |
| AD | Full perm |
Chapter #5: selective unpacking
The biggest feature of MD Smart Unpacker Script is the ability to let the final user perform a selective unpacking of a specific product, receiving in inventory only what is really wanted. This feature becomes very handy when applied to stores operating in the virtual fashion business: now days there are several different body types available in the market and fashion creators are asked to release body-specific versions of their product. This easily ends up in creators including more and more versions of their product in each package and consequently when final users unpack their purchased product they receive unwanted body-specific versions, cluttering their inventory and making it harder for them to go through the package and find the right items.
Selective unpacking is achieved by MD Smart Unpacker Script combining together several features such as the item’s category logic explained in the previous chapters, brands & models managing and keyword-based tagging.
PLEASE NOTE: selective unpacking features are available only when MD Smart Unpacker Script in used inside a HUD and not a simple product box.
Chapter #5.1: setup a “wear-to-unpack” HUD
In order to explain and understand how MD Smart Unpacker Script’s selective unpacking feature works, the best way is using an everyday-case example: a store owner needing to pack its latest release and prepare it for selling.
The release will have the following characteristics:
- Once sold, the product will be delivered to the final user as HUD with the “wear-to-unpack” formula;
- The product comes in several variants, each one for a specific body type;
- The pack contains one or more HUD, allowing the final user to customise the product purchased;
- The pack also contains other type of items, such as instruction notecard(s), a store landmark, product advertisement images;
Below is shown an example of HUD allowing selective unpacking:

The example HUD shown above is composed by a main (root) prim and several linked prims – working as buttons – corresponding at each available body type; each prim button is named with a specific keyword or tag which corresponds to a specific body type.
The content of the example HUD as shown above will look like this:

As shown, the HUD contains different items:
- Product: the final product where each object corresponds to a specific body type;
- HUD: the customisation HUD, one per each body brand;
- Notecard: instruction notecard;
- Landmark: store landmark;
- Texture: product advertisement;
IMPORTANT: The “core” part of MD Smart Unpacker Script’s selective unpacking is the relation between HUD’s buttons and HUD’s content and how keywords are used to create a bound between the button of the HUD and the correct item to be unpacked.
Starting from the example HUD shown above, when the final user presses the button of a specific body MD Smart Unpacker Script will retrieve the name of the button from the prim’s name (i.e. “(Lara)” – no quotes) and use its inventory map to retrieve a list of products and HUD having the same keyword in their name. So – for example – when the final user requests to unpack the Legacy body, MD Smart Unpacker Script will:
- retrieve the keyword from the button’s name pressed, in this example “(Legacy)” – without quotes;
- scan its inventory map using the keyword retrieved and create a temporary folder containing:
- the product called “My product – (Legacy)” – without quotes;
- the HUD called “My product HUD” – without quotes;
- the object called “My product – Add On – (ALL)” – without quotes;
- the notecard called “My product instructions” – without quotes;
- the landmark called “My Store Landmark” – without quotes;
- the advertisement texture called “My product” – without quotes;
- deliver the created folder with all its content to the requesting avatar;
This way the requesting avatar will receive a folder containing only the product and HUD for the selected body, along with the other (optional) items such as notecard, landmark and advertisement.
PLEASE NOTE: it is important to point out how in both buttons and products name the body type is written enclosed between parenthesis; this is because MD Smart Unpacker Script retrieves the keyword from the HUD’s button name and scans the inventory map collecting every item (product and HUD) having the same keyword in the name. For this reason if the button for the Legacy body was called just “Legacy” – without quotes – MD Smart Unpacker Script would have included both the product called “My product – (Legacy)“ and “My product – (Legacy Perky)“ in the folder to deliver, since both contain the keyword “Legacy” in their names. This would have been a mistake since the final user requested to unpack just the “Legacy” body and not the “Legacy” and “Legacy Perky” versions of the product. Enclosing the product name (and the corresponding HUD button) between round,square or brace parentheses will “isolate” the body type and allow the MD Smart Unpacker Script to select the right items.
Another important thing to notice is the behaviour of the object called “My product – Add On – (ALL)”: this specific item is flagged with the keyword “(ALL)” – without quotes – and for this reason considered as a “jolly” product, which will be always included during any kind of unpack.
One last thing worth to mention is the behaviour of the “ALL” button in the example HUD shown above: for this particular unpacking rule no separate prim is required as button, as MD Smart Unpacker Script will detect every click performed on the HUD root prim and automatically unpack everything.
Chapter #5.2: brands, models & default keywords
MD Smart Unpacker Script is able to identify and correctly manage a wide list of body types through default built-in keywords; each keyword is then linked to a specific brand and model which are used to create ad-hoc statistics about unpacking, such as the ranking of the most unpacked body models or the unpacking trend over months.
Store owner can easily take advantage of this automatic brand&model linking using – for each body type – the specific default keyword reported in the table below:
| Keyword | Brand | Model | Gender | Type |
|---|---|---|---|---|
| Gianni | Signature | Gianni | M | Body |
| Geralt | Signature | Geralt | M | Body |
| Davis | Signature | Davis | M | Body |
| AthleticM | Legacy | Athletic Male | M | Body |
| Jake | Belleza | Jake | M | Body |
| Lara | Maitreya | Lara | F | Body |
| Lara Petite | Maitreya | Lara Petite | F | Body |
| Legacy | Legacy | Original | F | Body |
| Perky | Legacy | Perky | F | Body |
| Pinup | Legacy | Pinup | F | Body |
| Maternity | Legacy | Maternity | F | Body |
| TMPClassic | TMP | Classic | F | Body |
| Freya | Belleza | Freya | F | Body |
| Isis | Belleza | Isis | F | Body |
| GenXCurvy | Belleza | Gen.X Curvy | F | Body |
| GenXClassic | Belleza | Gen.X Classic | F | Body |
| SPPeach | Spider Production | Peach | F | Body |
| Venus | Belleza | Venus | F | Body |
| EbodyCurvy | Ebody | Curvy | F | Body |
| EbodyClassic | Ebody | Classic | F | Body |
| Kupra | Inithium | Kupra | F | Body |
| KupraKups | Inithium | Kupra Kups | F | Body |
| Khara | Inithium | Khara | F | Body |
| Kario | Inithium | Kario | M | Body |
| Physique | Slink | Physique | F | Body |
| HG | Slink | Hourglass | F | Body |
| Alice | Signature | Alice | F | Body |
| TonicCurvy | Tonic | Tonic Curvy | F | Body |
| TonicFine | Tonic | Tonic Fine | F | Body |
| HGP | Slink | Hourglass Petite | F | Body |
| ClassicM | Legacy | Classic | M | Body |
| SlinkMale | Slink | Male | M | Body |
| Evolve | ExMachina | Evolve | M | Body |
| Aesthetic | Niramyth | Aesthetic | M | Body |
| Lara Flat | Maitreya | Lara Flat | F | Body |
| LaraX | Maitreya | Lara X | F | Body |
| Legacy Athletic | Legacy | Athletic | F | Body |
| EbodyReborn | eBody | Reborn | F | Body |
| Erika | Kalhene | Erika | F | Body |
| Analexa | Kalhene | Analexa | F | Body |
| TDB | ToddleeDoo | TD Baby | M&F | Body |
| TDK | ToddleeDoo | TD Kid | M&F | Body |
| TDF | ToddleeDoo | TD Fitted | M&F | Body |
| TWD | ToddleeDoo | TweeneeDoo | M&F | Body |
| Zooby | Zooby | Zooby | M&F | Body |
| BebeT | Bebe | Bebe Toddler | M&F | Body |
| BebeC | Bebe | Bebe Chonk | M&F | Body |
| BebeY | Bebe | Bebe Youth | M&F | Body |
| BebeYC | Bebe | Bebe Youth Chonk | M&F | Body |
| Leelu | Bad Seed | Leelu | M&F | Body |
| Tweenster | Meshmerized | Tweenster | M&F | Body |
| Lullabeebs | Lullabeebs | Lullabeebs | M&F | Body |
| CZSlim | CZ | Slim | M | Body |
| CZMuscle | CZ | Muscle | M | Body |
| CZMale | CZ | Male | M | Body |
| LelErin | LeLutka | Erin | F | Head |
| LelNova | LeLutka | Nova | F | Head |
| LelNuri | LeLutka | Nuri | F | Head |
| LelLake | LeLutka | Lake | F | Head |
| LelFleur | LeLutka | Fleur | F | Head |
| LelRyn | LeLutka | Ryn | F | Head |
| LelRiver | LeLutka | River | F | Head |
| LelLilly | LeLutka | Lilly | F | Head |
| LelZora | LeLutka | Zora | F | Head |
| LelSasha | LeLutka | Sasha | F | Head |
| LelIrina | LeLutka | Irina | F | Head |
| LelCeylon | LeLutka | Ceylon | F | Head |
| LelBriannon | LeLutka | Briannon | F | Head |
| LelAvalon | LeLutka | Avalon | F | Head |
| LelSkyler | LeLutka | Skyler | M | Head |
| LelLuka | LeLutka | Luka | M | Head |
| LelKane | LeLutka | Kane | M | Head |
| LelConnor | LeLutka | Connor | M | Head |
| LelAlain | LeLutka | Alain | M | Head |
| LelPaxton | LeLutka | Paxton | M | Head |
| GenClassic | Genus | Classic Face | F | Head |
| GenStrange | Genus | Strange Look | F | Head |
| GenStrong | Genus | Strong Face | F | Head |
| GenBaby | Genus | Baby Face | F | Head |
| CatMajerE | Catwa | Majer Edged | F | Head |
| CatMajerS | Catwa | Majer Soft | F | Head |
| CatQueen | Catwa | Queen | F | Head |
| CatSasa | Catwa | Sasa | F | Head |
| CatGeorge | Catwa | George | M | Head |
| WaifuB | eBody | Waifu Boobs | F | Addon |
| PrimaPetite | Prima | Petite | F | Body |
| PrimaElite | Prima | Elite | F | Body |
| PrimaBusty | Prima | Busty | F | Body |
| JuicyR | eBody | Juicy Rolls | F | Addon |
| NHUMANA | Nhuma | Nhuma | F | Body |
PLEASE NOTE: as explained in the previous chapter the keywords listed above have to be used both in the HUD’s button (written in the prim’s name) and added in the corresponding product’s name and customising HUD.
While using these default keywords will allow MD Smart Unpacker Script to automatically generate all the available types of statistics, store owners can use their custom keywords without breaking the unpacking features as long as the same custom keyword is used both for the HUD button’s name and is part of the corresponding product’s name.
Chapter #6: social link buttons for a “wear-to-unpack” HUD
MD Smart Unpacker Script allows store owners to configure a wide range of links in their product HUD; these links can go from the store landmark to a group join link or the major social networks. In order to setup this feature the owner will have to go through two different steps:
- Use the dedicated MD Smart Unpacker webpage at MD Labs Online Services to submit the desired links providing the corresponding URLs;
- Add, for each link type, a button in the HUD using a specific keyword as button’s name;
The owner will first have to reach the MD Smart Unpacker webpage at MD Labs Online Services and click on the “setup/edit” link located under the “store management” tab; this will load the social link setup window as shown below.
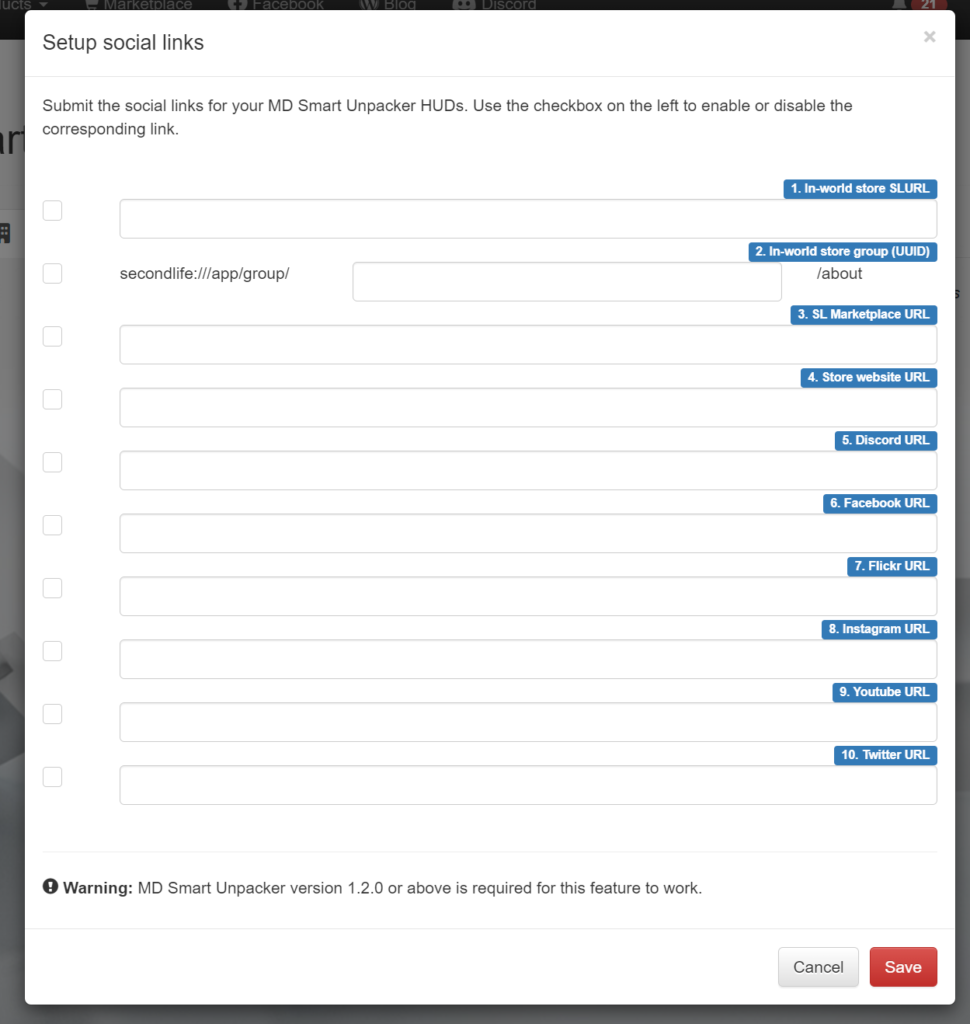
The owner will have to provide the requested information such as web URL, SLURLS, group UUID, depending on the link being setup and click on the “save” button to store the information; from now on, every HUD which will be setup will automatically download the social links setup without needing to submit the links again.
After enabling the desired links, the store owner will have to name the corresponding HUD prim buttons using the keyword specified in the table below; doing this will complete the setup and once the final user will click a specific link button, MD Smart Unpacker Script will retrieve the button’s name, match the keyword and provide the user the right link or action.
| Link type | HUD button prim’s name |
|---|---|
| Discord | discord |
| Flickr | flickr |
| Store in-world group | group |
| Store website | web |
| SL Marketplace | mp |
| Store in-world SLURL | slurl |
| Youtube | youtube |
Chapter #7: setup a single-prim box
MD Smart Unpacker Script is designed for a maximum flexibility and it is able to work also when installed in a single-prim box: in this case once the final user wears the box or rezzes it on the ground and touches it the complete content of the package is automatically delivered.
It is important to notice that when using MD Smart Unpacker Script in a simple single-prim box the store owner will lose the benefits of the advanced features such as selective unpacking and all the statistics which come with it.
Chapter #8: MD Labs Online Services
MD Labs Online Services is a responsive website, accessible from any platform from mobile devices to desktop computers, which allow to interact with the products released by MD Labs. Here’s a quick overview of what the the MD Smart Unpacker Script owner will be able to do:
- Get a quick overview of all the body types unpacked, with total number of unpacks;
- View detailed graphs with unpack trends by model, brand, gender;
- Associate custom-created keywords (tag) to a specific brand & model;
- Analyse the unpacking trends over time;
Chapter #8.1: register an account and activate the product
Before accessing the website for the first time, the owner must register an account and activate the service. In order to do so, an Online Services HUD is provided inside the MD Smart Unpacker pack.
Click here for the detailed instructions about how to register and activate your product for MD Labs Online Services.
2021 MD Labs