Quick summary:
-
Chapter #1: Initial setup
-
Chapter #2: Owner menu
-
Chapter #3: Basic usage
-
Chapter #4: Privacy
-
Chapter #5: Options
Initial notes
The following user manual applies to:
- MD Teleport System
- MD Teleport System – Super Mario Pipe Edition
When some of the features are available only for a specific version, will be clearly stated.
Chapter #1: initial setup
To get started using your MD Teleport System, first rez a copy and click on it to perform the quick setup; the owner will be asked to name the teleporter in order to idenfity it.
Please note: this step is very important and mandatory for the teleporter to work correctly; moreover, the name provided should be unique in order to avoid confusion between multiple teleporters belonging to the same owner.
Once the teleporter have been named, the initial setup is complete. At this point, the teleporter will start scanning the area around for other teleporters belonging to same owner and will automatically link to them if they are found; this procedure can take up to 60 seconds the first time.
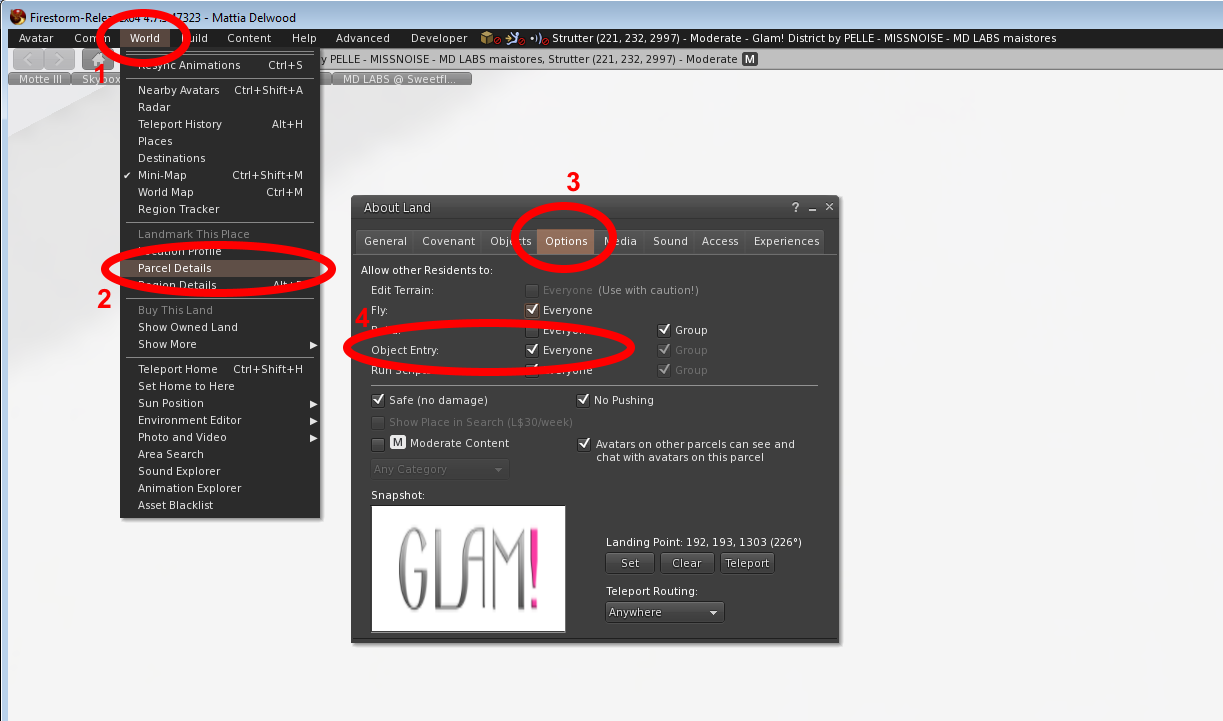
Important: for the teleporter to work properly, there is a parcel setting called ‘object entry’ that must be set correctly; this specific setting allows the telporter to move around the parcel, infact teleporting the avatar itself. Usually this setting is enabled by default but in case it isn’t, the MD Teleport System will send the owner a warning during the setup process, requesting to enable the option. To enable this option go to World > Parcel Details > Options tab and set the Object entry checkbox to Everyone.
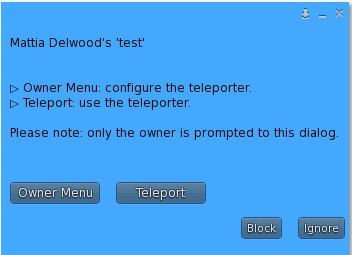
Once the initial setup is complete if owner clicks on the teleporter will be propted to a menu called ‘choice menu’; this menu can be accessed by the owner only and will show 2 different buttons:
- Owner menu: using this button the owner can access to the teleporter’s configuration menu, where several options can be set in order to customize the teleporter.
- Teleport: this button starts the normal teleport procedure.
Chapter #1: Owner Menu
When the owner clicks the teleporter and selects ‘Owner Menu’, the configuration menu is displayed. This particular menu – accessible by the owner only – contains all the settings and options needed to setup the MD Teleport System in a quick and flexible way.
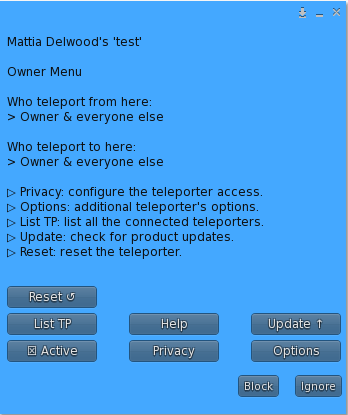
This menu is divided in many section, some of them leading into other sub menus
- Active: this button enables or disables the teleporter. When enabled, the teleporter will be usable by the owner and other users whom comply the optional access list configuration; if disabled, the teleporter will be unusable for everyone, including the owner.
- Privacy: this button leads the owner to a submenu where it’s possible to configure the teleporter’s access list, defining who can use (leave and reach) the teleporter.
- Options: this button takes the owner to a submenu where some additional settings are present, in order to customize even more the teleporter.
- List TP: this button will list to the owner the complete list of all teleporters connected to the actual one.
- Update: this button starts the update module, which will look online for a new update of the product and – if found – deliver it to the owner.
- Reset: this button will reset the teleporter, wiping all the data, including options and access list.
Chapter #3: Basic Usage
For a basic usage – suitable to most users – the owner will have to rez at least 2 teleporters. Once named them correctly (using different names!), the teleporters will start scanning the area around and within 60 seconds they will link to each others; a message will be sent to the owner, stating the teleporter have found each others and connected. At this point, simply right clicking on one teleporter and selecting ‘Teleport’ will teleport the user from one teleporter to another. Alternatively, the owner can also left-click on the teleporter and select “Teleport” from the Choice Menu to teleport.
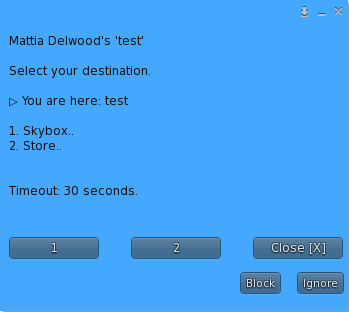
If more than 2 teleporter are rezzed and setup, once an user clicks to teleport will be propted to a menu where its asked to choose the destination among the possible ones; a 30 seconds timeout is applied at this step and the user will be unsit from the teleporter if the timeout occurrs.
Chapter #4: Privacy
This section is one of the most important present into the MD Teleport System, because allows the owner to define who can use each teleporter. Using this feature and its many options, the owner can have the total control on who is able to use the teleporter to reach some specific areas. The Privacy menu is divided itself into 3 sections:
- Leave: this button takes the owner to another menu where it’s possible to define who can leave using the teleporter. In other words, the ‘leave’ setting define who can sit on the teleporter and teleport to a specific destination.
- Arrive: this button takes the owner to another menu where it’s possible to define who can reach the teleporter. In other words, the ‘arrive’ setting define if the corresponding teleporter will appear inside the list of possible destinations.
- Access list: this button takes the owner to the access list submenu, where it’s possible to create, edit and remove a group of avatars whom will have specific permissions on the teleporters.
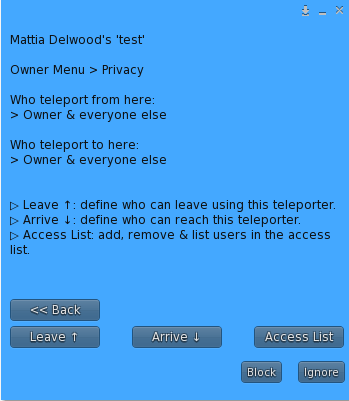
NOTE: By default, the teleporter is set to ‘public’: this means everyone can use the teleporter to leave (teleport) and everyone can arrive to the teleporter (teleport present in destination list).
Chapter #4.1: Leave
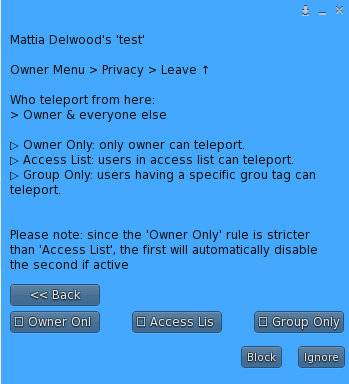
When defining who can sit and use the teleporter, different options are present:
- Owner Only: if this option is enabled, only the owner will be able to teleport from this device.
- Note: while other users cannot sit and teleport, they will still be able to see and reach this teleport as a destination when using from another teleport. The restriction of this behavior has to be done inside the ‘Arrive’ submenu.
- Access List: with this option active, only the owner and the users present in the access list will be able to sit and teleport from this device.
- Note: while other users not present into the access list cannot sit and teleport, they will still be able to see and reach this teleport as a destination when using from another teleport. The restriction of this behavior has to be done inside the ‘Arrive’ submenu.
- Group Only: this option let only users wearing a specific group’s tag to be able to teleport from this device. In order to use this feature, owner will be asked to assign the teleporter to the desired group using the group tool that can be found under right-click > Edit >General tab. Once selected the right group, clicking on the “Group Only” button will enable the feature.
- Note: while other users not having the right group tag cannot sit and teleport, they will still be able to see and reach this teleport as a destination when using from another teleport. The restriction of this behavior has to be done inside the ‘Arrive’ submenu.
Chapter #4.2: Arrive
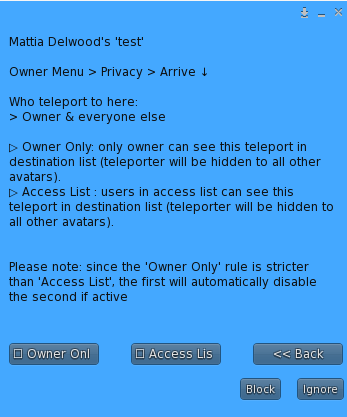
When defining who can see a specific teleporter in the destination list and reach it, different options are present:
- Owner Only: if this option is enabled only the owner will be able to see this teleporter in the destination list and select it, making the teleporter perfect for a private area where no one – except the owner – have access.
- Note: while other users cannot reach this teleporter selecting it from the destination list, they can still use it if they somehow reach (or are teleported) to the area where the teleporter is rezzed. The restriction of this behavior has to be done inside the ‘Leave’ submenu.
- Access List: with this option active, only the owner and the users present in the access list will be able to see this teleporter in the destination list and teleport to the area where its rezzed.
- Note: while other users cannot reach this teleporter selecting it from the destination list, they can still use it if they somehow reach (or are teleported) to the area where the teleporter is rezzed. The restriction of this behavior has to be done inside the ‘Leave’ submenu.
Chapter #4.3: Access List
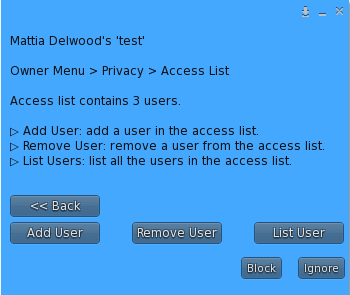
This section is designed to manage the access list, used to define both who can leave (sit and teleport) and who can arrive (select the teleporter from the destination list).
There are 3 main action to perform in this area:
- Add user: by clicking, owner will be asked to provide the name or key (UUID) of the avatar to add to the access list. If the value submitted is valid, the corresponding avatar will be immediately added and will be able to leave and/or arrive to the teleporter, depending by the privacy settings.
- Remove user: this button will popup a menu containing all the avatar present inside the access list and owner will be asked to pick the one to remove.
- List user: this button will list to the owner all the avatars present in the access list.
Important: the access list is shared and synced between ALL the teleporters present in the parcel: this is mandatory for all the privacy settings to work properly. This means that when adding or removing a user on one teleporter, the change will be reflected to all teleporters linked during the next sync.
Chapter #5: Options
In the option sub menu is possible to find some additional features aimed to enrich even more the experience with the MD Teleport System.
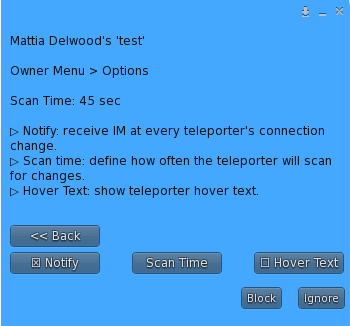
- Notify: when this option is enabled, the owner will receive a notification IM from the teleporter once one of its connections changes; this means either when a new teleporter is found and connected or when an existing teleporter is removed from the linked ones.
- Scan Time: each teleporter – when active – will keep scanning the area around at a given rate; this rate, called scan time, can be adjusted to define how often the scan will occurr. At each scan the teleporter will update the list of connected teleporters, removing the deleted ones and adding the new ones.
- Hover Text: this option will display a custom text – submitted by the owner – on the teleporter.