Quick summary:
-
Chapter #1: Initial setup
-
Chapter #2: Owner menu
-
Chapter #3: Basic usage
-
Chapter #4: Demo & fatpack
-
Chapter #5: Multiple setup
-
Chapter #6: Options
-
Chapter #7: MD Labs Online Services
-
Chapter #8: SL Marketplace integration
-
Chapter #9: User menu
Initial notes
The following user manual applies to:
- MD Buy / Buy as Gift Script
- MD Buy / Buy as Gift Vendor
When some of the features are available only for a specific version, will be clearly stated.
Chapter #1: initial setup
Depending on the version, the owner will have to either drag the MD Buy / Buy as Gift Script in any object to be used as vendor or just rez the MD Buy / Buy as Gift Vendor. Then, a simple click will prompt the debit permission request. This step is mandatory for the vendor system setup and it’s required to activate the refund system. Clicking on “next” and granting the permission will complete this step.
Once granted the debit permission, the vendor is not already setup for working and some other steps are necessary. If a normal user – different from the owner – clicks on the vendor at this point, will get a message saying the vendor is not yet ready for work. When the owner clicks on the vendor, a dialog menu will appear called “owner menu”: this dialog is visible only by the owner and allow to enter script settings.
The basic setup for the vendor is now done, but to make it working a couple of more additional steps are required.
Chapter #2: owner menu
When the owner enters the owner menu, a dialog will appear. From this window, all the script options are accessible to be customized.
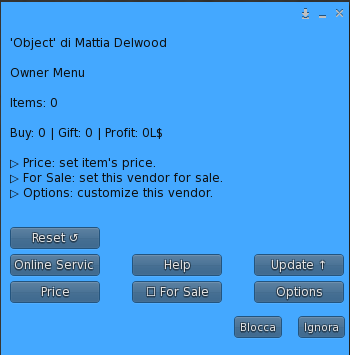
This menu is divided in many section, some of them leading into other sub menus:
- Price: this first feature is used to set item and fatpack (if present) price in L$; clicking on the “Price” button will open a submenu where the owner is asked if the price to set is for the item’or the fatpack. Once made the choice, the owner is asked to submit the price in L$. Only integer values bigger than zero are allowed.
- For Sale: this button acts like a switch, setting the vendor and all its content for sale or not. Setting the vendor for sale is a mandatory step to complete the setup; in order to be set for sale, the vendor should match some criteria:
- Must contain at least one item to be sold;
- The item’s price must be set;
- If a fatpack item is present, the fatpack’s price must be set;
If all the above conditions are verified, clicking the “For Sale” button will set the vendor for sale, giving users the chance to purchase the products. Clicking another time the button will set the vendor to not for sale state and users won’t be able to interact with the vendor.
- Options: this sub menu groups together all the options present that aim to make this product as flexible as possible. The feature present in this menu are vendor mode, profit split, discount and group mode, notifications, redelivery system, hover text, vendor’s time and limited stock quantity. The detail of each feature will be explained in the options chapter.
- Online Services: opens the MD Labs Online Services website, where the owner can interact with all the rezzed vendors. Details about this feauture can be found in the corresponding chapter.
- Update: this button starts the update module, which will look online for a new update of the product and – if found – deliver it to the owner.
- Reset: this button will reset the vendor, wiping all the data, including options and price.
Chapter #3: basic usage
The basic usage of a vendor containing the MD Buy / Buy as Gift script is very simple: once rezzed and granted the debit permission, owner will have to drop inside the vendor’s content one or more items that users will be able to purchase. For this step owner’s permission on the selected items are very important: if the owner does not have transfer permission on an item it will be ignored and users won’t be able to purchase it. Morevoer, if owner does not have copy permission on an item it will be considered, but a warning message is sent to remind the owner the only available copy of the item will be given to the first user purchasing it.
Once one or more valid item are dropped inside the vendor’s content, a second step is required: owner infact will have to click the “Price” button and input the item’s price in L$.
At this point, clicking the “For Sale” button will set the vendor for sale, terminating the setup and allowing users to purchase the product inside the vendor.
Users can click the vendor and open the users menu to buy, gift or use the redelivery system. Based on the action choosed among the listed ones, different scenario will take place.
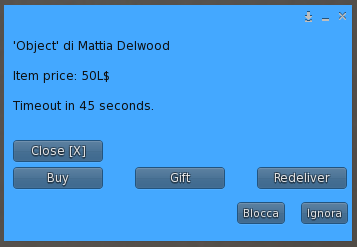
In case of a normal purchase (“Buy” option), user will be asked to select which item to process – if more than one item is present – from a multi page menu; once the selection is made, the vendor will enter the “pay mode” and user will have to pay the vendor the defined amount – either via right click > pay or simply clicking to make the default Second Life payment window show – within a certain time, defined by the vendor’s timeout. If the timeout is reached the operation will be canceled; on the opposite, if users pays correctly the vendor the selected item will be immediately sent as inventory offer, completing the transaction.
In case of gift (“Gift” option), user will be asked to first submit the name or the key (UUID) of the avatar whom will receive the item. After a valid name or key is passed, the process will run similarly to the normal purchase one; user will infact be asked to select the item to gift and then pay the vendor within the defined time to complete the transaction. The purchased item will be immediately sent to the receiver avatar as inventory offer along with an instant message notifying the gift just received.
In case of redelivery (“Redelivery” option), user will be prompted to a list of item contained inside the vendor and available for redelivery; selecting one of them will trigger a verification request to check if the item has been actually purchased by the requesting avatar. In case a transaction record is found the verification ends with success and the item is sent again to the user as inventory offer.
Chapter #4: demo & fatpack
Other than normal items, MD Buy / Buy as Gift can handle a virtually unlimited number of demo items and one fatpack item. To enable these two features, owner will have drop the demo/fatpack item in the vendor first; in order for the script to correctly identify those special items a reserved keyword in their name is needed:
- Demo items must contain the keyword ‘DEMO‘ in their name;
- Fatpack item must contain the keyword ‘FATPACK‘ in its name;
Please note: the keyword can be in any part of the item’s name, but it mandatory to write it with capital letters and without quotes.
Here’s a couple of examples for correct demo items:
- DEMO Mesh rigged hair;
- Mesh rigged hair DEMO;
- (DEMO) Mesh rigged hair;
- Mesh rigged hair [DEMO];
- DEMO! MESH RIGGED HAIR;
- Mesh hair DEMO rigged;
Here’s a couple of examples for correct fatpack items:
- FATPACK Mesh rigged hair;
- Mesh rigged hair FATPACK;
- (FATPACK) Mesh rigged hair;
- Mesh rigged hair [FATPACK];
- FATPACK! MESH RIGGED HAIR;
- Mesh hair FATPACK rigged;
All above examples are correct, since the keyword its written in capital letters and appear in different point of the item name.
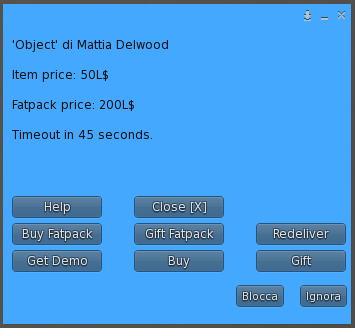
Once a new item is dropped inside the vendor, the MD Buy / Buy as Gift Script will scan each item’s name and – using the above keywords – automatically understand if it’s a demo, a fatpack or a normal item. When a demo or a fatpack is found the corresponding feature is automatically enabled, making new options appear in the user menu, like shown below:
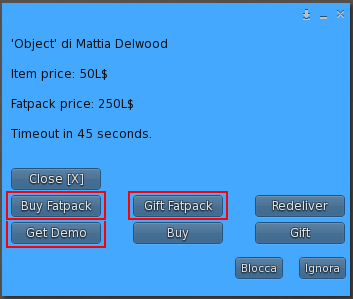
Important: when a fatpack item is dropped inside a vendor, the MD Buy/Buy as Gift Script will automatically set the vendor not for sale, until the owner will set a price for the fatpack item through the “Set Price” button in the owner menu. Once the fatpack’s price is choosen, clicking the “For Sale” button will set the vendor for sale again.
When a user selects the “Get Demo” option will automatically receive an inventory folder containing all the demo items present inside the vendor; by default, demo items costs 0L$ and this option cannot be changed.
When a user selects “Buy Fatpack” or “Gift Fatpack” options, the normal buy / gift workflow as described in the previous chapter is activated, but applied on the fatpack item.
To disable the demo/fatpack feature owner will just have to remove the corresponding item from the vendor’s content and the MD Buy / Buy As Gift Script will automatically do the rest.
Chapter #5: multiple Setup
MD Buy / Buy as Gift introduces a very useful feature that aims to save time while preparing the vendors. This feature, called ‘multiple setup’, allow the owner to decide whether apply a specific setting to the current vendor or to all vendors present within the same region at the same time.
It’s possible to take advantge of this great feature with all options described in the next chapter. Once a feature is chosen from the option sub menu, the owner will be propted to a dialog asking if apply the setting to the single vendor or to all vendors; once the selection is made and the specific option configured, the settings will be applied to the single vendor or all vendors.

Chapter #6: options
In the options sub menu is possible to find a vastity of additional features aimed to enrich the experience with the buy / buy as gift script, adding some specific functions. These features may not be useful to everyone all the times, but will allow the owner to setup more flexible and customized vendors.
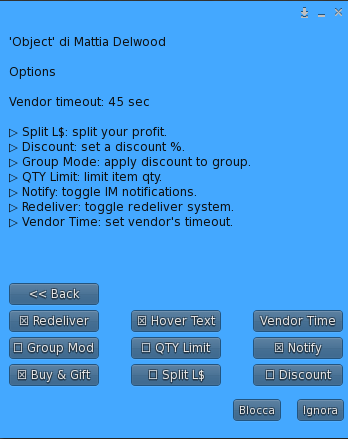
- Vendor mode: this first button acts like a switch, changing the vendor’s operating mode through Buy&Gift, Buy Only and Gift Only. While the Buy&Gift mode allow users to either buy or gift the items in the vendor, the Buy Only mode removes all the gift options from the user menu, allowing users to only purchase the items for themselves. Similarly, the Gift Only mode allow users to only gift the products, removing every buy options.
- Split L$: this option allow the owner to split the profit from the vendor with another avatar. Once clicked on this button, the owner will be asked to type the name or UUID (avatar key) of the avatar whom is going to split the profit with, and pick a split percentage between 1% and 99%. If both steps are done correctly, each time a user makes a purchase, the profit is splitted with the avatar declared and the L$ immediately payed out. When this option is active a “check” sign will appear in the corresponding button of the menu and details will be listed in the menu’s header; hitting another time the ‘Split L$’ button will disable the feature.
- Discount: this option let owner apply a custom discount % to the items present inside the vendor. The owner will be asked to submit a custom discount percentage between 1% and 99%. Once this step is complete, the discounted price is calculated based on the percentage chosen and applied to the item’s cost and to the fatpack too, if present. When this option is active a “check” sign will appear in the corresponding button of the menu and details will be listed in the menu’s header; hitting another time the ‘Discount’ button will disable the feature.
- Group mode: by enabling this feature only the users wearing a specific group’s tag will be able to interact with the vendor. First, the owner will have to assign the vendor the desired group using the group tool that can be found under right-click > Edit >General tab. Once selected the right group, clicking on the “Group Only” button will enable the feature. When the group only mode is active clicking on the button again will disable it. The basic usage of the group mode will allow only users wearing a specific group tag to be able to use the vendor; however, this feature becomes even more useful when used in combination with the discount. Enabling both the discount and group mode, infact, will allow users having the right group tag to purchase item and fatpack at the discounted price, while the others will have the choice to join the group and pay the discounted price, or proceeding without the right group tag and purchasing at the full price.
- QTY Limit: this option – if enabled – lets the owner decide a maximum number of items to be sold, after which the vendor will be set sold out. When clicked on the corresponding button, the owner will be asked to submit the number of items available in stock. Once submitted the value, the feature will be immediately activated and for each sale (“buy” or “gift”) the number of available items in stock is decreased by one unit. When no more items are available the vendor is automatically set on sold out and the owner will receive a notification IM.
- Notify: this option – if enabled – sends the owner an IM each time a users pays the vendor to purchase a product. The IM contains reports the name of the user, the product purchased and the amount payed. If the split L$ option is active, a second IM is sent to the avatar the owner is splitting the income with. When this option is active a “check” sign will appear in the corresponding button of the menu and details will be listed in the menu’s header; hitting another time the ‘Notify via IM’ button will disable the feature.
- Redeliver: when this option is enabled the “Redelivery” button appears in the users menu, allowing the redelivery system. On the other hand, when this option is disabled, the item redelivery is not possible, since no “Redelivery” button will be present in the users menu. When this option is active a “check” sign will appear in the corresponding button of the menu and details will be listed in the menu’s header; hitting another time the ‘Redelivery’ button will disable the feature.
- Hover Text: this option when active displays the hover text over the vendor; this text contains useful suggestion and shows the vendor’s status. When this option is active a “check” sign will appear in the corresponding button of the menu and details will be listed in the menu’s header; hitting another time the ‘Hover Text’ button will disable the feature.
- Vendor Time: this last options represent the amount of time available for the users to interact with the vendor at any step of the purchase process. User infact clicking on the vendor will reserve it for a limited amount of time; if no actions are taken before the timeout, the vendor is set available for the other users. By default the vendor time is 45 seconds, but any value between 30 and 300 seconds is allowed. Clicking on this option owner will have to submit the new vendor time in seconds which will be immediately applied.
A quick side note on Second Life default pay mode & MD Buy / Buy as Gift:
It is normally possible for an avatar to right click on a vendor and select the ‘pay’ option, to directly pay that item without using the vendor’s menu. In this case, the script will consider the purchase as a “Buy” and the item will be delivered directly to the avatar whom paid the vendor.
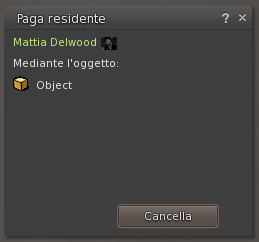
There are some scenario although, where the MD Buy / Buy as Gift will disable this option to avoid wrong payments and mistakes. This because the right amount to pay may vary depending on group mode, discount and item type (normal item or fatpack). Due to all these reasons and for error preventing, the payment method via right click may be disabled, like shown in the image below:
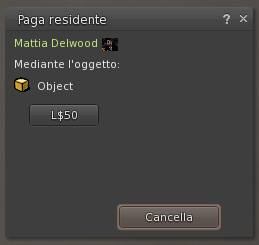
However, there is a particular scenario that represent an exception:
- No fatpack item present inside the vendor;
- No discount feature active;
If these conditions are matched, the MD Buy / Buy as Gift will automatically create a button with the corresponding amount in the payment window, like shown in the next image:
Chapter #7: MD Labs Online Services
MD Labs Online Services is a responsive website, accessible from any platform from mobile devices to desktop computers, which allow to interact with the products released by MD Labs. Here’s a quick overview of what the the MD Buy / Buy as Gift owner will be able to do:
- Get a quick overview of all the vendors, with locations where they are rezzed and total profit;
- Rename a specific vendor (on the website only);
- Delete all data about a specific vendor (from the website only);
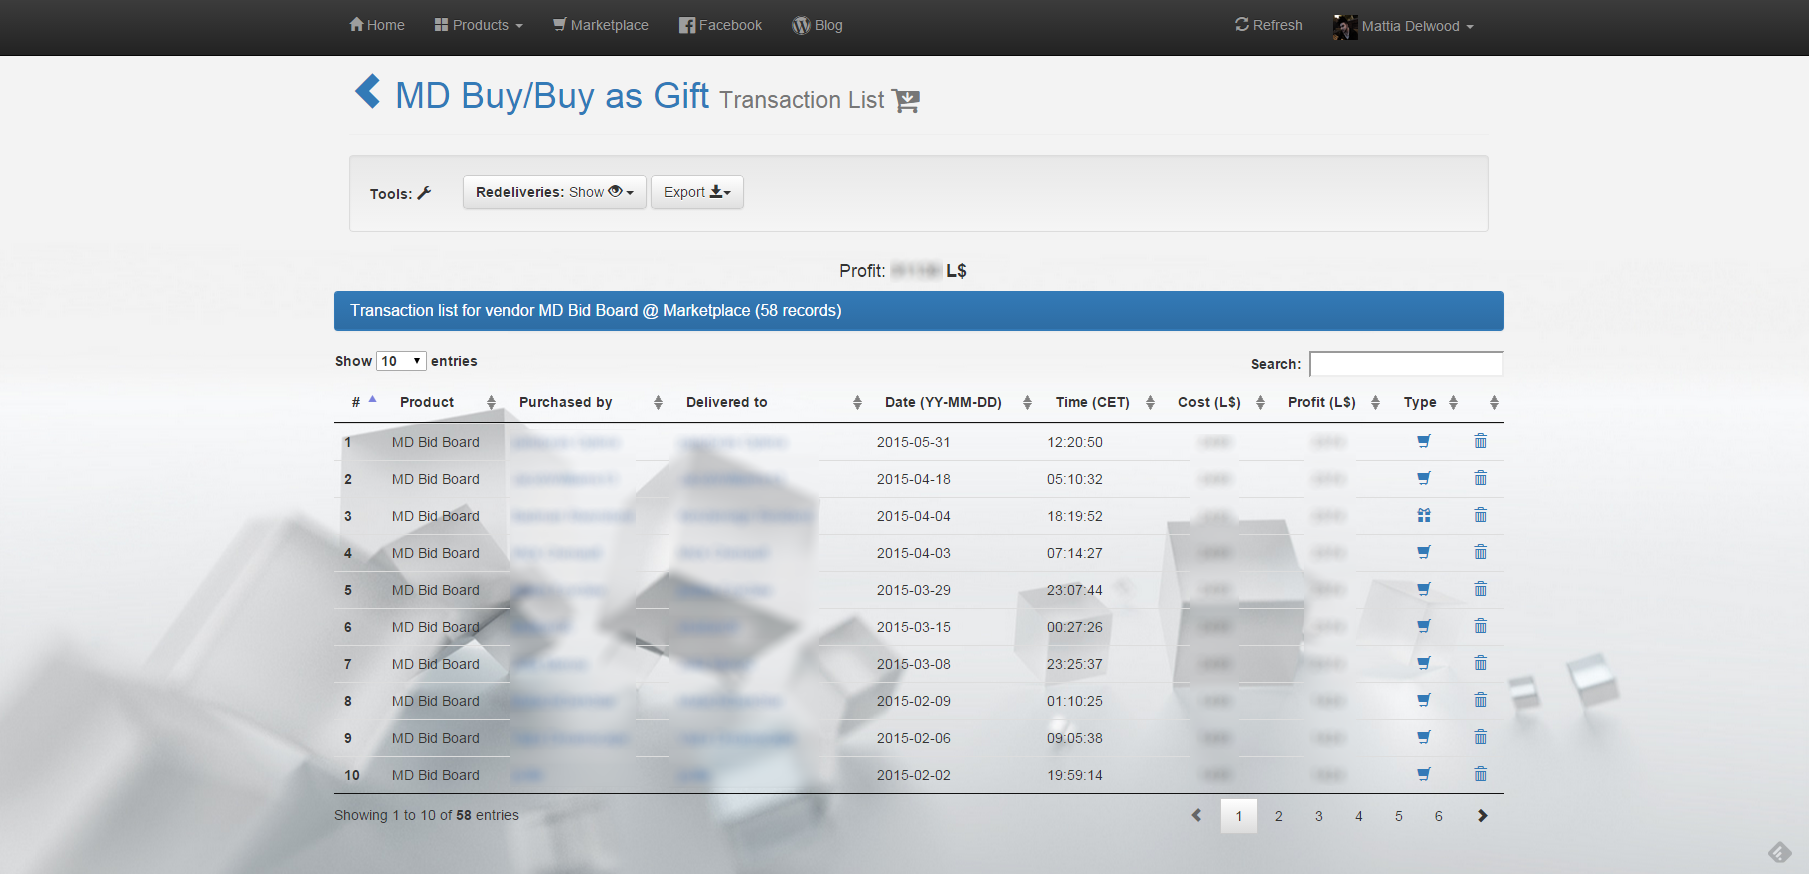
- See the transaction list for any vendor, including buyer, item bought, item cost, net profit, purchase type, purchase date-time;
- Delete a specific transaction from a vendor;
- Display, for each vendor, all the successfull redeliveris;
Before accessing the website for the first time, the owner must register an account and activate the service. In order to do so, an Online Services HUD is provided inside the MD Buy / Buy as Gift pack.
Once attached the HUD, there are 2 simple steps to follow:
- Click on the user icon
 of the HUD, and type a password for the Online Services login.
 - Click on the check icon
 to activate the MD Buy / Buy as Gift for the Online Services.
At this point it’s possible to open the MD Labs Online Services website and simply log in; once successfully logged in, select ‘MD Buy / Buy as Gift’ from the product drop down list on top and the main page will load.
The main page is divided in two different tabs, the first one is called ‘Data’ and the second one is called ‘Graph’; inside the Data tab a full list of all the vendors rezzed in-world is displayed, reporting also the region where the vendor is rezzed and the total profit in L$ made by the single vendor. A box named ‘Tools’ allows to change view and data source in order to lead multiple data analysis, other than exporting the data.
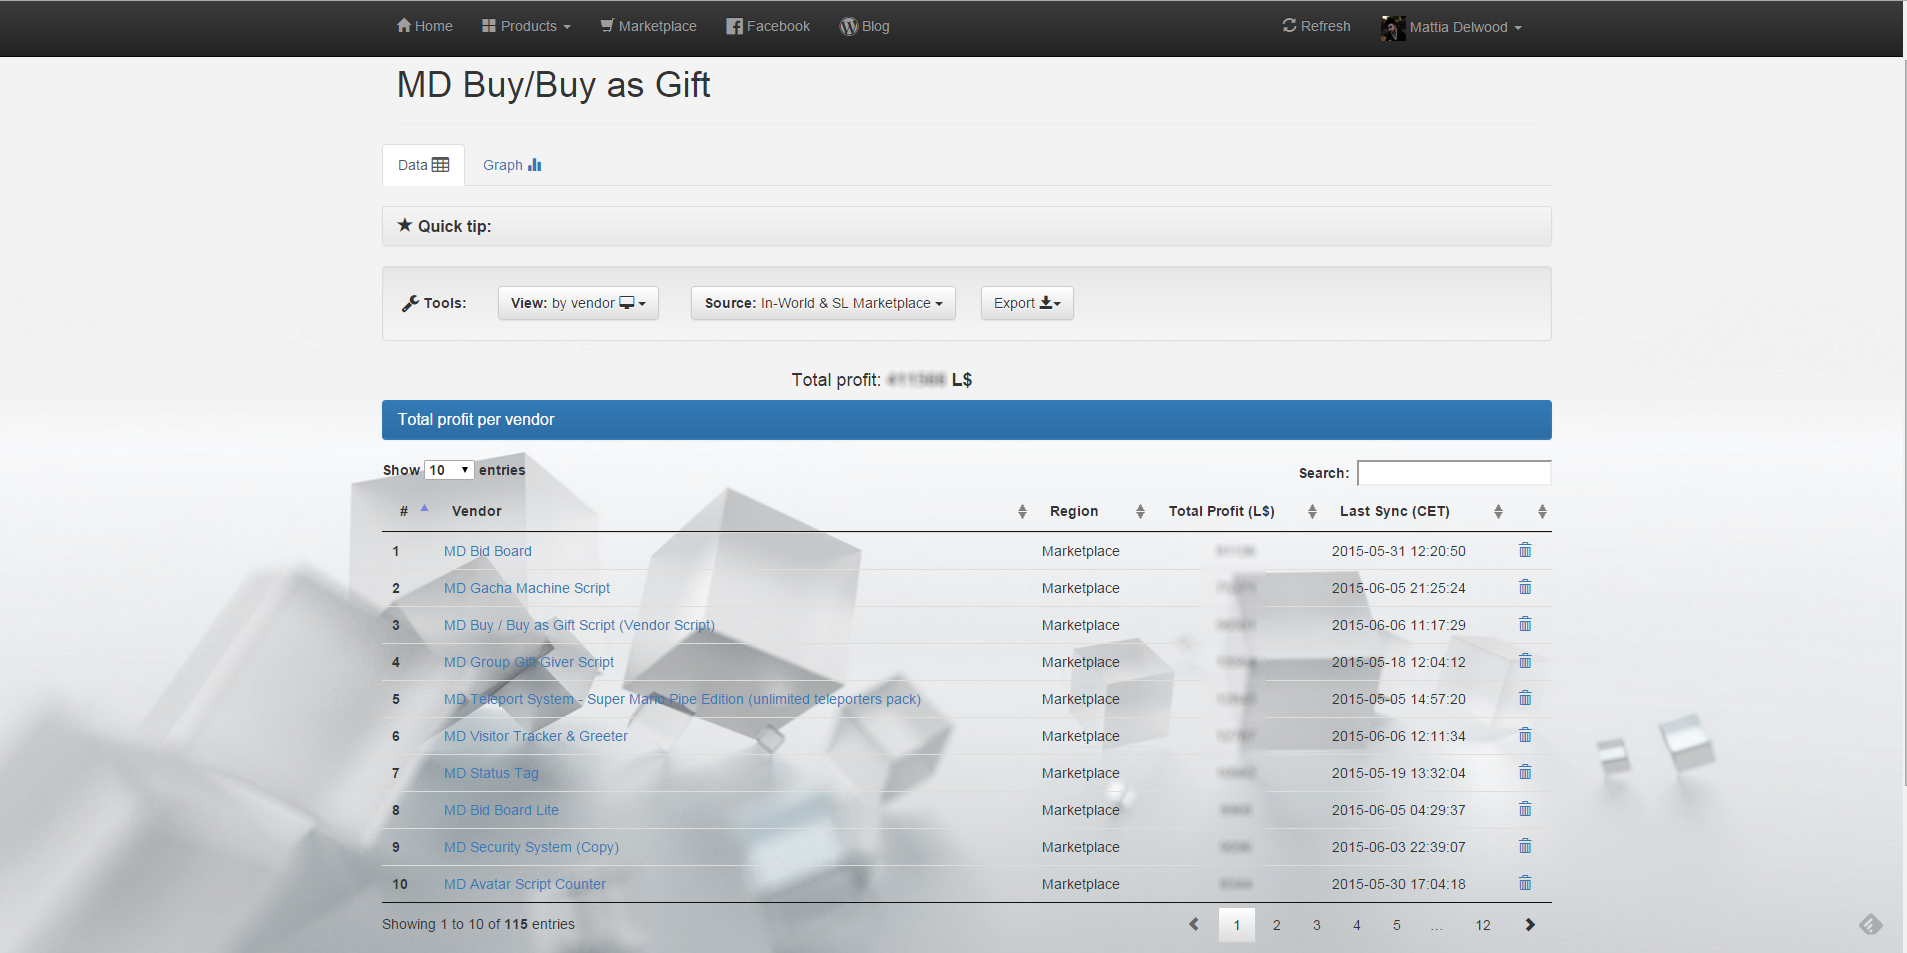
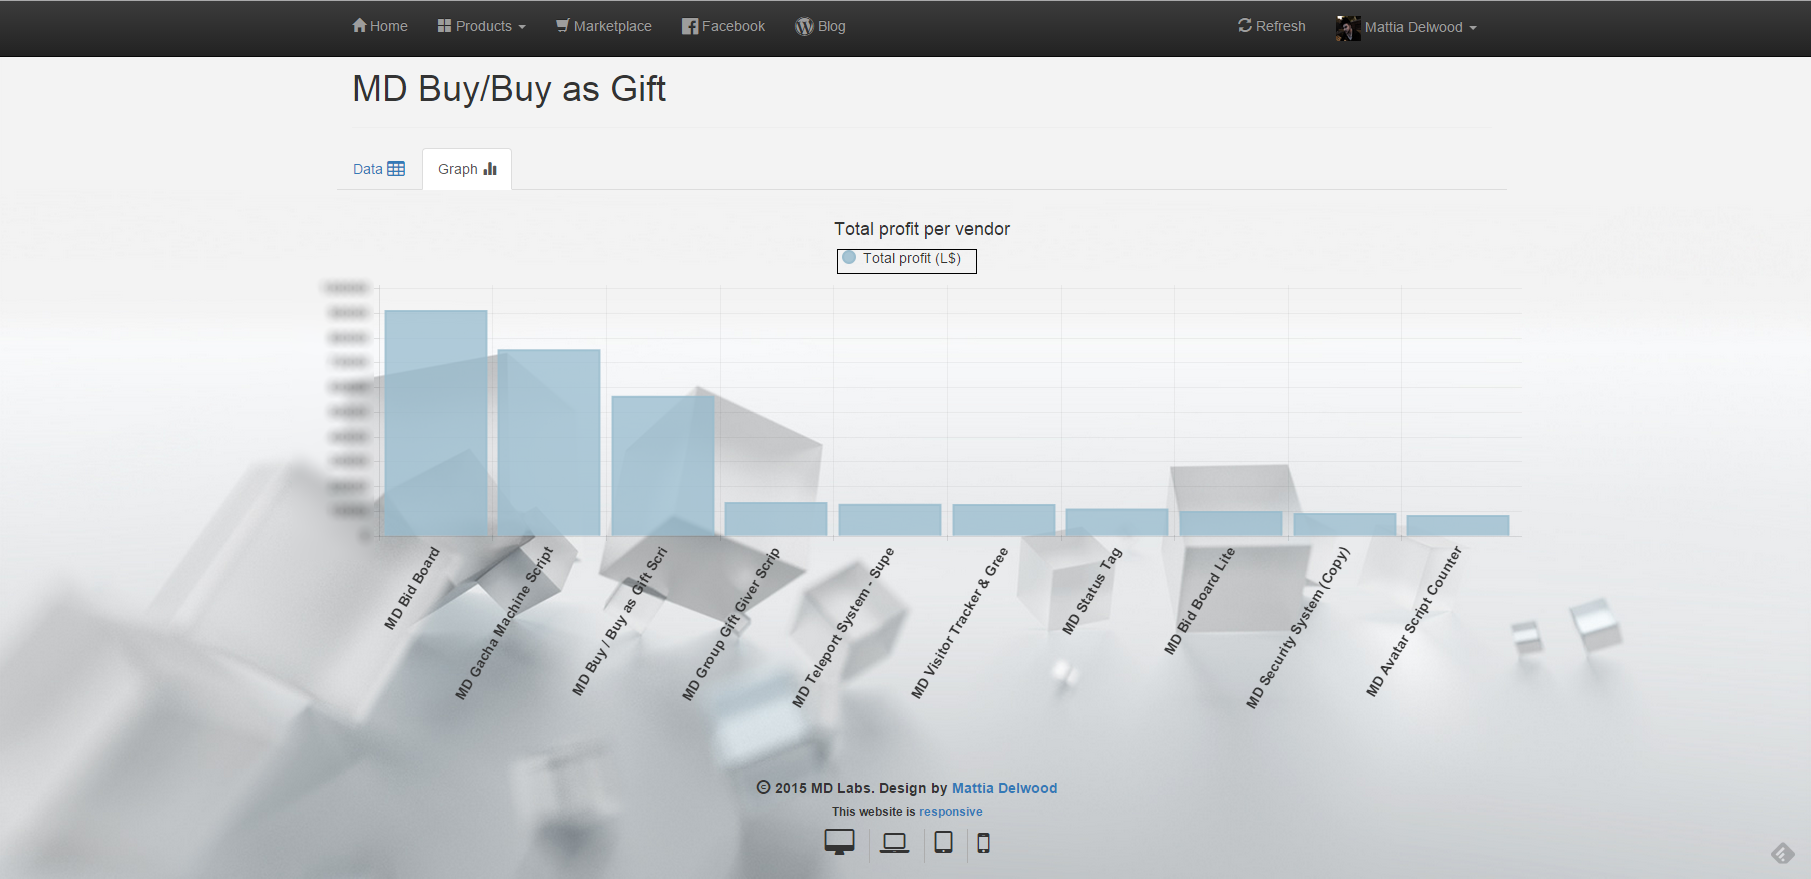
Once selected a specific view and a data source, the ‘Graph’ tab will show an accurate graphic rapresentation of it, like shown in the image below:
By clicking on a specific vendor in the ‘Data’ tab its possible to check the full transactions list of the vendor, with detailed infos about the payer, the receiver, the amount paid and such.
Chapter #8: SL Marketplace integration
MD Labs Online Services also offer the opportunity to integrate SL Marketplace data inside the Online Services website. This means all the sales made through the SL Marketplace will be listed inside the Online Services website, giving a complete and detailed view of both in-world and Marketplace.
In order to integrate SL Marketplace with MD Labs Online Services a quick and easy setup is required. The procedure can be summarized in these few steps:
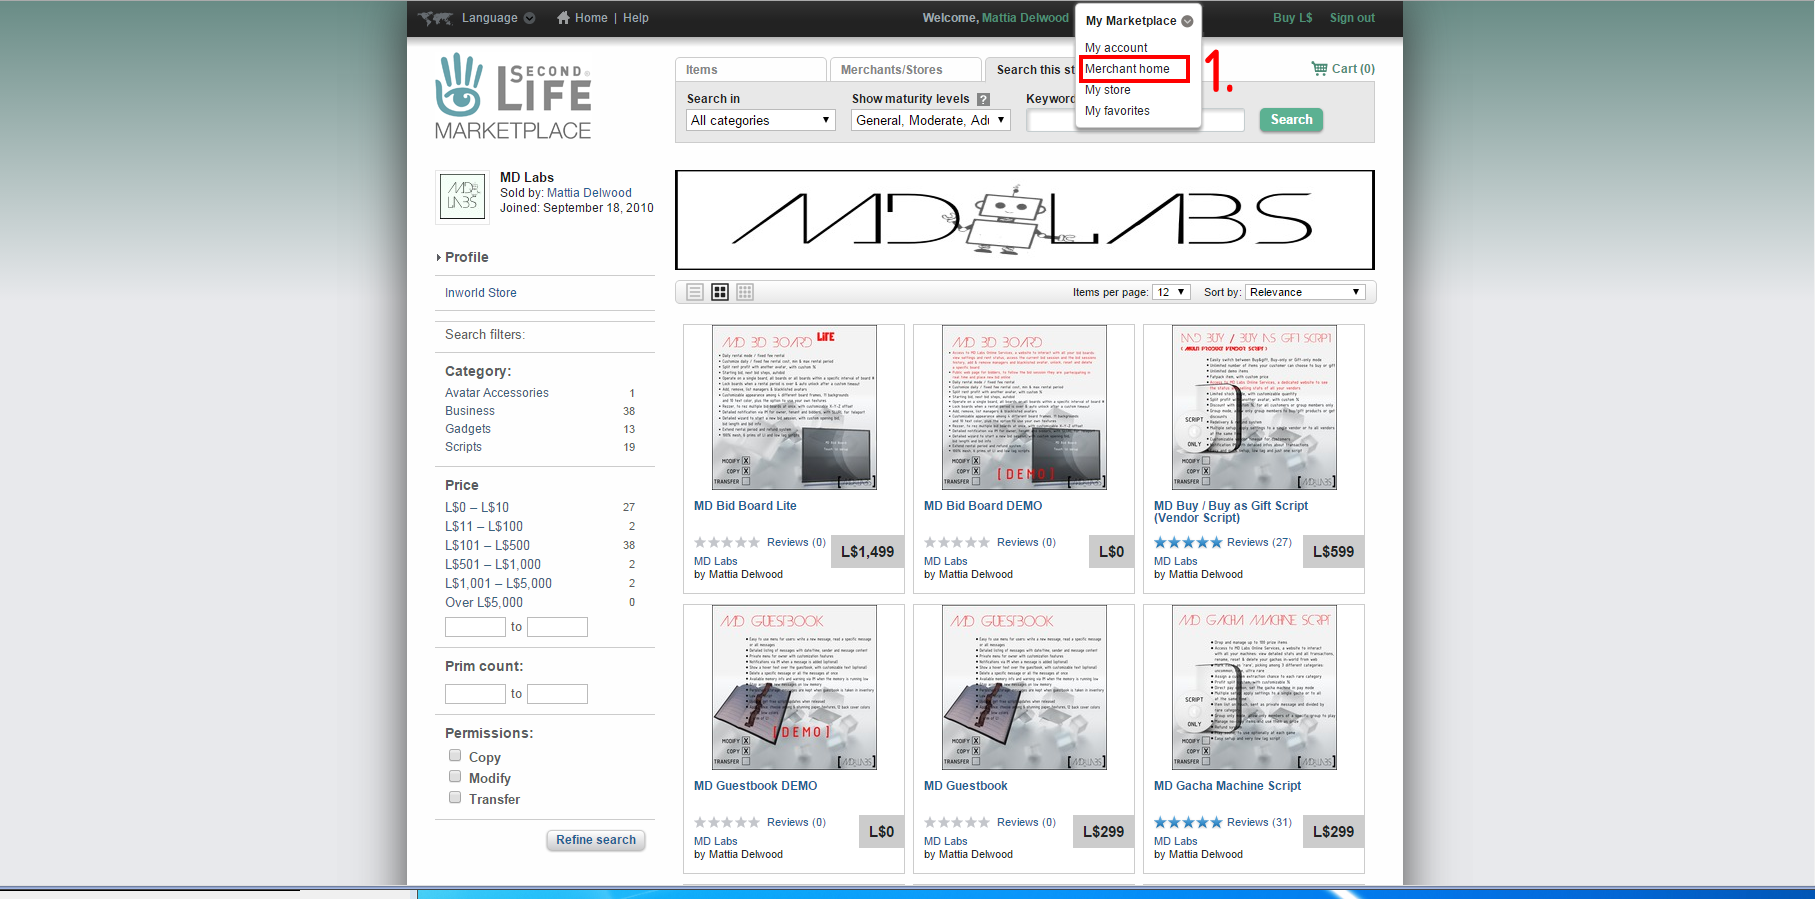
- Open your SL Marketplace webpage and select ‘Merchant home‘ from the ‘My Marketplace‘ drop down list on the top.
2. Select “Automatic Notifications (ANS)” from the left drawer.
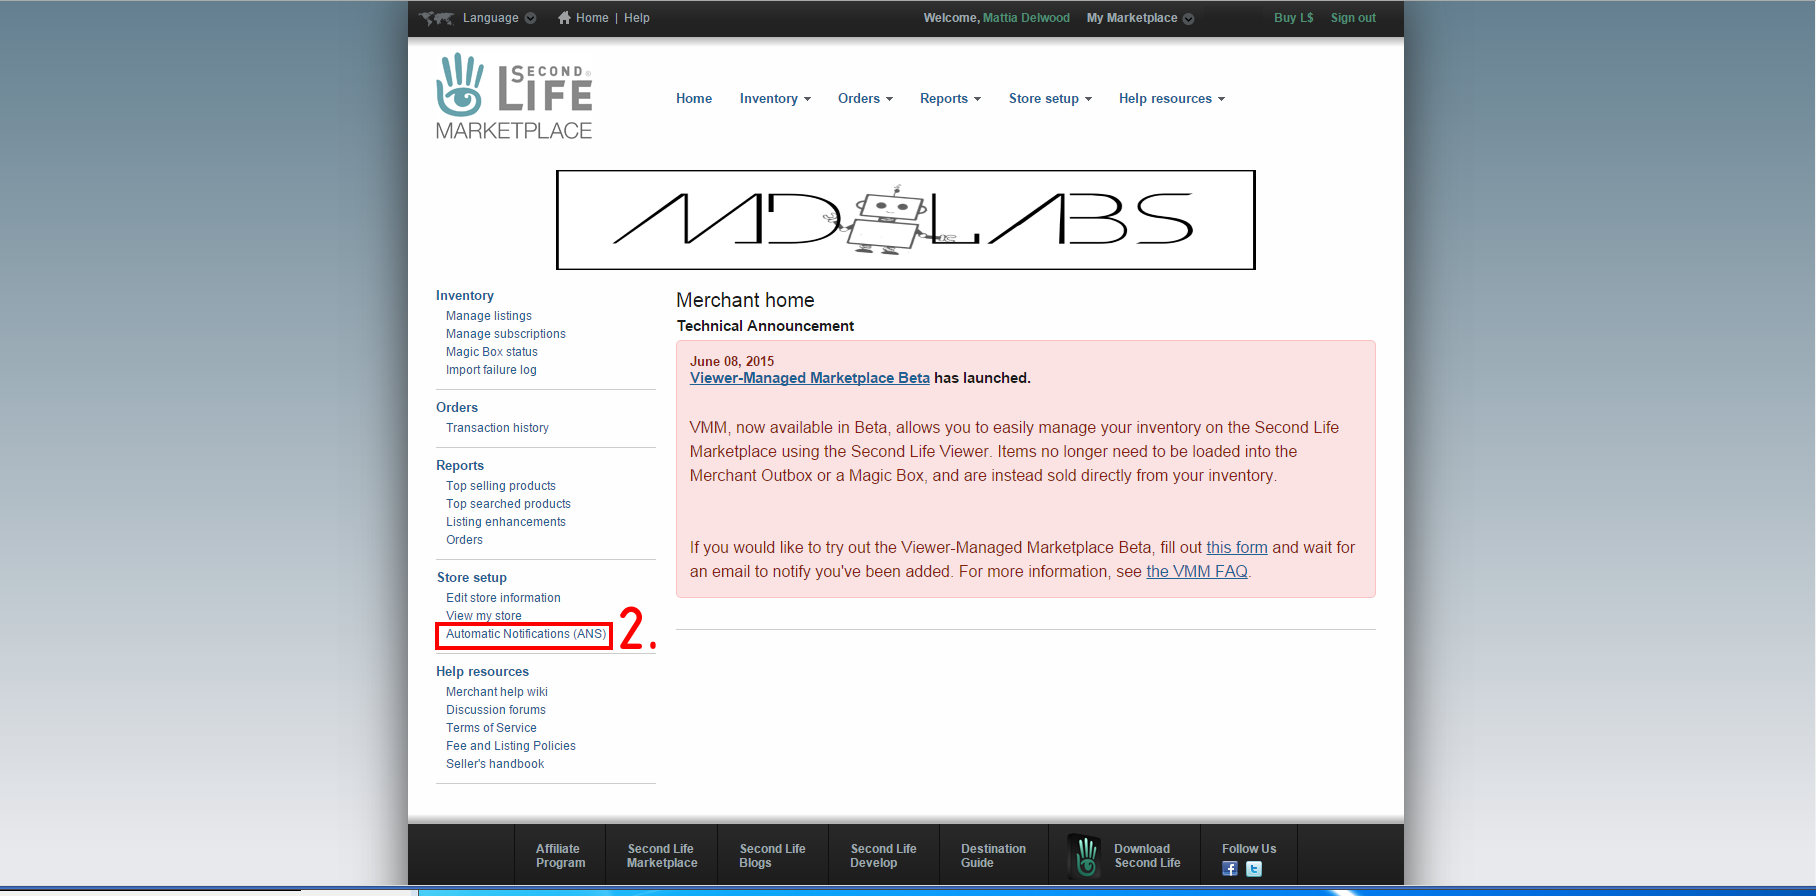
3. Add ‘http://mattiahost.altervista.org/Generic/ans.php’ (without quotes) in the ‘Notification URL‘ field.
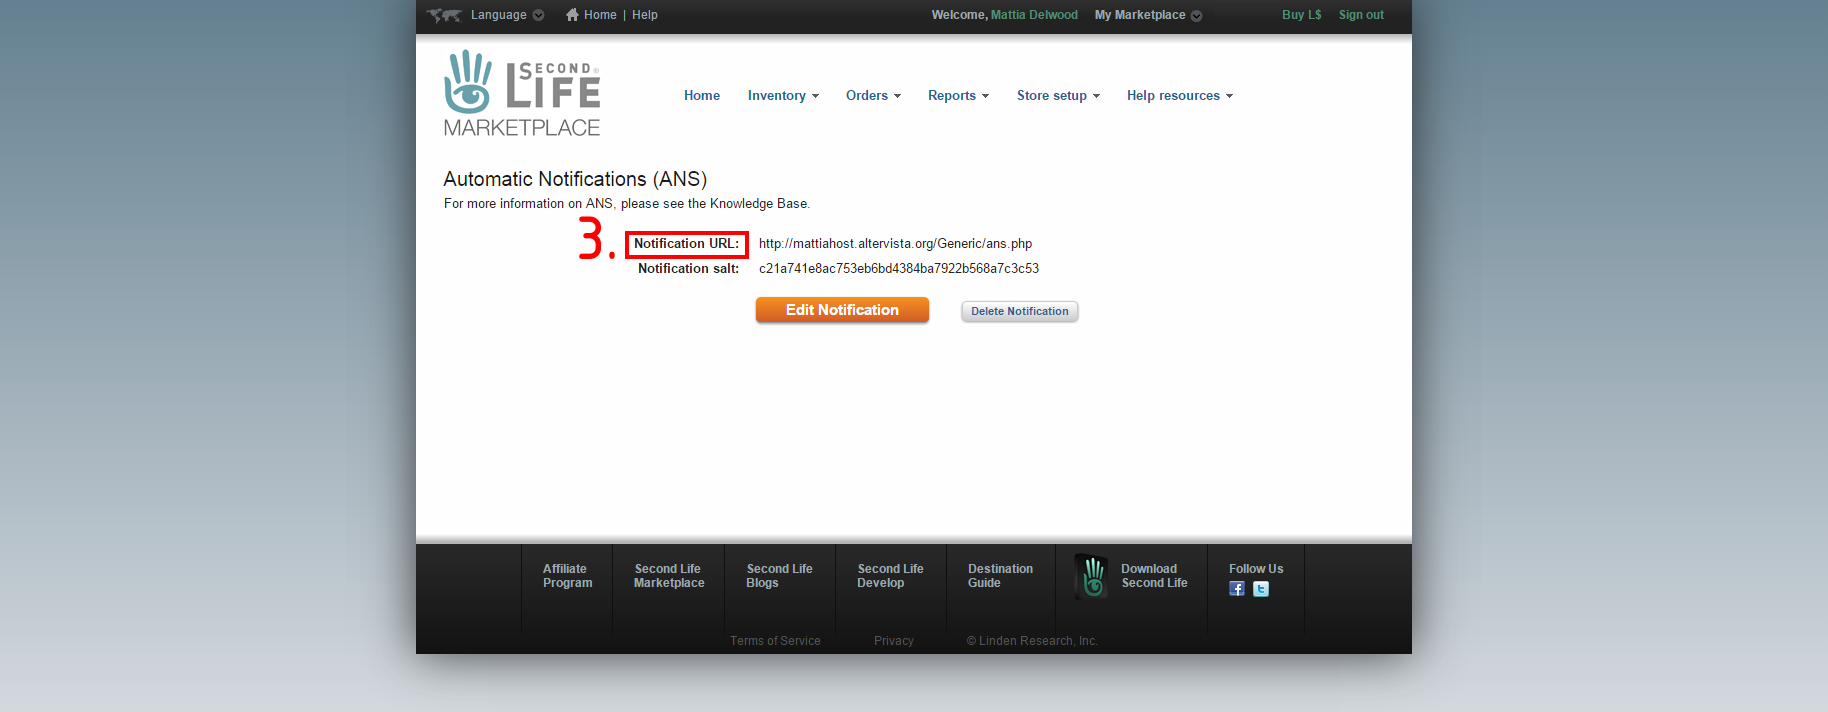
At this point, the integration is complete and all the future sales on SL Marketplace will be automatically listed inside the MD Labs Online Services website.
Chapter #9: user menu
Depending on the setup chosen by the owner, once a user click on the vendor a menu is shown containing many options; this guide will cover all the possible features, but not all of them may be present at any time.
- Get demo: clicking on this button the user will receive a folder containing all the demo items inside the vendor. The cost of this operation is always 0L$.
- Buy: this option allow the user to purchase one of the item inside the vendor. If more than one item is present, the user will be promtped to a multi page menu, where the desired product must be selected. Once the selection is made the vendor will set itself in pay mode, waiting for the user to pay the amount requested; a timer is started at this point and if no actions are taken before the timeout the operation is canceled and the vendor is set available again. A simple click on the vendor will open the default Second Life payment window and once the user pays the vendor, the item selected will automatically be sent as inventory offer.
- Gift: this option let users gift an item from the vendor to another avatar. As first thing, user will be asked to subit the name or the key (UUID) of the avatar receiving the gift. If the submitted value is correct the process will proceed and if more than one item is present, the user will be promtped to a multi page menu, where the desired product must be selected. After this step the vendor will set itself in pay mode, waiting for the user to pay the amount requested; at this point the work flow is the same as for the buy option; once user pays the vendor the requested amount the item purchased is sent to the receiving avatar as inventory offer, and an instant message is sent as well, notifying the receiver about the gift.
- Buy Fatpack: this option allow user to purchase the fatpack from the vendor. The process is exactly the same as the “Buy” one described above, just applied to the fatpack.
- Gift Fatpack: this option allow user to gift the fatpack from the vendor to another avatar. The process is exactly the same as the “Gift” one described above, just applied to the fatpack.
- Redeliver: this last option let user request for the redelivery of a product already purchased. User will be prompted to a list of item contained inside the vendor and available for redelivery; selecting one of them will trigger a verification request to check if the item has been actually purchased by the requesting avatar. In case a transaction record is found the verification ends with success and the item is sent again to the user as inventory offer.